BACKSTROKE
Body Position Drills
- Swim Drill - 26 - Float on Spine
- Swim Drill - 27 - Water-Line Drill
- Swim Drill - 28 - Twelve Kick Switch Backstroke
Kick Drills
- Swim Drill - 29 - Boiling Water Drill
- Swim Drill - 30 - No Knees Streamline Kick
- Swim Drill - 31 - Pigeontoed Kicking
- Swim Drill - 32 - Quarter Roll with Cup on Forehead
Arm Stroke Drills
- Swim Drill - 33 - One Arm Pull/Push
- Swim Drill - 34 - Up and Over
- Swim Drill - 35 - Fist Backstroke
- Swim Drill - 36 - Corkscrew
Recovery Drills
- Swim Drill - 37 - Clock Arms
- Swim Drill - 38 - Two-step Recovery
- Swim Drill - 39 - Locked Elbow Drill
- Swim Drill - 40 - Dog-ears
Breathing Drills
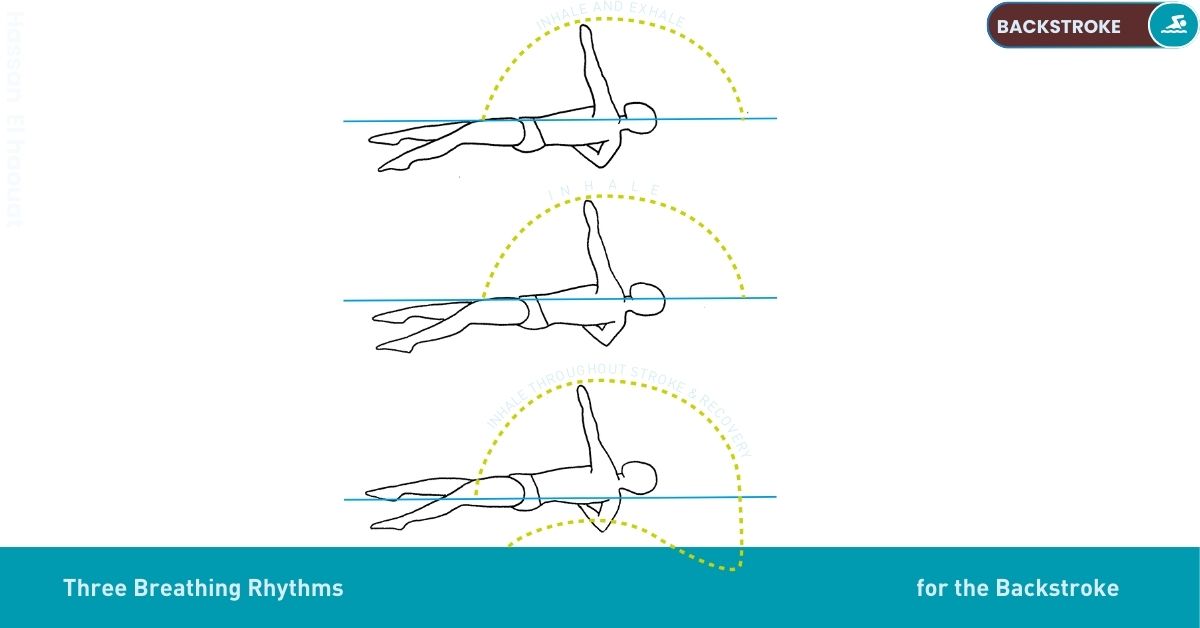
- Swim Drill - 41 - Rhythmic Breathing Sequence
- Swim Drill - 42 - The Breathing Pocket
Leverage Drills
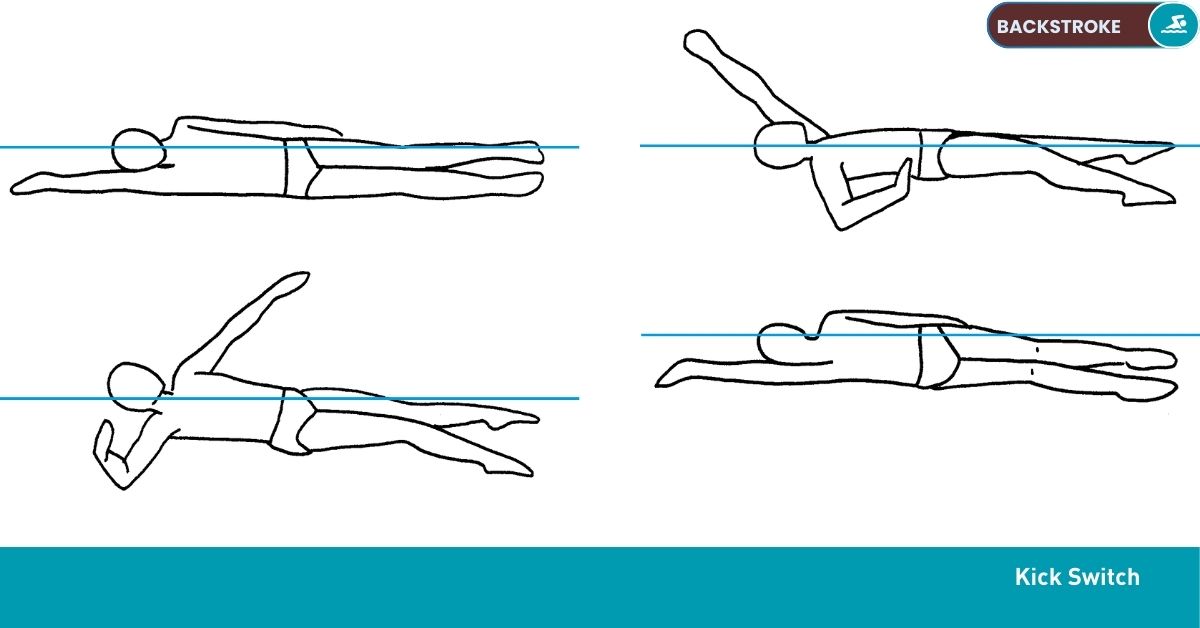
- Swim Drill - 43 - Three Stroke Switch Backstroke
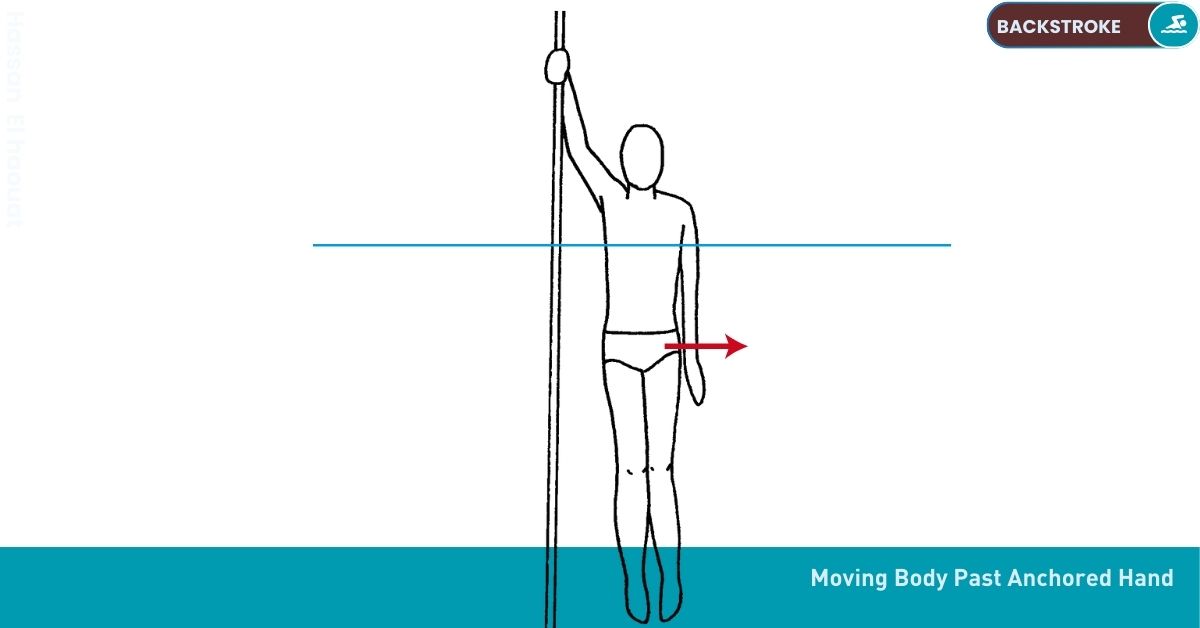
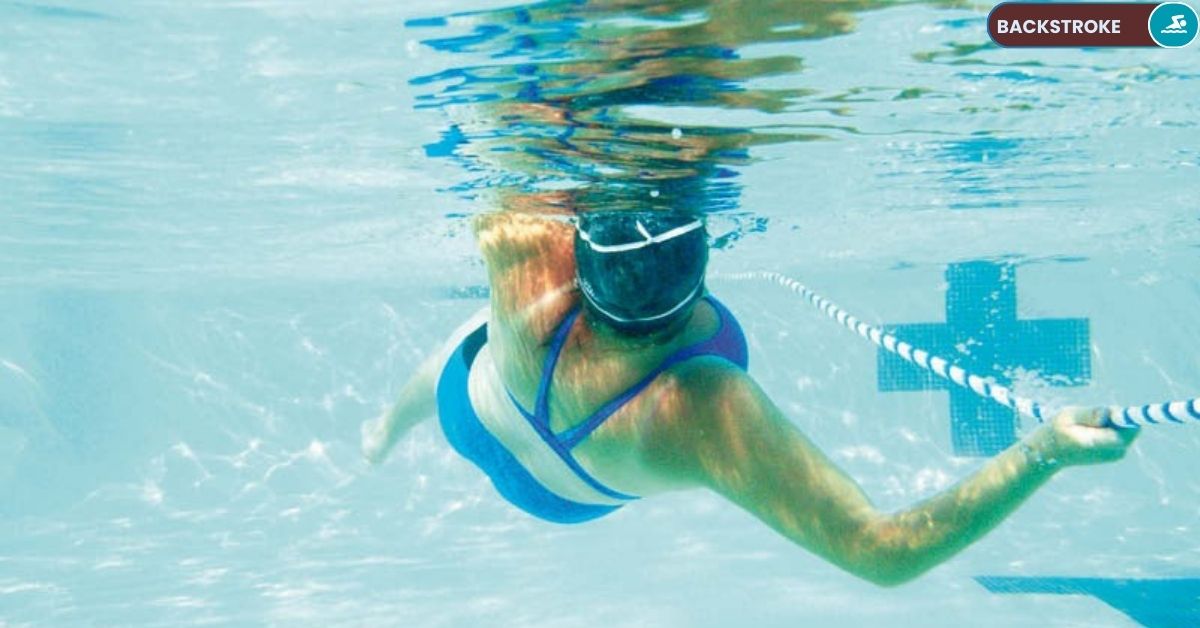
- Swim Drill - 44 - One Arm Rope Climb
- Swim Drill - 45 - Opposition Freeze Frame
- Swim Drill - 46 - Armpit Lift
Coordination Drills
- Swim Drill - 47 - Roll, Pull, Roll, Push
- Swim Drill - 48 - Pinkie Lead
- Swim Drill - 49 - Backstroke Balance Drill with Cup
- Swim Drill - 50 - Opposition Overlap
Backstroke Swimming : - Body Position Drill
Swim Drill - 26 - Float on Spine
THE PURPOSE OF THIS DRILL
- Achieving an advantageous backstroke floating position
- Feeling effective core tension and stability
- Being comfortable on the back
HOW TO DO THIS DRILL
- Step 1: Lay horizontally in the water, face up, without attempting any forward motion, arms at sides, head leading.
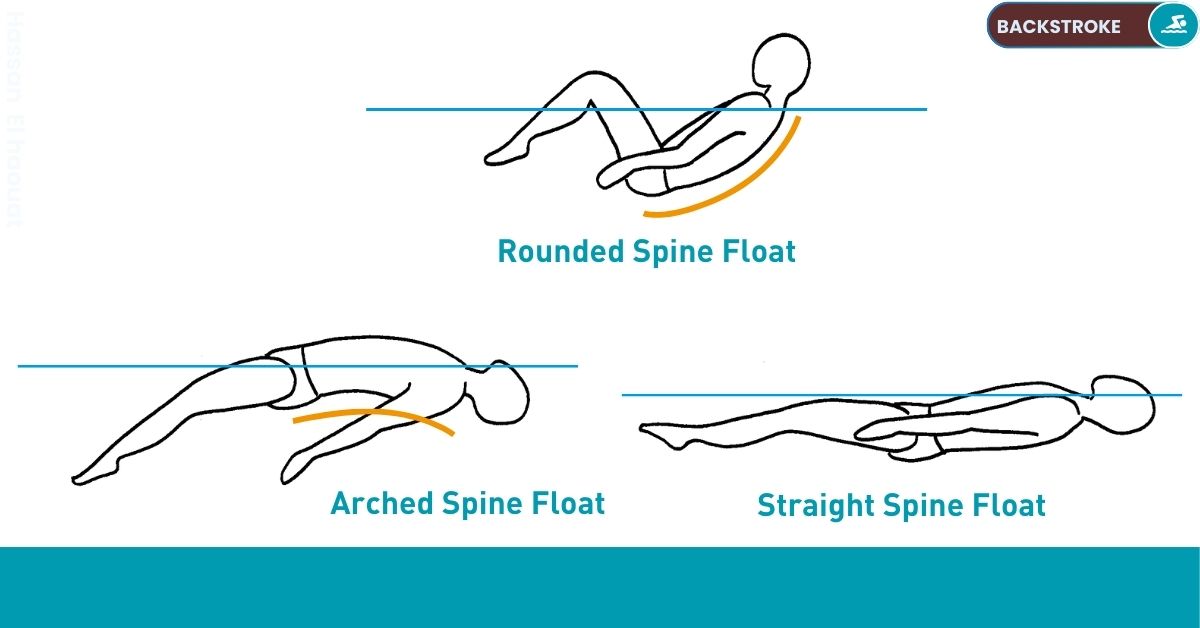
- Step 2: Focus on how your spine affects your floatation. First, round your spine so that your knees come up toward your chest, and your hips are low, as if you were sitting in the water. Notice that you have a hard time floating in this position. Your face may even submerge.
- Step 3: Resume your horizontal position in the water, face up. Focus on your spine. Now, arch your back, so your belly button is the highest point of your body. Try to get it above the water. Notice that by doing so your face submerges, or nearly submerges in the water. Your legs may also sink.
- Step 4: Again lay horizontally in the water, face up. Focus on your spine. Make it as absolutely straight as possible. This includes straightening the natural bends in the small of the back and at the neck. To accomplish this, rotate your pelvis forward, and press the back of your head into the water. Notice that in doing so, you contract your abdominal muscles, and actually relax your neck. Notice too that your body floats more horizontally. This is the advantageous floating position which you can build a good backstroke stroke upon.
- Step 5: Practice several times until you achieve the feeling of balancing on your spine.
Backstroke Swimming : - Body Position Drill
Swim Drill - 27 - Water-Line Drill
THE PURPOSE OF THIS DRILL
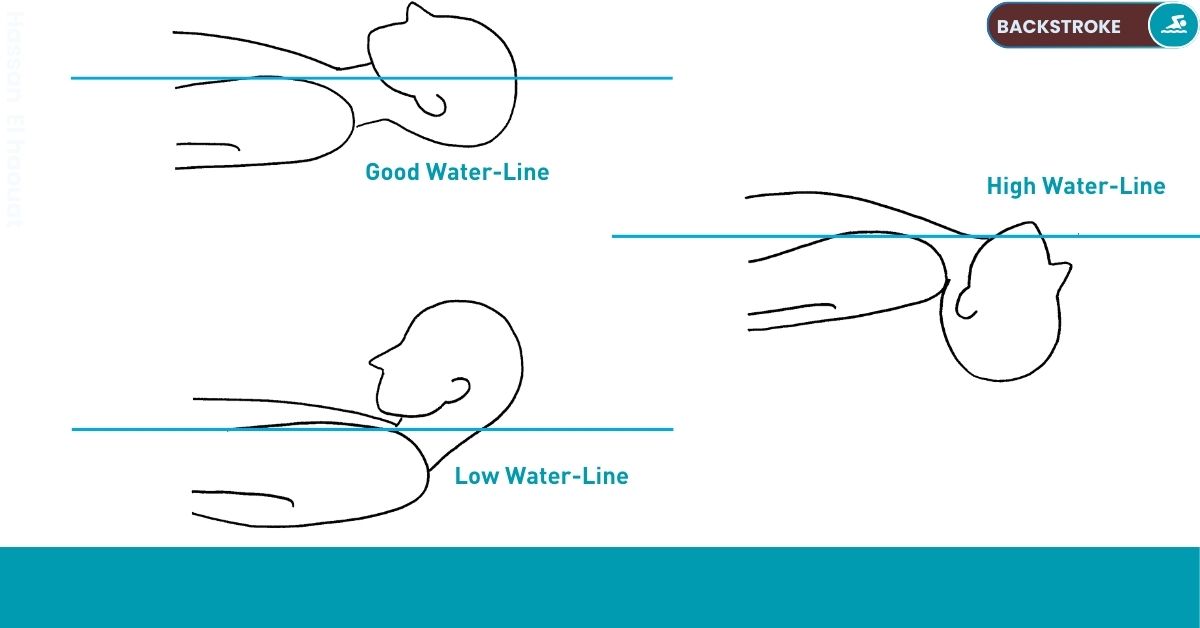
- Finding correct head alignment
- Feeling the water-line around your face
- Relaxing the neck, shoulders and upper back
HOW TO DO THIS DRILL
- Step 1: Lay horizontally in the water, face up, arms at sides, spine straight. Do not produce any forward motion.
- Step 2: Now move your chin toward your chest until the surface of the water, or the "water-line" is just below your ear lobes. Notice that in this position, the muscles in your neck and shoulders are fully engaged. Your legs may also sink, and it will probably be difficult to maintain your floatation.
- Step 3: Now lay horizontally in the water, face up, spine straight. Lift your chin and rock your head back, until your ears are completely submerged and you can see the water at the back of your head. The waterline will be at your eye brows and around your throat. Notice that in this position, the muscles in the back of your neck and upper back are engaged. Your float will probably not suffer, although you will feel probably quite stiff.
- Step 4: Again lay horizontally in the water, face up, spine straight. Hold your chin neutral, as if you are looking at someone who is exactly the same height as you. The water-line will surround your face, from your hairline to the bottom of your chin. In this position, your ears will be submerged and your neck, shoulders and upper back will be relaxed, like when your head rests on a pillow. This is the correct head position for the backstroke.
Backstroke Swimming : - Body Position Drill
Swim Drill - 28 - Twelve Kick Switch Backstroke
THE PURPOSE OF THIS DRILL
- Maintaining a straight spine while moving
- Beginning to feel leverage from the core
- Identifying the longest backstroke position
HOW TO DO THIS DRILL
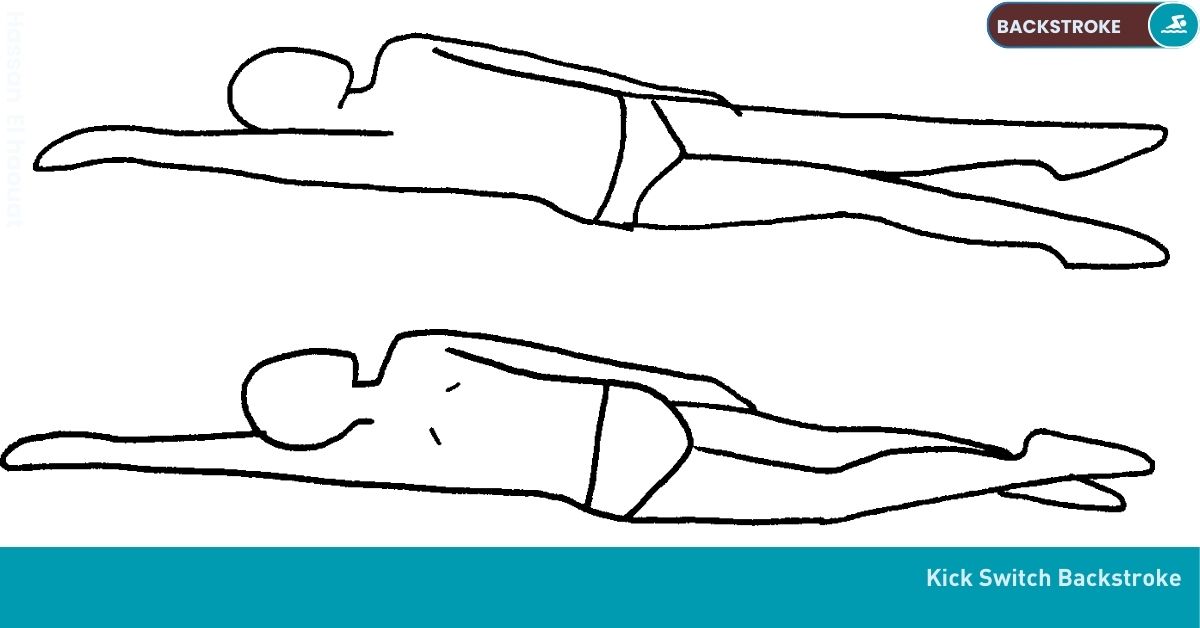
- Step 1: Lay on your side in the water, with the arm closest to the surface at your side, and the arm closest to the bottom of the pool extended over your head. Achieve a straight spine, and good water-line.
- Step 2: Begin a gentle but continuous flutter kick, which should also be directed side to side.
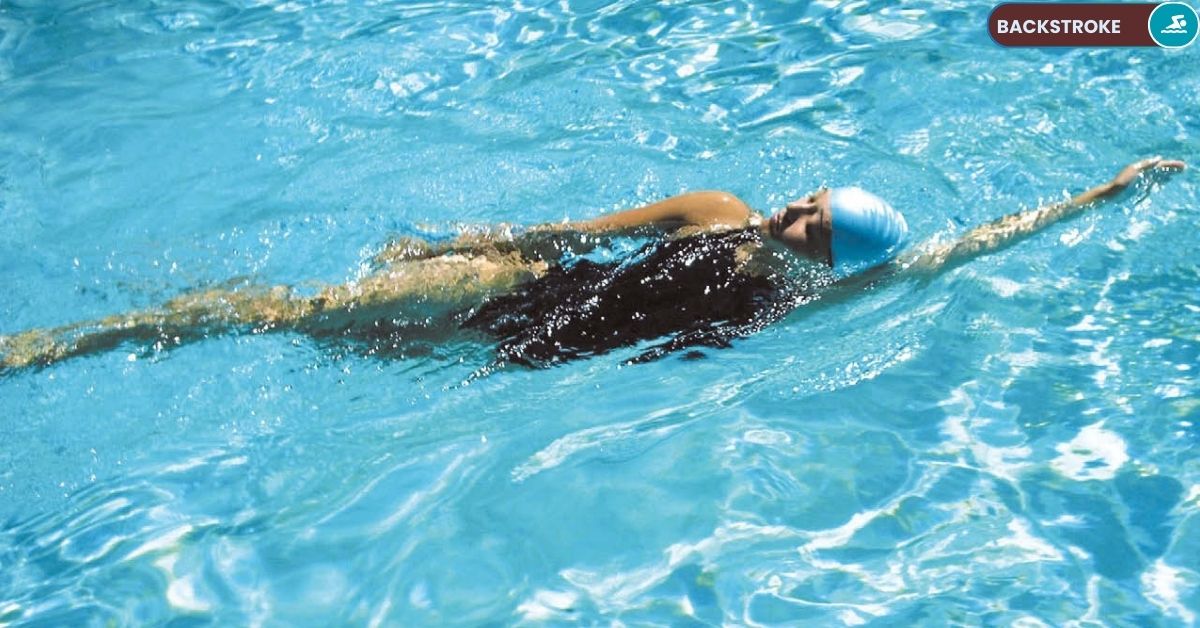
- Step 3: Although your body is floating on its side, allow your face to float straight up, so it is completely out of the water. Relax your neck so your head feels like an independent object floating in front of your body. In this position, the shoulder of the arm at your side should be out of the water and closer to your cheek than your other arm is to the other cheek.
- Step 4: Kick twelve times (each leg equals one kick).
- Step 5: Just as you finish the last kick, bring the arm laying by your side straight over the water to an extended position over your head, and at the same time, bring the forward reaching arm through the water to your side, as you switch to the opposite side of your body to float. All the time maintain a straight spine and core stability.
- Step 6: Kick twelve more kicks in this position. Repeat the switch with your arms and floating side. Continue to kick twelve times then switch until you reach the far end of the pool.

Backstroke Swimming : - Kick Drill
Swim Drill - 29 - Boiling Water Drill
THE PURPOSE OF THIS DRILL
- Learning to kick upward with force
- Feeling the water with your feet
- Developing a centralized kick
HOW TO DO THIS DRILL
- Step 1: Stand in the water a bit more than waist deep. Hold one arm outstretched in front of you about twelve inches over the surface of the water. Now, drop your hand down with force into the water. Notice that the splash that occurs goes in all directions. Notice too the sound that your hand makes as it makes a hole in the water.
- Step 2: Now, hold your arm outstretched about twelve inches under the surface of the water. Raise your hand up with force to about three inches under the surface of the water. Notice the water welling up, almost like water coming to a boil. Repeat this action, with more force, as if bringing the water to a full boil, without your hand ever reaching the surface of the water. This is what your feet do in a good backstroke kick.
- Step 3: Try the same thing with your feet. Standing with your back supported at the side of the pool, bring your foot about twelve inches over the surface of the water and drop it down into the water. Notice the large splash. Listen to the distinct sound of your foot making a hole in the water. Now hold your foot twelve inches under the water, toes pointed, and force your foot up towards the surface, but don't allow any part of your foot to break the surface of the water. Make the water boil. Notice the feeling of the water against the top of your foot.
- Step 4: Now lay horizontally in the water, face up, straight spine and good water-line, arms at your sides, toes pointed. Drop the heel of your right foot down about twelve inches into the water. Force it up quickly and create a visible boil. Try it with your left foot. Now try it alternating feet. As the one foot forces the water up, the heel of the other foot drops down.
- Step 5: Kick at a tempo that there is no distinction on the surface of the water between the boil from one foot and that of the other. Continue to the other end of the pool, using a more forceful upward motion, and a gentler downward motion. Repeat for several lengths, feeling the difference between the water on your foot as you force it upwards, and as you drop your heel down.
Backstroke Swimming : - Kick Drill
Swim Drill - 30 - No Knees Streamline Kick
THE PURPOSE OF THIS DRILL
- Learning to keep the knees under the water
- Using the correct muscles to kick backstroke
- Developing an efficient backstroke kick
HOW TO DO THIS DRILL
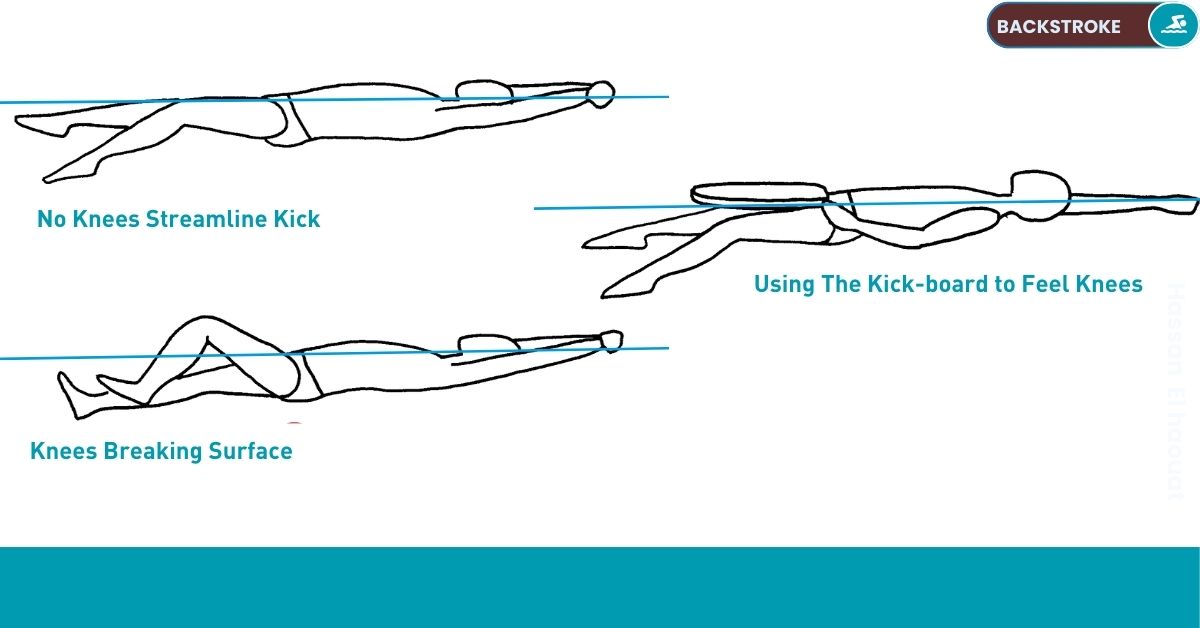
- Step 1: Lay horizontally in the water, face up, straight spine and good water-line, toes pointed. Extend your arms over your head, squeezing your ears between your elbows and clasping your hands, one over the other. Begin the flutter kick, kicking upward with more force.
- Step 2: Kick at a tempo that there is no distinction on the surface of the water between the boil from one foot and the other. Maintaining a neutral chin position, use your peripheral vision to see if your knees are breaking the surface of the water, or if the water is moving upward around your knees. If so, this indicates that you are lifting your knees, or doing a bicycling motion during your kick. This is common because the muscles used to lift the knees, the abductors, that connect the legs to the abdomen, are used a great deal by humans on land in actions such as walking, running, cycling and climbing stairs. However, in the backstroke kick, lifting your knees weakens your kick.
- Step 3: To engage the correct backstroke kicking muscles, the quads and the hamstrings, resume your backstroke float, hands leading, spine straight, good water-line, squeezing your ears with your elbows, and begin kicking with absolutely no bend at the hips. It means you have to start the kick lower than the surface of the water, and use your leg as if to kick a ball floating on the surface of the water. Although your knee will bend, it is only as a result of your dropping your heel into the water, not by lifting your knee. Imagine kicking a ball with your foot by raising your knee. It wouldn't work. Using your peripheral vision, check your knees. There should be no water moving around them. Practice for several lengths of the pool.
- Step 4: Now, double check if you are lifting your knees by holding a kickboard with one hand, positioning it the long way over your upper legs and knees as you float and kick, keeping the other arm extended over your head. As you kick, you will be able to feel if your knees bump the kickboard. Practice for several lengths of the pool.
Backstroke Swimming : - Kick Drill
Swim Drill - 31 - Pigeontoed Kicking
THE PURPOSE OF THIS DRILL
- Feeling the most advantageous foot position
- Using the most foot surface to kick
- Developing a centralized kick
HOW TO DO THIS DRILL
- Step 1: Lay on your back in the water. Achieve a straight spine, good water-line, and pointed toes. Extend your arms over your head, squeezing your ears between your elbows and clasping your hands, one over the other. Begin the flutter kick.
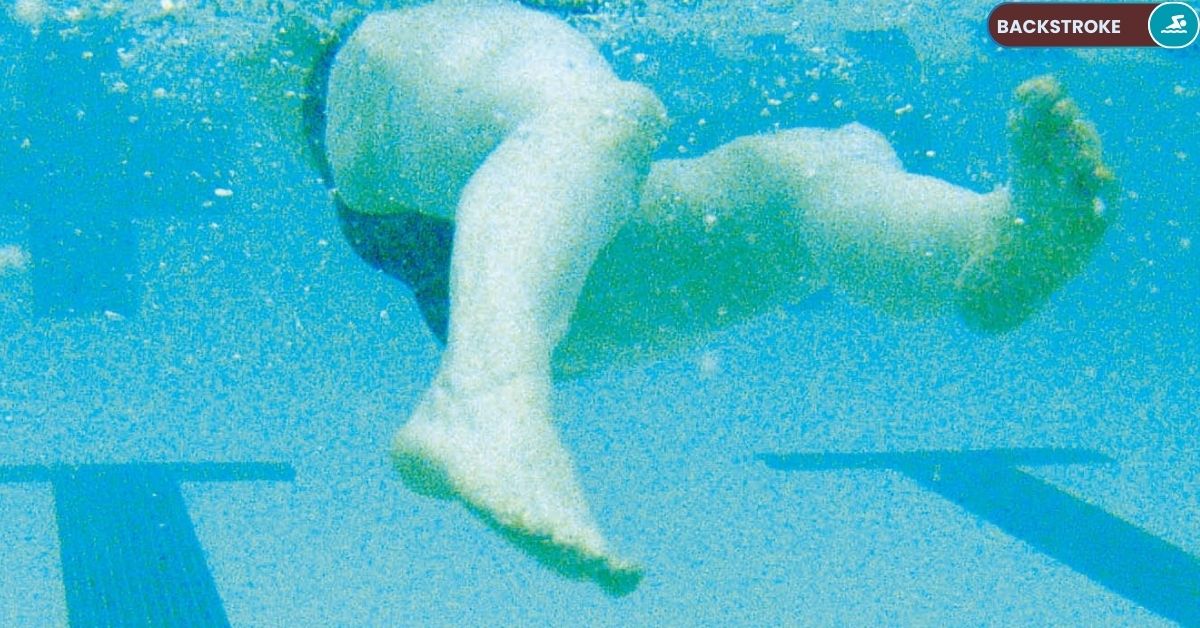
- Step 2: Point your toes and use a quick kick tempo. Kick upward with more force, creating a boil on the surface of the water. Notice that the part of your foot that comes closest to the surface is your big toe. Kick to the far end of the pool.
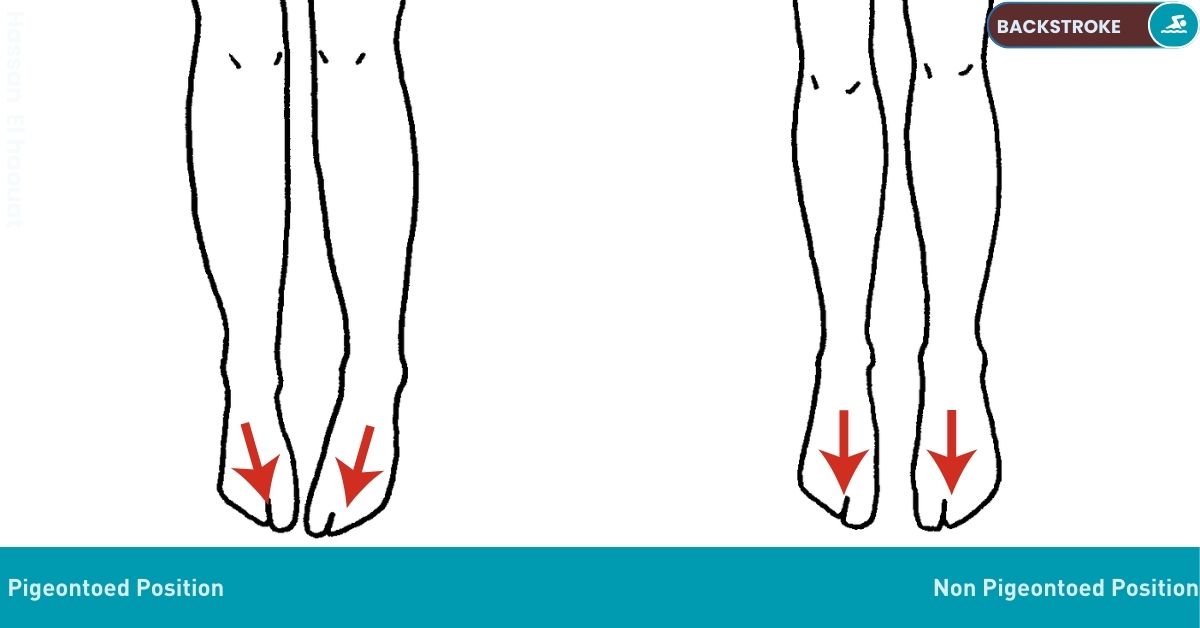
- Step 3: Now push off the wall again for the backstroke kick. This time, turn your feet inward to the pigeontoed position, so your big toes are closer together than the rest of your feet. Notice that by turning your feet inward, your knees and hips are also internally rotated. Begin kicking.
- Step 4: Continue kicking with a quick tempo. Feel the top of your foot press upward against the water. Notice that you are engaging more of your foot's surface by positioning your pigeontoed feet. Notice too that your kick is more productive. Kick to the far end of the pool.
- Step 5: Push off again for the backstroke kick. Achieve the pigeontoed position and kick at a quick tempo. Kick the water upward. Notice the centralized boil on the surface of the water. Notice too that your knees stay under the surface of the water better. Continue kicking for several lengths of the pool.
Backstroke Swimming : - Kick Drill
Swim Drill - 32 - Quarter Roll with Cup on Forehead
THE PURPOSE OF THIS DRILL
- Developing a balanced, effective kick
- Understanding the changing orientation of the kick
- Maintaining a stable head position while kicking
HOW TO DO THIS DRILL
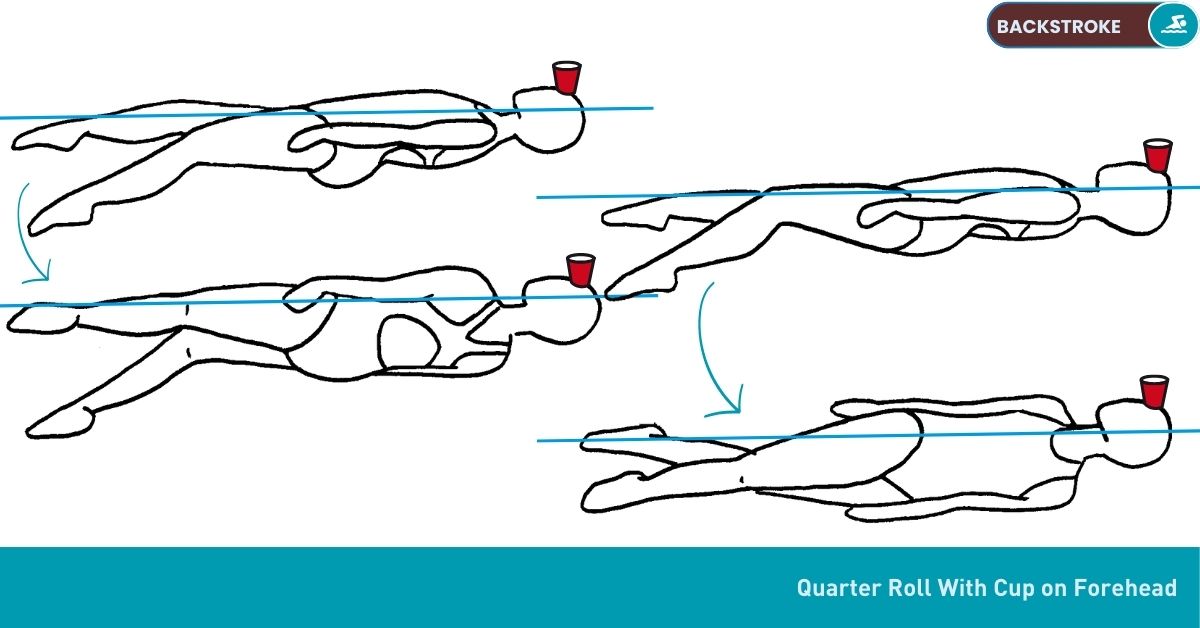
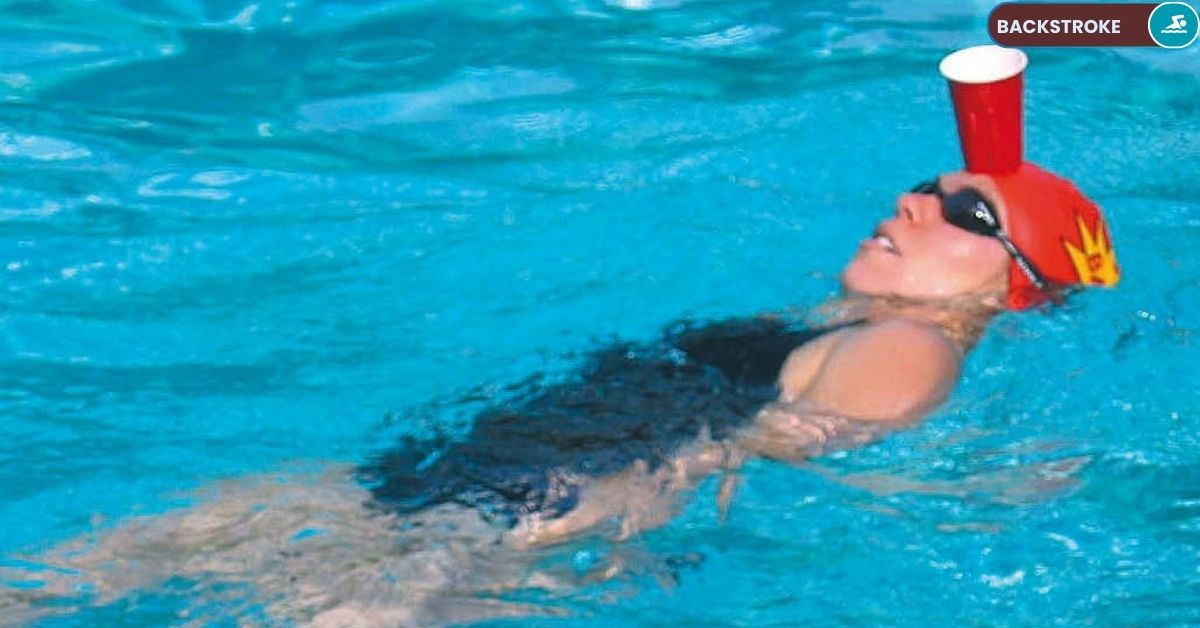
- Step 1: Fill a medium plastic cup halfway with water. Gently balance the cup on your forehead as you lay on your back in the water, with a straight spine and good water-line. Once the cup is balanced, position both arms at your sides. Begin kicking, toes pointed, knees underwater, making the water boil. Continue kicking to the other end of the pool, trying to keep the cup of water balanced on your forehead. If it falls off, stand and start again. Practice until you can kick productively without the cup falling off for a full length of the pool.
- Step 2: Now prepare to kick another length with the cup on your forehead. This time, every six kicks, do a quarter roll. Keeping your head still so the cup remains balanced, roll your body clockwise, so that your left shoulder, arm and hip are out of the water, while your right shoulder, arm and hip are low in the water. Your kick should now be oriented to the side.
- Step 3: After six kicks, roll your body a quarter turn counter-clockwise, so you are again flat on your back, and your kick is up and down. Do six kicks. Now, maintaining your head position so the cup stays on your forehead, turn your body a quarter turn clockwise again, so that your right shoulder, arm and hip are out of the water, while your left shoulder, arm and hip are low in the water. After six kicks, roll back to the flat back floating position, kicking up and down.
- Step 4: Continue kicking with quarter rolls to the end of the pool, with your head still so that the cup remains balanced on your forehead. If the cup falls off, start again. This is not an easy drill! Practice until you can kick productively, with quarter rolls, while the cup remains on your forehead for several lengths of the pool.
Backstroke Swimming : - Arm Stroke Drill
Swim Drill - 33 - One Arm Pull/Push
THE PURPOSE OF THIS DRILL
- Learning the path of the backstroke arms
- Feeling both pull and push
- Rolling into and out of each stroke
HOW TO DO THIS DRILL
- Step 1: Float in the water, face up, spine straight, good water-line, kicking productively, with one arm at your side and the other extended over your head, aligned with the shoulder.
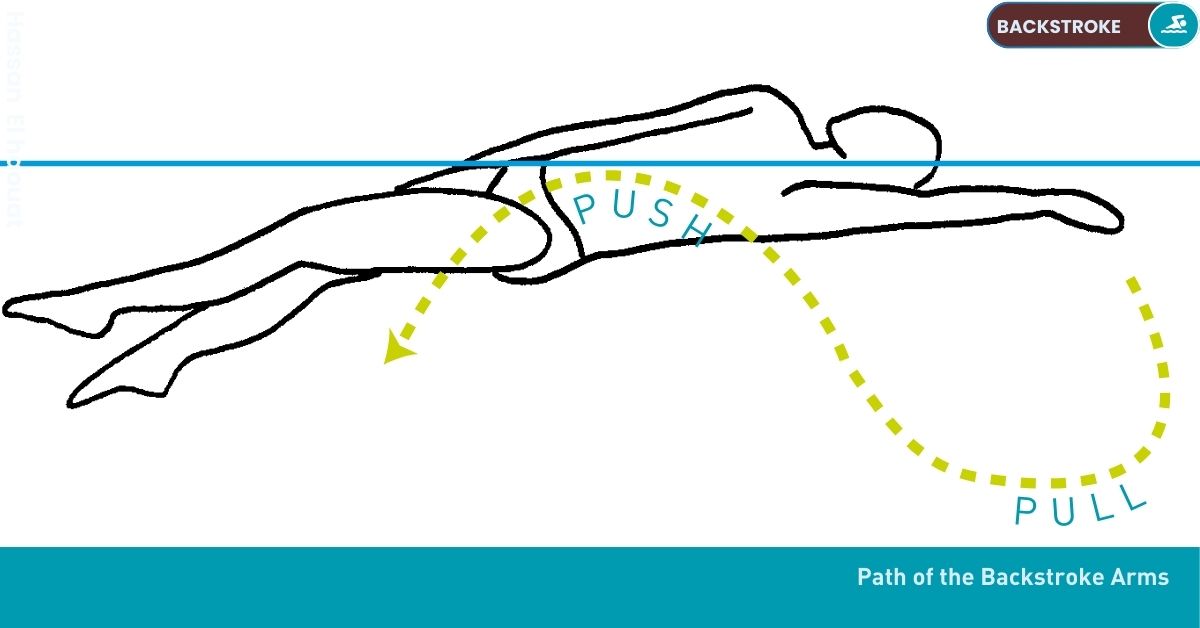
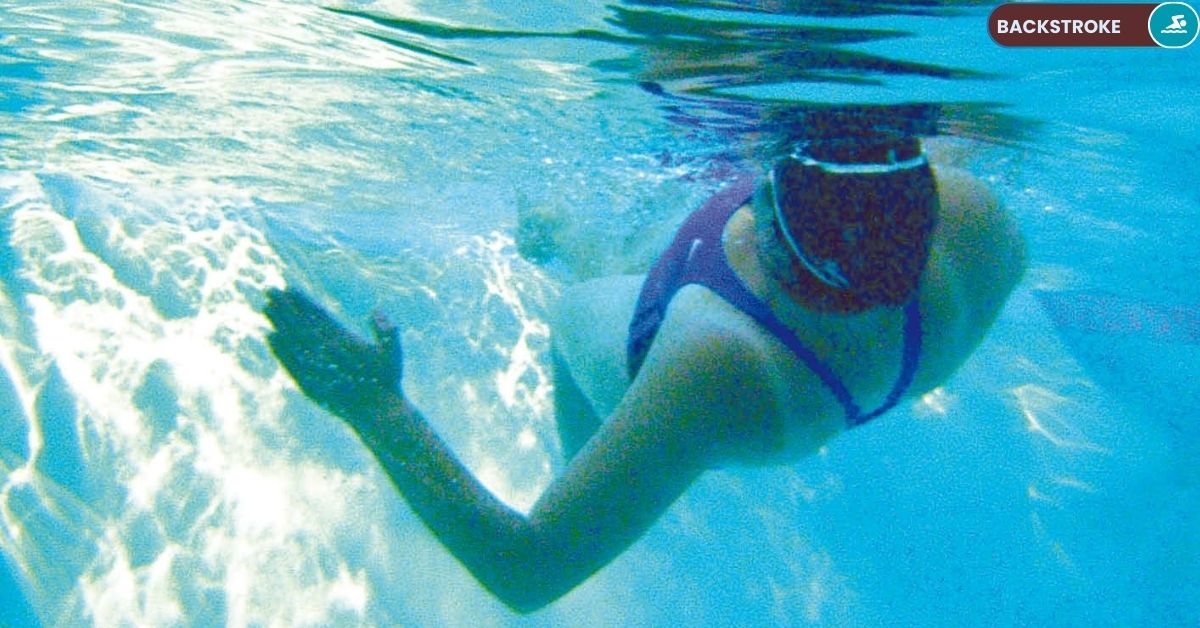
- Step 2: Start your stroke by descending your reaching hand about twelve inches straight down into the water, pinkie finger first, allowing the opposite shoulder and hip to rise at the same time. From twelve inches deep, keeping your elbow absolutely still, begin to move your fingertips and palm upward to press the water toward your feet. Sweep your hand to the height of your shoulder, so that your arm is close to a right angle. Done correctly, it should feel like your forearm is rotating around your elbow. This is the pull portion of the backstroke arms.
- Step 3: From that point, straighten your arm in a quick sweep until your hand stops below your hip, with your fingertips pointing toward your feet. Allow your whole arm to become involved in this sweep. At the same time, roll your same side hip upward to assist in the power of this action. This is the push portion of the backstroke arms.
- Step 4: Recover your arm over the water and repeat the path of the backstroke arm with the same arm. Notice that your hand is tracing a sort of "S" shape along the side of your body. The top curve is the pull, the bottom curve is the push. This "S" shape can become more pronounced as you increase your roll into the top curve with your shoulder and hip, and out of the bottom curve with your shoulder and hip. Continue to the end of the pool.
- Step 5: Repeat the drill, quickening your tempo, and accelerating your hand toward your hip. Hold your elbow firm. Roll in and roll out of each stroke. Try to identify the transition between pull and push. Continue for several lengths, then switch arms.
Backstroke Swimming : - Arm Stroke Drill
Swim Drill - 34 - Up and Over
THE PURPOSE OF THIS DRILL
- Feeling the path of the backstroke arms
- Maintaining a stable elbow position
- Catching deep water
HOW TO DO THIS DRILL
- Step 1: Push off the wall for the backstroke, both arms extended over your head. Achieve a straight spine, firm core and good water-line. Establish a productive kick. Begin the backstroke arm stroke with your right arm, leaving your left arm in the extended position.
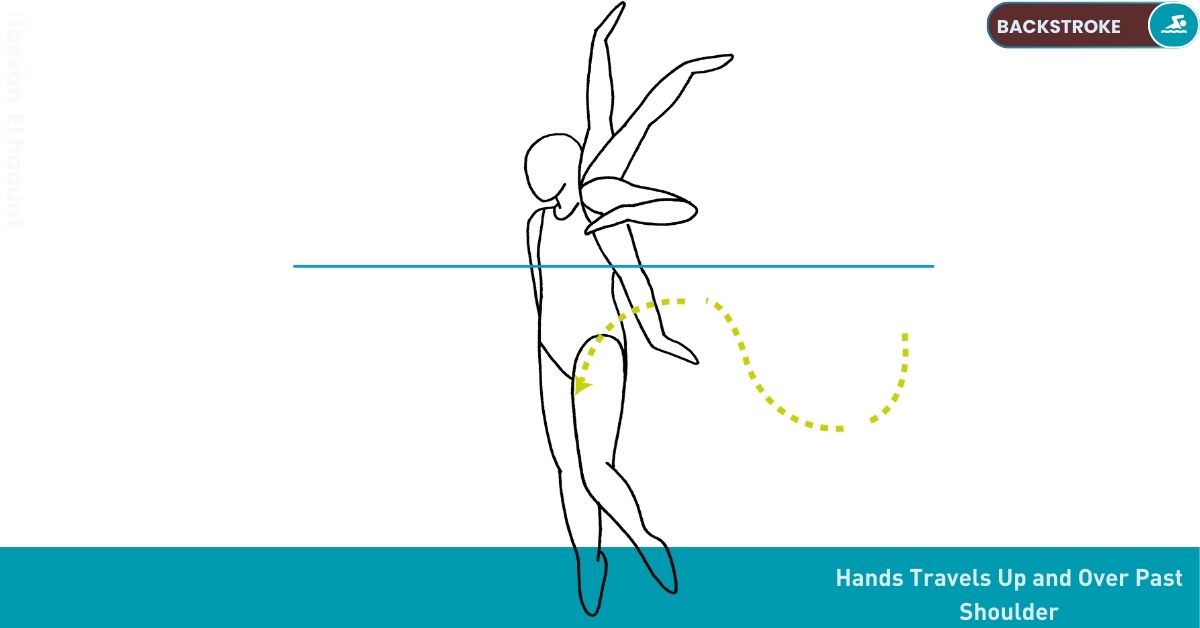
- Step 2: Lower your right hand about twelve inches down into the water by rolling the same side shoulder and hip down, and the opposite shoulder and hip up. As your hand reaches its deepest point, catch a handful of water. Maintaining a stable elbow position, move your handful of water in an arch up and over your elbow.
- Step 3: At the highest point in the arch, your fingers should be pointing upward toward the surface of the water, but not breaking the surface. At the finish of the arch, your arm should be straight along the side of your body, and your fingertips should be pointing toward your feet.
- Step 4: As your right arm exits the water by your hip and returns over the water to its starting position, trace the same path with your left arm. Roll your left hip and shoulder down into the water, causing your left hand to come to a depth of about twelve inches. Grab hold of deep water, and sweep your hand up and over your still elbow in an arch that finishes with your arm straight at your side.
- Step 5: Continue stroking with alternating arms. Catch the water deep and keep hold it as your hand traces an arch up and over your elbow with each stroke. Trace the arch with more speed. Feel your body move forward with each stroke. Practice for several lengths of the pool.
Backstroke Swimming : - Arm Stroke Drill
Swim Drill - 35 - Fist Backstroke
THE PURPOSE OF THIS DRILL
- Learning to feel the water with the forearm
- Using a stable, high elbow
- Appreciating the role of the hand
HOW TO DO THIS DRILL
- Step 1: Push off the wall for the backstroke. Before the first stroke, form closed fists with each hand.
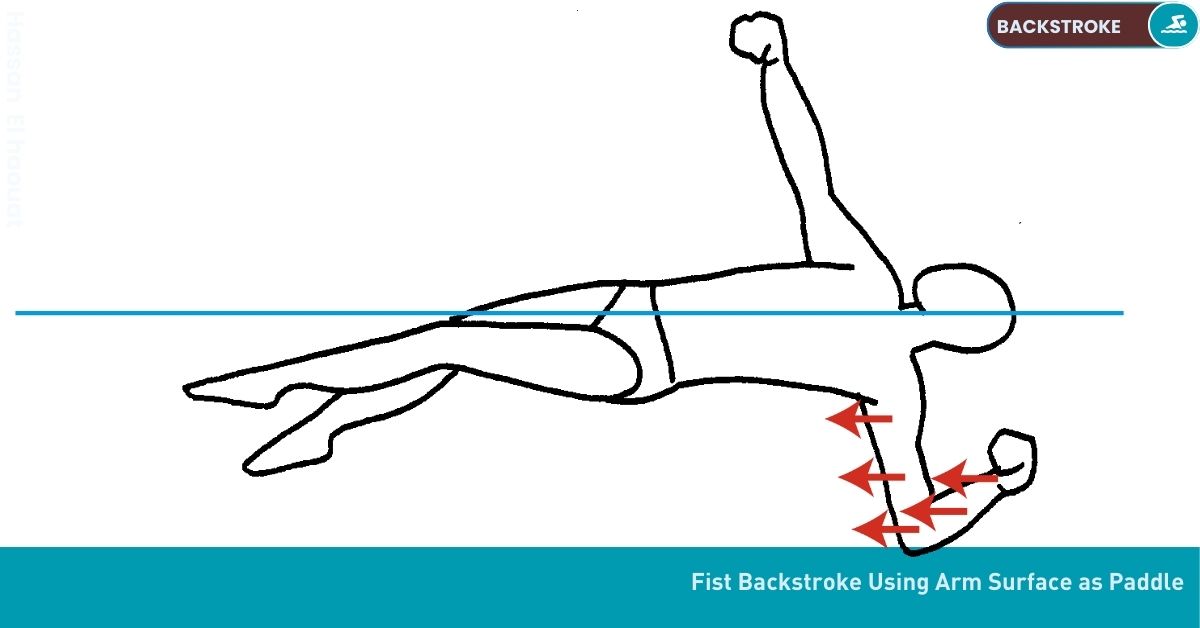
- Step 2: Start to stroke. At first it may seem impossible to make forward progress without the paddle of your open hand. Keep stroking, purposely positioning your arm so your forearm works as your paddle to press against the water. This will require you to initiate the stroke by moving your fists without moving your elbows, and to keep your elbows high and stable as your fist moves past them.
- Step 3: Use the whole length of the stroke, top to bottom. Feel pull and push. Accelerate the underwater stroke. Maintain opposition. Adapt your stroke to the handless paddle. Continue to the other end of the pool.
- Step 4: Now push off again, this time with open hands. Swim regular backstroke, using your hand as well as your forearm to press against the water. Keep a stable, elbow high. Feel pull and push. Accelerate your stroke. Maintain opposition.
- Step 5: Continue alternating lengths of fist and open hand until you are feeling the water with a paddle that includes both your hand and your forearm.
Backstroke Swimming : - Arm Stroke Drill
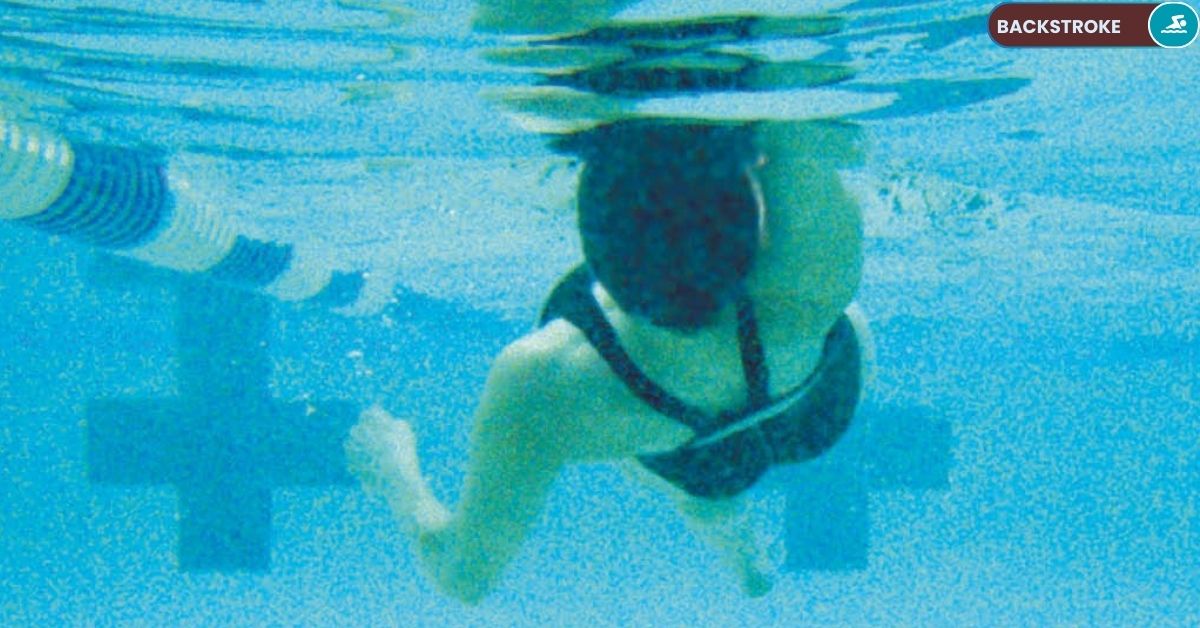
Swim Drill - 36 - Corkscrew
THE PURPOSE OF THIS DRILL
- Achieving depth to begin the stroke
- Feeling the roll that begins the arm stroke
- Using a bent arm mid-pull similar to freestyle
HOW TO DO THIS DRILL
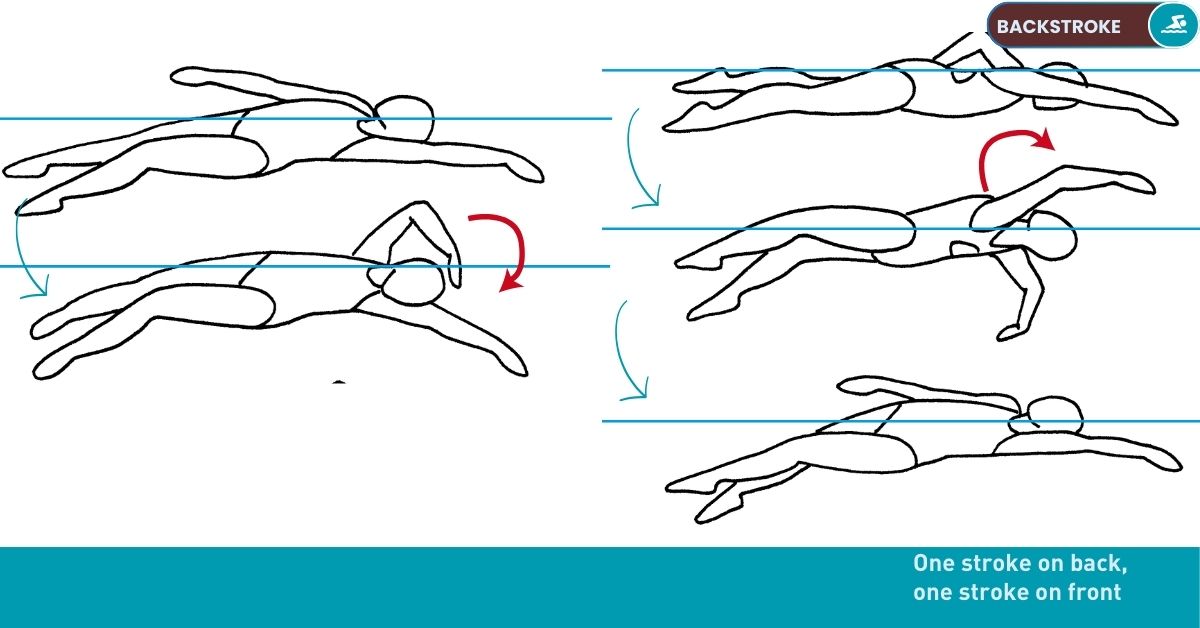
- Step 1: Push off the wall for the backstroke with your arms extended. Achieve a straight spine and good water-line. Kick productively.
- Step 2: Take one stroke with your left arm. As your left arm reaches your side, begin to stroke with your right arm while your left arm starts its recovery over the water.
- Step 3: When your right arm approaches mid-recovery, your left arm should have come to its deepest point underwater. The shoulder and hip of your recovering arm should be at least partially out of the water, and the shoulder and hip of your stroking arm should be low in the water.
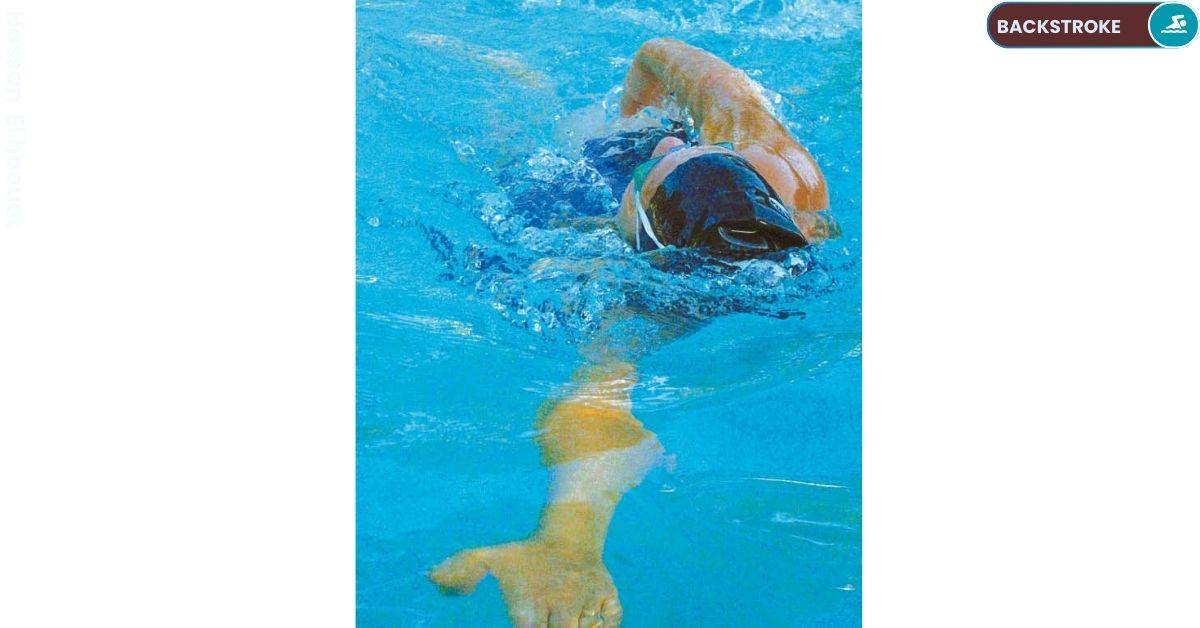
- Step 4: At this point, redirect your recovery to cross over toward your opposite shoulder, and lead your body to switch from its side, to a front floating position. Your recovering hand should enter the water as a freestyle stroke.
- Step 5: Start to stroke with freestyle as the arm at your side starts to recover as freestyle. You should again be floating on your side, and by mid-recovery, redirect your over-the-water-arm to enter the water as the backstroke.
- Step 6: Continue to move through the water, one stroke as backstroke and the next as freestyle. Feel the depth that your arm achieves to begin each stroke on your back. Notice the similar bent elbow position of your arms in both strokes during the mid-pull. Feel how rolling toward your stroking arm accesses more power for the stroke.
Backstroke Swimming : - Recovery Drill
Swim Drill - 37 - Clock Arms
THE PURPOSE OF THIS DRILL
- Using an aligned entry position
- Learning to avoid over-reaching
- Feeling the natural range of motion of the shoulder
HOW TO DO THIS DRILL
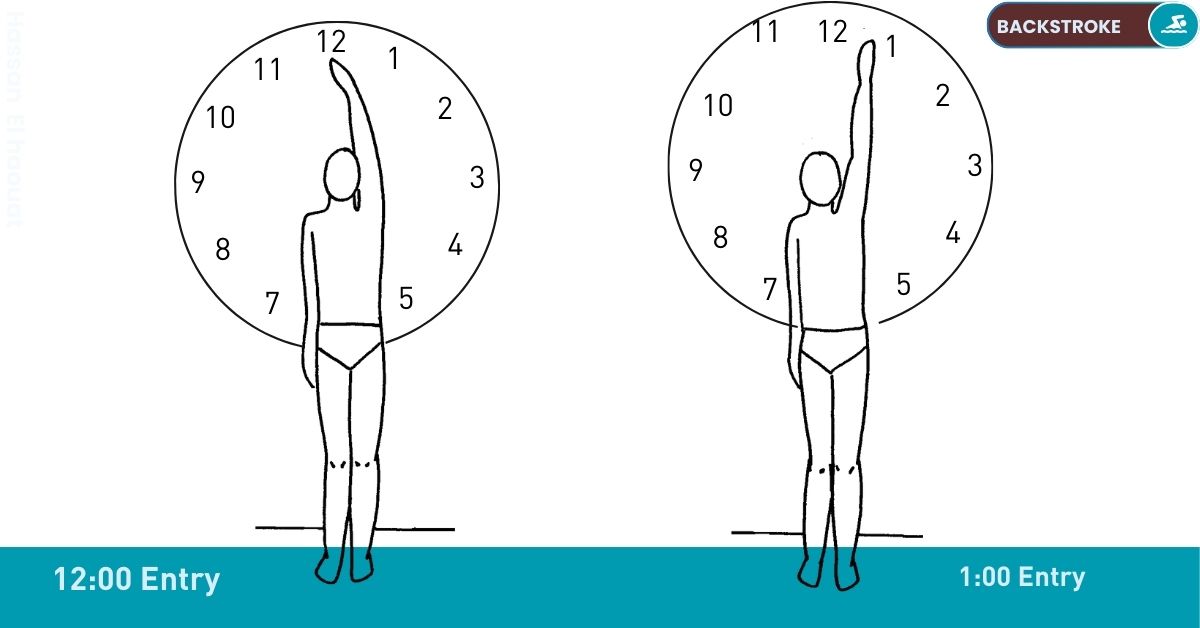
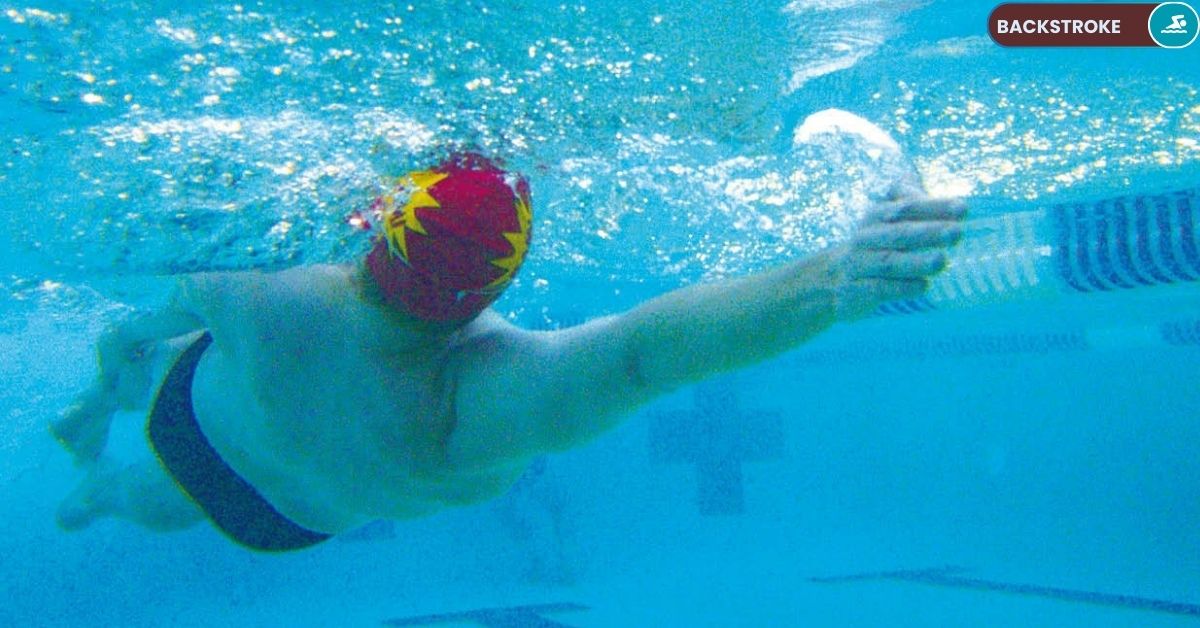
- Step 1: Stand in front of a full-length mirror. Imagine the face of a large clock centered on the mirror in front of you. Raise your right arm over your head as if preparing to enter the water for the backstroke, pinkie first. Position your hand at 12:00. Now, attempt to lower your arm downward as you would into the water to a point about twelve inches below where the water's surface would be. Notice that from the 12:00 position, your shoulder does not allow this rotation, unless you are double-jointed.
- Step 2: Again, raise your right arm over your head extended as if preparing to enter the water for the backstroke. This time, position your arm at 1:00, and attempt to lower your arm as you would into the water to a point about twelve inches below where the water's surface would be. Notice that your shoulder allows this rotation, moving more freely around the joint. Some swimmers may need to use a 1:30 or 2:00 for a more comfortable entry point.
- Step 3: Once you have found an entry point that allows free shoulder joint rotation, try duplicating this entry point with the other arm. Now try alternating arm action, monitoring your clock arms in the mirror in order to avoid an "over-reaching" 12:00 entry. Continue for 30 seconds.
- Step 4: Now, try alternating arm action with your eyes closed. Every six or seven strokes, freeze at your entry position, open your eyes, and check if you are properly aligned at 1:00 or 11:00 so your arm can descend freely downward and you are aligned most directly forward. Once you have checked, and made a modification if necessary, resume your stroke action with your eyes closed. Check again. Continue until you are able to maintain a recovery with a well-aligned entry position.
- Step 5: Now try it in the water. If you are swimming in an indoor pool, use the beams, pipes or lines on the ceiling to align your arms at 1:00 and 11:00. If you are swimming in an outdoor pool, keep imagining the clock around you, and align your arms outside 12:00. Practice lowering each arm down into the water to begin the stroke, and notice if your arm is rotating easily around the shoulder joint. Practice aligning your arm precisely in the direction you are heading. Continue until you are achieving a well-aligned entry that both allows your arm to achieve a wider range of motion and moves you most directly forward.
Backstroke Swimming : - Recovery Drill
Swim Drill - 38 - Two-step Recovery
THE PURPOSE OF THIS DRILL
- Establishing the path of the recovery
- Feeling correct recovery alignment
- Avoiding an over-reaching entry
HOW TO DO THIS DRILL
- Step 1: Push off the wall preparing to do the backstroke, both arms extended over your head, straight spine, good water-line, productive kick.
- Step 2: Take one stroke, leaving the other arm extended. When your arm finishes the underwater phase of the stroke past your hip, slide it straight out of the water, upward past the side of your body. Establish the path of your recovery by tracing a half-circle in the air, from the place where your arm exited the water to the point it will enter, extended past your shoulder, aligned in the direction you are heading. Repeat with the other arm, focusing on the forward-aimed, arched path of the recovering arm.
- Step 3: Now, as your arm begins the recovery after the next stroke, begin to trace the arch over the water, but stop your arm at the highest point in the arch and count to five. Notice the alignment to your higher arm. It should be directly above your shoulder, pointing to the sky, not above your face. A misaligned recovery leads to an over-reaching entry that starts the stroke from a position of weakness.
- Step 4: After the count of five, lower your arm back into the water, following the same recovery path in reverse, finishing with your hand past your hip. Count to five, and begin recovery again, this time tracing the whole recovery path and entering the water extended past your shoulder. Check your alignment at the high point as your arm passes. As your arm begins this second, full recovery, the extended arm begins its underwater stroke.
- Step 5: When the second arm completes the underwater stroke, again do a half recovery, then the complete recover. Continue to the far end of the pool, alternating arms with a two-step recovery. Practice for several lengths until the path of the recovery is well aligned with your shoulder at the top of the arch, and not over-reaching to the center at entry.

Backstroke Swimming : - Recovery Drill
Swim Drill - 39 - Locked Elbow Drill
THE PURPOSE OF THIS DRILL
- Learning to fully align your recovering arm
- Extending the stroke range by locking the recovering elbow
- Feeling opposition balance
HOW TO DO THIS DRILL
- Step 1: Holding a piece of chalk in your hand, stand with your back against a wall. Trace around the shape of your shoulders and head.
- Step 2: Still standing within your chalk outline on the wall, extend the arm with the chalk, as if preparing to enter the water from your backstroke recovery. Make a mark on the wall in that position. Return your arm to your side.
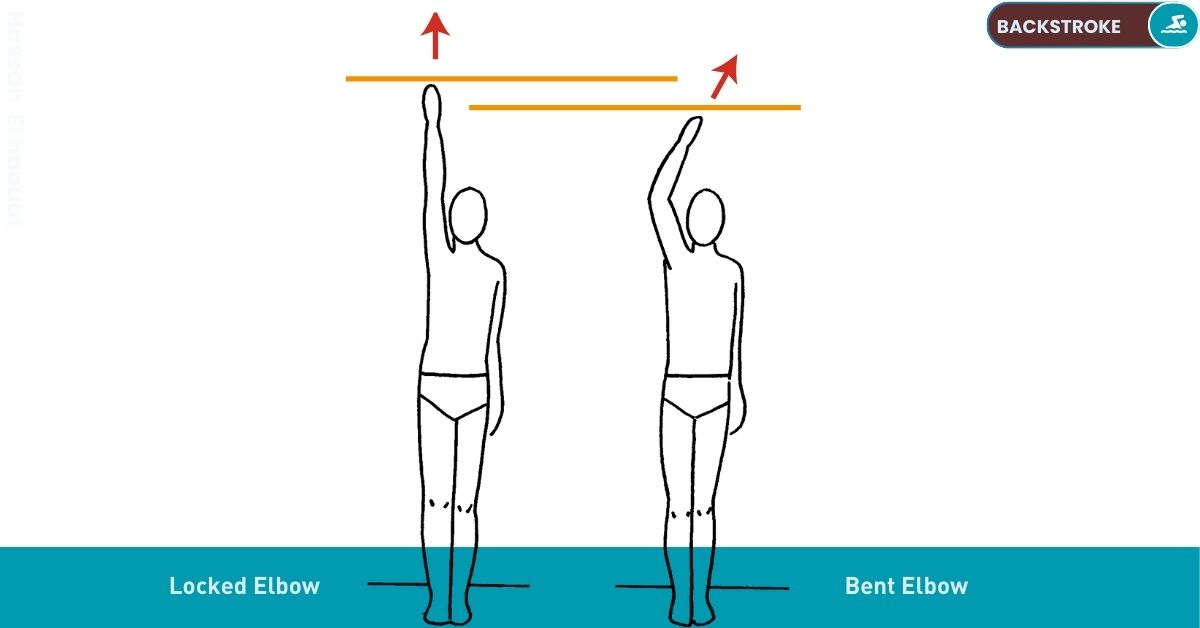
- Step 3: Again extend your chalk arm, but as you approach the entry position, push your elbow to the locked position, as if you would if trying to reach something on a shelf that is a bit too high. Make another mark on the wall, using more pressure in order to distinguish it from the first mark.
- Step 4: Step away from the wall and compare the two marks. Notice that by locking your elbow, the second mark aligns above your shoulder, where as the first mark aligns more closely with your head. In addition, many swimmers will notice that simply locking their elbow, the second mark will be higher on the wall by several inches, indicating a longer stroke. Try it with the other arm.
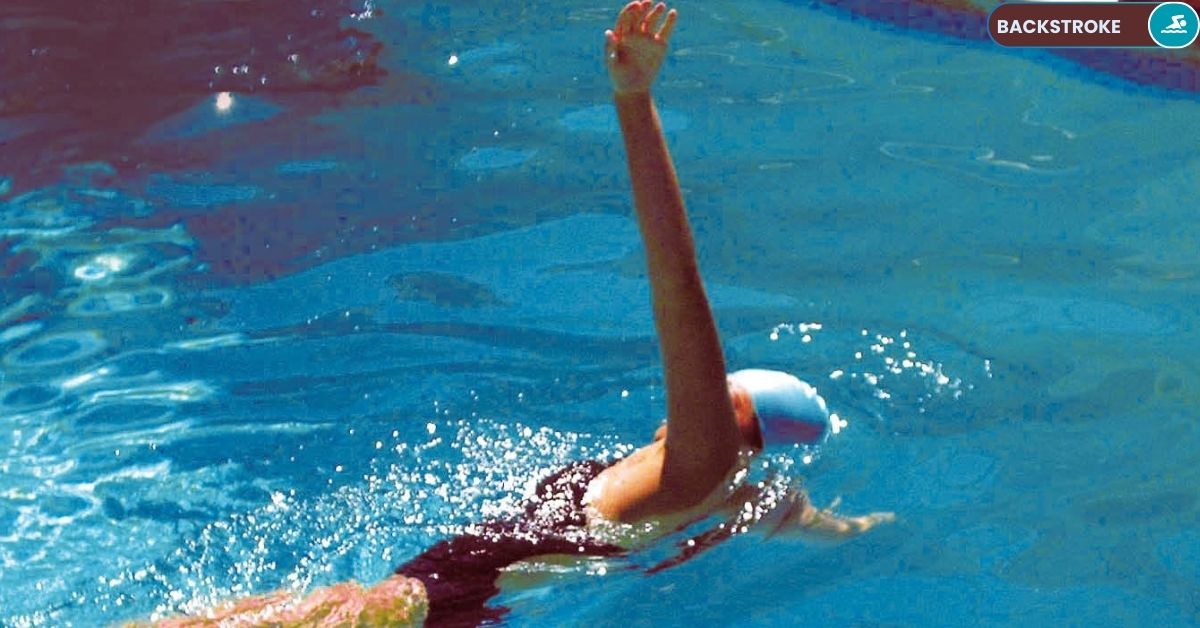
- Step 5: Now, get in the water and push off the wall for the backstroke, arms extended over your head, spine straight, good water-line, and productive kick. Take one underwater stroke ending past your hip. Begin your recovery focusing on your elbow. Look for any bend in your recovering arm at any point during the arching path over the water. Swim backstroke to the far end of the pool, watching each recovery, and checking for any bend in your elbow.
- Step 6: Again swim regular backstroke. As each stroke ends past your hip, deliberately push your elbow to the locked position before starting the recovery. Maintain your locked elbow throughout the recovery. Notice that your stroke will feel longer. Notice too that your locked elbow recovering arm will feel more connected to the underwater arm, as it creates an opposition balance while they move in conjunction. Notice as well that you will be able to feel the water better as your recovery arm transitions to the stroking arm.
Backstroke Swimming : - Recovery Drill
Swim Drill - 40 - Dog-ears
THE PURPOSE OF THIS DRILL
- Feeling an outward hand pitch
- Maintaining a firm arm and a relaxed hand
- Avoiding a collapsed wrist at entry
HOW TO DO THIS DRILL
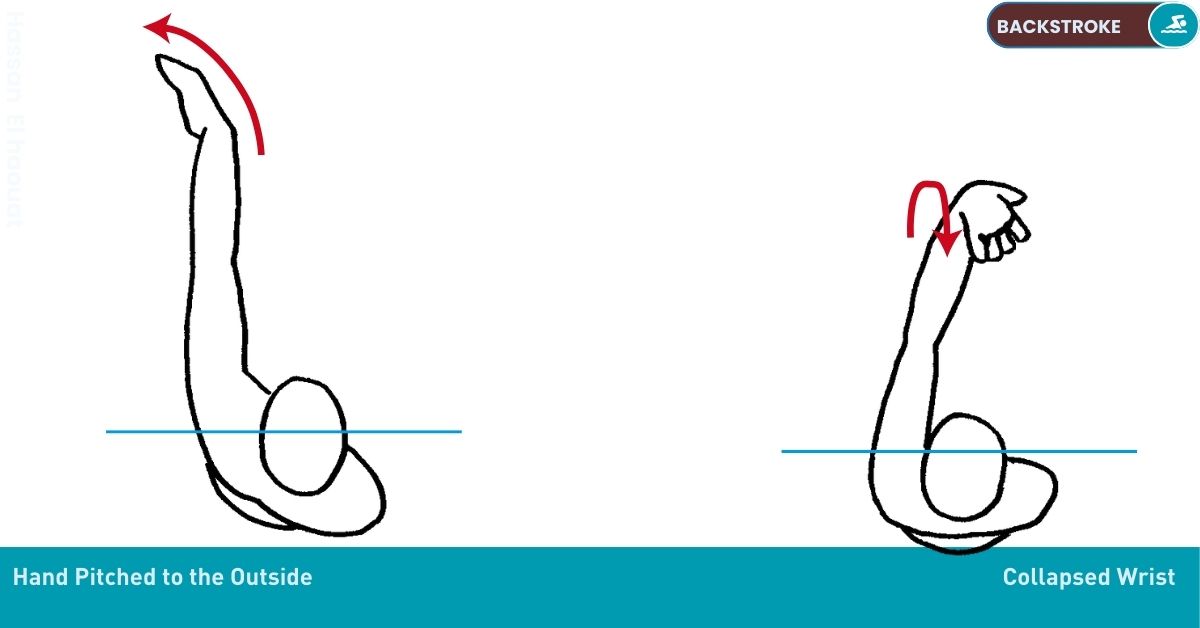
- Step 1: Push off the wall for the backstroke. Achieve a straight spine, good water-line, opposition balance, and locked recovering elbow. Kick productively. Stroke through and recover. After recovery, your hand should enter the water pinkie first, slicing the water, rather than making a hole in it with your flat hand. This requires positioning your hand with the palm facing outward. Try the palms out entry for several strokes.
- Step 2: Now, swim backstroke again, maintaining a palms-out entry position at the end of recovery. Freeze in the position when your arm has passed the top of the recovery arch. Observe which way your fingers are pointing. If they are pointing inward toward your face, and you are seeing the back of your hand, you have a collapsed wrist. A collapsed wrist positions your palms upward, as if you were a waiter holding a tray over your shoulder. It is the weakest entry position possible, and a disruption in your alignment. Notice that with a collapsed wrist, the muscles in your forearms are working, rather than resting during recovery. Notice too, that with a collapsed wrist, it is much harder to maintain a locked elbow recovery. Continue swimming, avoiding a collapsed wrist.
- Step 3: Now, with your locked elbow, palms-out recovering arm, deliberately allow that hand to flop to the outside at the wrist, relaxing your fingers as you do. This is the Dog-ears position. Notice that your forearm becomes more relaxed simply by changing your wrist position. Notice too that with your hand in an outwardly pitched position, when your hand lowers into the water, it is positioned perfectly to grab a handful of water.
- Step 4: Continue swimming backstroke with a dog-eared recovery. Increase your stroke rate. Grab a handful of water with each entry, hold on to it, and move your body past your hand.
Backstroke Swimming : - Breathing Drill
Swim Drill - 41 - Rhythmic Breathing Sequence
THE PURPOSE OF THIS DRILL
- Experimenting with different breathing rhythms
- Matching the stroke rate and the breathing rhythm
- Becoming comfortable breathing in the backstroke
HOW TO DO THIS DRILL
- Step 1: Stand with your hand on your abdomen, between your breastbone and your belly button. Close your eyes and breathe normally. Feel the rhythm of your breathing as you inhale and exhale. Now, maintaining the same rhythm, breathe as if you were in the water, inhaling through your mouth and exhaling through both nose and mouth.
- Step 2: Now, in the pool, push off the wall preparing to do the backstroke, spine straight, good water-line, productive kick, locked elbows, hands pitched out. Try to duplicate the breathing rhythm you did on land. Swim at a rate so that your inhale happens as one arm recovers, and your exhale happens when the other arm recovers. Continue for several lengths of the pool, resting at the end of each length.
- Step 3: Next, try a quicker stroke rate. Match your breathing to your quicker stroke rate, inhaling on one arm, and exhaling on the other. Notice, that with a quicker stroke rate, this breathing rhythm doesn't work as well. There is not time to fully inhale or exhale. Change your breathing rhythm to inhale with one full stroke cycle (one stroke with each arm), and then exhale on the next stroke cycle. Notice that your breathing rhythm more closely resembles your "normal" breathing rhythm using this timing. Continue for several lengths of the pool, resting after each length.
- Step 4: Now, try a stroke rate that is very relaxed and easy, perhaps resembling warm-up speed. Inhale with one stroke cycle, exhale with the next. Notice, that at this slower stroke rate, this breathing rhythm doesn't work as well. The exchange of air is not frequent enough. Change your breathing rhythm so you are both inhaling and exhaling with each arm recovery, doing the same thing on the next arm. Notice that the breathing rhythm is now more normal. Continue for several lengths of the pool, resting after each length.
Backstroke Swimming : - Breathing Drill
Swim Drill - 42 - The Breathing Pocket
THE PURPOSE OF THIS DRILL
- Using the ebb and flow of the water to time your breathing
- Finding another benefit of the roll in and out of the stroke
- Becoming comfortable when breathing in the backstroke
HOW TO DO THIS DRILL
- Step 1: Push off the wall preparing to do the backstroke, spine straight, good water-line, productive kick, locked elbow recovery, dog-eared hand. Focus on rolling into and out of each stroke, feeling opposition. Take several strokes, then freeze at the point that one arm is in mid-stroke underwater, and the other arm is in mid-recovery. At this point, the armpit of your recovering arm should be completely out of the water, and the shoulder of the other arm should be at its lowest point under the water.
- Step 2: Observe that in this position and point in the stroke, the raised armpit side forms a barrier to the water that would otherwise be in your face. Resume stroking. Notice that this barrier is only in place for a very brief moment. This is your breathing pocket. It is your chance to inhale without water going in your face.
- Step 3: Swim backstroke again, exaggerating your roll to make the breathing pocket very clear. Try to find the breathing pocket on each side of your body. Continue swimming backstroke inhaling in your breathing pocket with each stroke.

Backstroke Swimming : - Leverage Drill
Swim Drill - 43 - Three Stroke Switch Backstroke
THE PURPOSE OF THIS DRILL
- Benefiting from core leverage
- Feeling the roll into and out of each stroke
- Transferring power from the core to the limbs
HOW TO DO THIS DRILL
- Step 1: Push off the wall preparing to do the backstroke, straight spine and good water-line. Perform three strokes (one arm = one stroke), accompanied by a productive kick. As your arm approaches your hip on the third stroke, float and kick in that position, with the arm that just finished its underwater stroke at your side, the other arm fully extended. You should not be floating flat in the water, but instead you should be mostly on your side with the arm at your side closer to the surface, and the arm extended over your head lower in the water. Your face should remain out of the water the whole time. Do six good kicks in this position (one leg = one kick).
- Step 2: With your sixth kick switch floating sides, by rolling toward the other hip and shoulder, but remaining face up. This roll should initiate three more strokes by bringing the high hip and shoulder down, and the low hip and shoulder up, while the arm at your side recovers over the water to the front, and the reaching arm begins its underwater stroke. Keep a steady kick through the whole process.
- Step 3: Continue doing three strokes, kicking the whole time, and then six kicks in the side position until you reach the far end of the pool. Notice that your "switch" affects both arms at the same time.
- Step 4: Repeat the drill, this time using three strokes and three kicks. As you become more comfortable, try to incorporate the switch between each stroke. Continue to the far end of the pool.
- Step 5: Once you are able to roll productively with each stroke, begin swimming regular backstroke rolling into and out of each stroke, as you did in the drill. Practice for several length of the pool.
Backstroke Swimming : - Leverage Drill
Swim Drill - 44 - One Arm Rope Climb
THE PURPOSE OF THIS DRILL
- Learning to anchor your reaching arm
- Feeling the high elbow position of strength
- Experiencing your body moving past your hand
HOW TO DO THIS DRILL
- Step 1: String a rope from one end of the pool to the other, attaching it securely to the lane rope hooks in the side of the pool. The rope should be fairly tight, floating just below the surface of the water.
- Step 2: Lay in the water on your back, one arm extended over your head, spine straight, good water-line, the rope just outside your extended arm. Grasp the rope with the hand of your extended arm. From this anchor point, pull your body past your hand, with a totally straight arm, moving your arm across the surface of the water, until the hand holding the rope is by your hip. Notice that as you move forward, no matter how much core stability you have, your legs swing toward the rope. Notice as well, that your shoulder is doing all the work.
- Step 3: Grasp the rope again with your arm extended over your head. This time, drop your elbow down, lowering it into your ribs as you attempt to move your body past your anchored hand. Notice that it is very difficult to move your body forward with your elbow low and moving.
- Step 4: Again, grasp the rope with your arm extended over your head. This time, pull your body up so that your shoulder is at the same level as your hand. Allow your elbow to bend up to a right angle, but remain about parallel to your shoulder and hand. From this point, straighten your arm. Keep your elbow firm as your body moves past your anchored hand. Notice that by keeping your elbow firm you have more leverage to move yourself forward. It is also easier and more productive than the other two ways that you tried.
- Step 5: Continue the one arm rope climb using a high, stable elbow, and an accelerating arm action. When you reach the far end of the pool, switch arms. Practice several times with each arm. Once you are able to clearly feel yourself move past your anchored hand, begin swimming regular backstroke, anchoring your hand in the water, and again move your body past that point with each stroke.
Backstroke Swimming : - Leverage Drill
Swim Drill - 45 - Opposition Freeze Frame
THE PURPOSE OF THIS DRILL
- Understanding the role of opposition in backstroke leverage
- Checking opposition at various stages in the stroke
- Learning to maintain opposition
HOW TO DO THIS DRILL
- Step 1: Push off the wall on your back, with both arms at your sides. Kick productively. With your right arm, do one complete backstroke, bringing your arm over the water in a fully aligned arch, then stroking through to your hip. When your right arm returns to its starting point, do the same thing with your left arm. Continue for twelve strokes. Notice that the forward motion you produce is not continuous, so that when your left arm is at your side and your right arm is in the air recovering, nothing is moving you forward except your kick. Notice too that it is difficult to roll into and out of your stroke, accessing core leverage. This is an example of backstroke without "opposition".
- Step 2: Now, push off the wall with both arms extended over your head, preparing to do the backstroke, spine straight, good water-line, productive kick, locked elbows, hands pitched out. Establish opposition by doing an underwater stroke with one arm, while the other remains over your head. Roll toward the side of your body with the arm extended, so that side of your body becomes lower in the water. Now, begin swimming backstroke, focusing on maintaining opposition.
- Step 3: Swim six strokes at a good strong pace. On the next stroke, freeze when your right hand has entered the water. Notice where your left hand is. It should be at the opposite extreme of the stroke, exiting the water past your hip.
- Step 4: Continue swimming backstroke. After six strokes, freeze again as your right hand transitions from pull to push. Notice where your left hand is. It should be opposite, in the middle of the recovery.
- Step 5: Continue swimming backstroke. After each six strokes, freeze at a different point in the stroke, checking your opposition.

Backstroke Swimming : - Leverage Drill
Swim Drill - 46 - Armpit Lift
THE PURPOSE OF THIS DRILL
- Balancing the recovery arm with the stroking arm
- Using core leverage
- Developing a unified stroke
HOW TO DO THIS DRILL
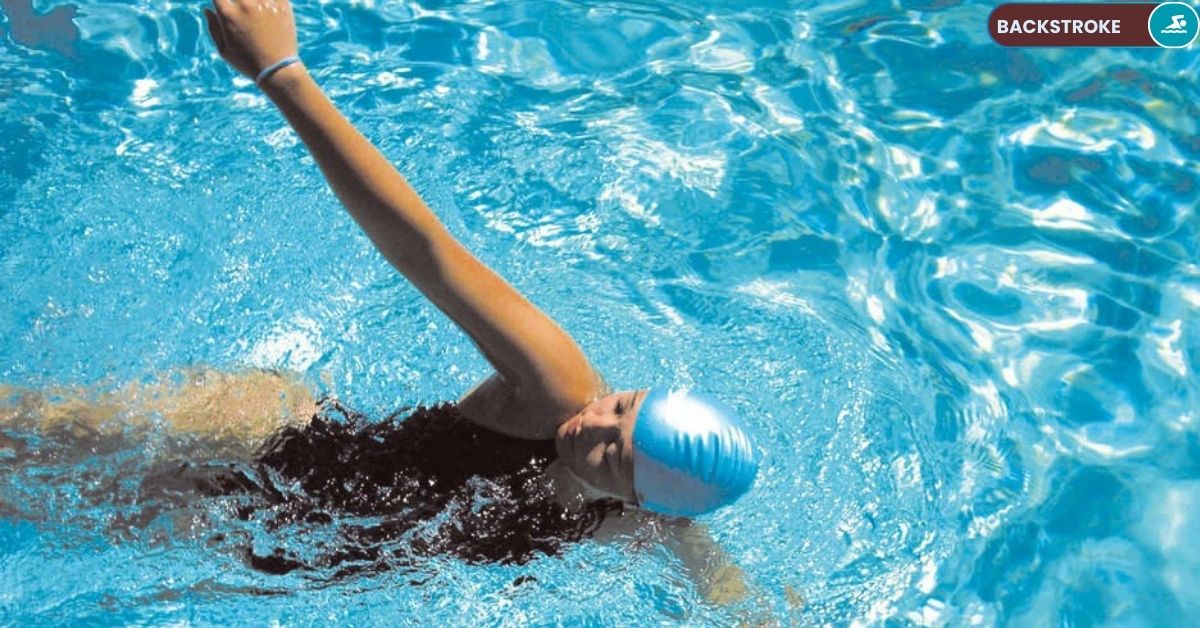
- Step 1: Push off the wall preparing to do the backstroke, straight spine, good water-line, productive kick. Establish opposition. Roll into and out of each stroke.
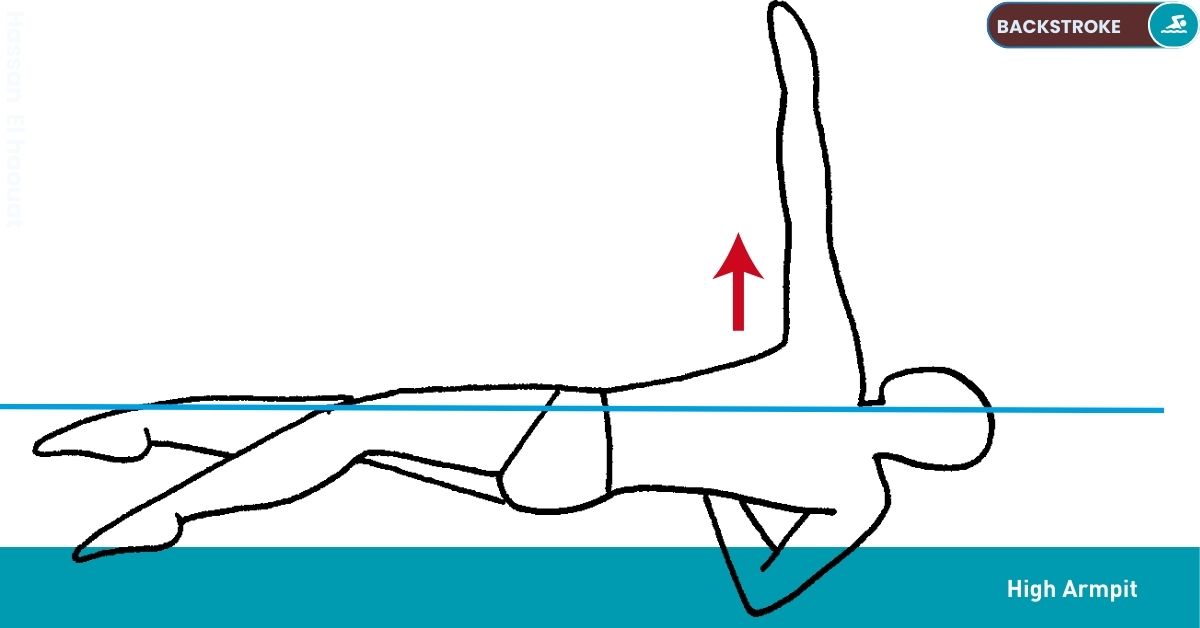
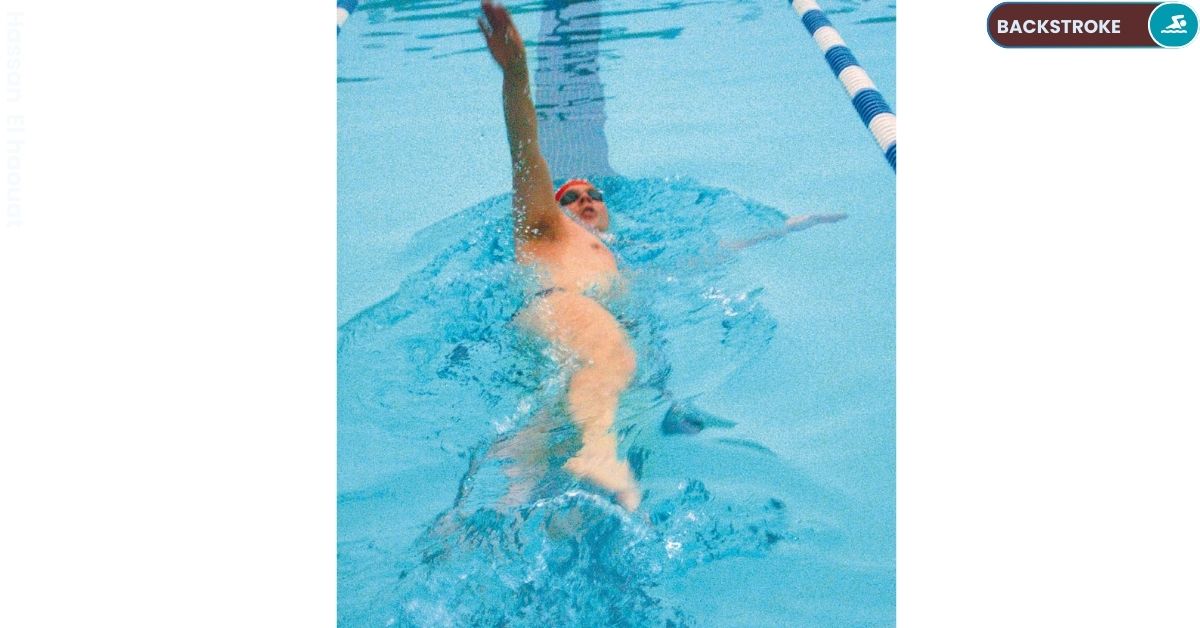
- Step 2: As your recovering arm approaches the top of the arch over the water, lift your armpit out of the water by rolling your opposite shoulder down lower into the water. Keep your elbow locked, and your hand aligned above your shoulder. When your recovering arm approaches the entry point beyond your shoulder, allow your armpit to submerge again.
- Step 3: Recover with the other arm. Notice that when you lift the armpit at the top of the recovery arch, it affects the underwater stroking arm. Correctly balanced, lifting your armpit helps your other arm to transition from the pull phase to the push phase of the stroke, and, to produce important arm speed at the finish of the stroke.
- Step 4: Continue stroking, and with each recovery, lift your armpit out of the water during the highest part of the arch. Continue for several lengths of the pool until you feel that the action of lifting your armpit balances the actions of the stroking arm. It should feel that the arms are working together, yet opposite.
Backstroke Swimming : - Coordination Drill
Swim Drill - 47 - Roll, Pull, Roll, Push
THE PURPOSE OF THIS DRILL
- Blending the actions of the roll and the arm stroke
- Initiating the arm stroke from the core
- Coordinating backstroke action
HOW TO DO THIS DRILL
- Step 1: Push off the wall on your back, both arms extended, preparing to do the backstroke, straight spine, good water-line, productive kick. Swim to the other end of the pool focusing on identifying the pull phase and the push phase in your backstroke arm stroke.
- Step 2: Swim another length of backstroke, this time focusing on identifying the roll or "switch" from one side of your body to the other.
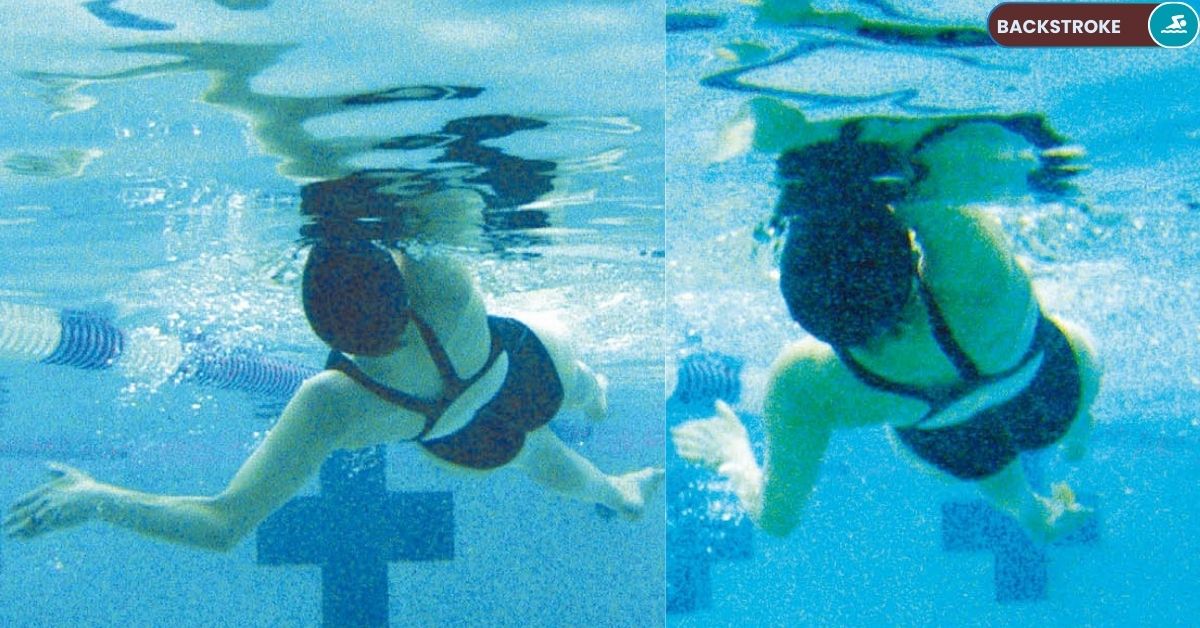
- Step 3: Now, swim a length of backstroke timing the pull phase of the underwater arm stroke to begin as you "switch" toward the underwater arm. Then, with the same arm, time the push phase of the stroke to begin as you "switch" away from the underwater arm.
- Step 4: Swim several lengths of the pool, focusing on the timing of roll, pull, roll push. Concentrate on one arm at a time. Once coordinated with the first arm, concentrate on the other arm to see if your timing also follows roll, pull, roll push.
- Step 5: Practice until you can increase your stroke rate and still maintain this timing. This is the ideal backstroke coordination.

Backstroke Swimming : - Coordination Drill
Swim Drill - 48 - Pinkie Lead
THE PURPOSE OF THIS DRILL
- Using the hip roll to initiate the recovery
- Eliminating extraneous actions
- Learning to avoid shoulder pain
HOW TO DO THIS DRILL
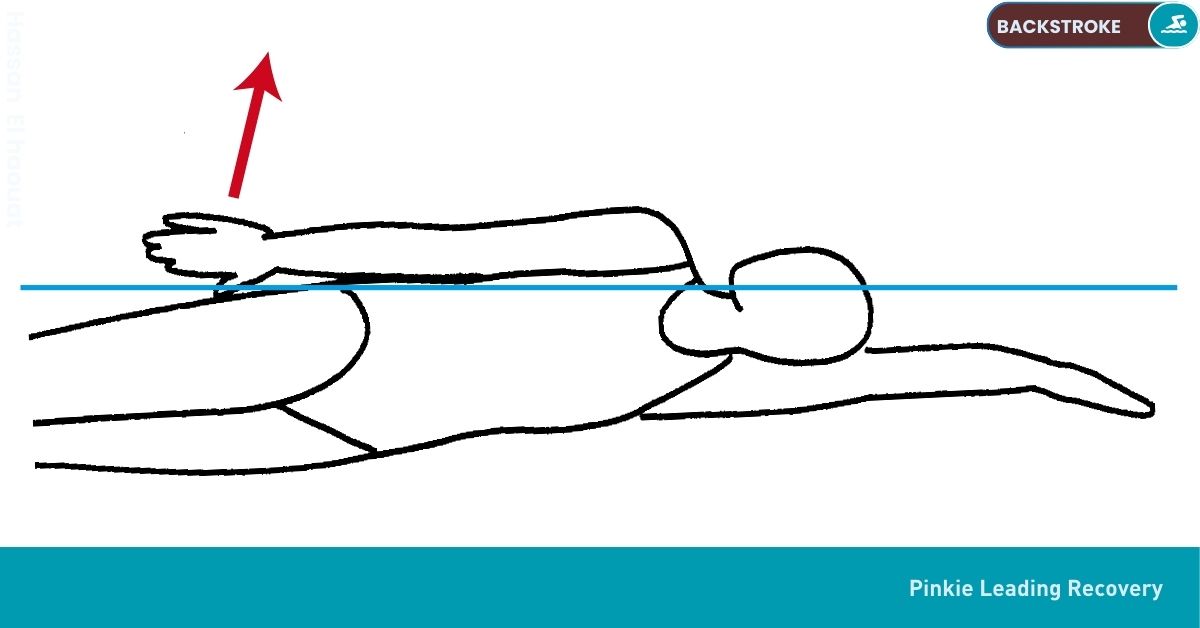
- Step 1: Push off the wall on your back, both arms extended, preparing to do the backstroke, straight spine, good water-line, productive kick. Swim backstroke to the other end of the pool focusing on your hand at the end of the push phase of the arm stroke, just before recovery. Notice that your thumb is closest to your body as it finishes the push, and the pinkie is to the outside. In this position it is the back of the hand that exits first for recovery, creating a large hole in the water, and lifting heavy water upward into the recovery.
- Step 2: To avoid this, traditionally, most swimmers have been taught to flip their hand to a thumb up position to exit the water, then flip their hand again during recovery to achieve a pinkie first entry at the end of recovery. Although the thumb-lead position avoids more drag than exiting with the back of your hand, it requires the additional action of flipping your hand over and then back again. This action is done independently from the roll, making the arm work harder. In addition, if not done early enough in the recovery, the second hand flip can contribute to shoulder pain. Practice the thumb-first recovery, initiating the flip to pinkie leading before your hand reaches the top of the recovery arch.
- Step 3: The alternative to flipping your hand, before and again during recovery, is to allow your roll to position your hand for recovery. Swim backstroke to the other end of the pool, feeling core stability that unites your shoulders and hips. Focus on your shoulder of the arm that is finishing the push phase of the underwater stroke. As the hand finishes the push, deliberately pop the same side shoulder out of the water just as your hand passes your hip. Notice that as you do this deliberate movement with your shoulder, your same hip will also rise. Practice to the far end of the pool.
- Step 4: Now, swim another length of backstroke, focusing on popping your shoulder out of the water, and allowing your same side hip to rise at the point when your same side your hand is finishing the push. Freeze in that position. Observe that having rolled, it is the pinkie that is positioned to exit the water first for recovery. With the pinkie leading the recovery from start to finish, there is no need to flip the hand over and back, or to make sure the second flip is done early in the recovery to avoid shoulder pain.
- Step 5: Repeat this drill, maintaining unified hip and shoulder action. With each stroke, deliberately pop your shoulder out of the water as your hand finishes the push. Feel your hip rise as your hand is finishing its push. Then, as the hip continues its switch, let it lift your hand out of the water in the same position the hand finished the push, pinkie leading. It is just less work than a thumb-lead recovery.
Backstroke Swimming : - Coordination Drill
Swim Drill - 49 - Backstroke Balance Drill with Cup
THE PURPOSE OF THIS DRILL
- Developing a balanced, effective backstroke
- Developing continuous backstroke motion
- Maintaining a stable head position while swimming backstroke
HOW TO DO THIS DRILL
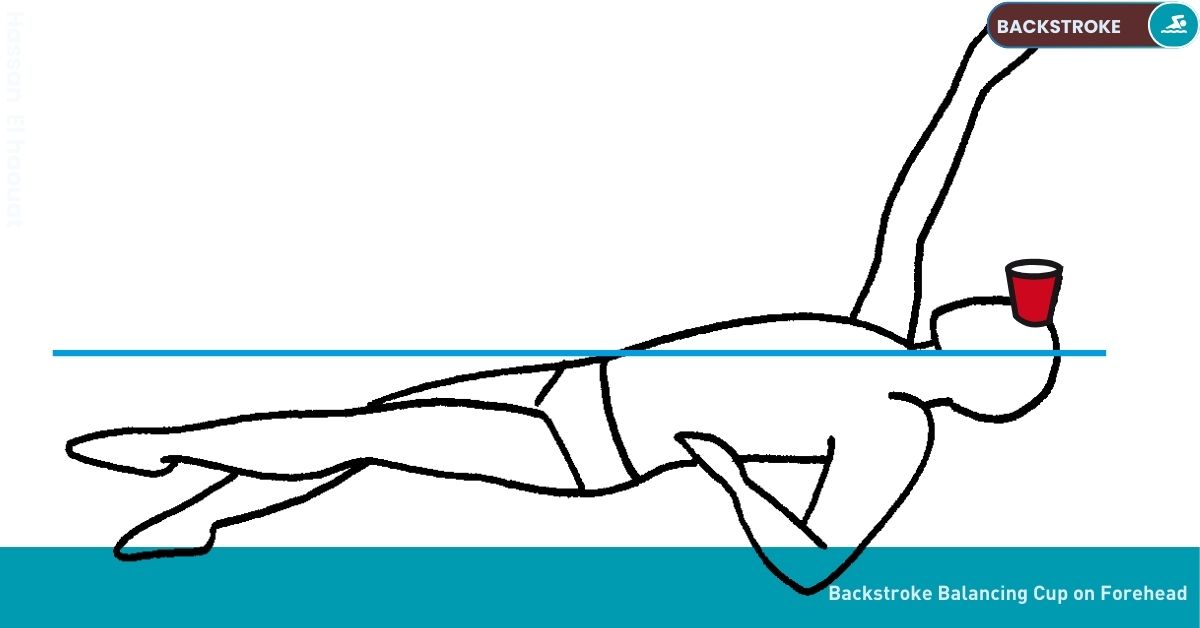
- Step 1: Fill a medium plastic cup halfway with water. Gently balance the cup on your forehead as you lay on your back in the water, with a straight spine and good water-line. Once the cup is balanced, position both arms extended over your head. Kick productively.
- Step 2: Begin the underwater stroke with one arm, rolling smoothly into the stroke, while your head stays still, centered and neutral. Keep the cup of water balanced on your forehead. When the first arm passes your hip, begin stroking with the other arm. If the cup falls off, stand and start again.
- Step 3: Practice until you can swim smoothly for several strokes without the cup falling off your forehead.
- Step 4: Swim backstroke again, with the cup on your forehead, increasing your stroke and kick rate, and maintaining your stable, neutral head position. Roll smoothly from side to side, and with your hips and shoulders united, While they are opposite, feel the movement of both of your arms initiated at once by a single action of the core. This is ultimate backstroke.
Backstroke Swimming : - Coordination Drill
Swim Drill - 50 - Opposition Overlap
THE PURPOSE OF THIS DRILL
- Recognizing the momentary non-opposition point in the backstroke
- Making the most of both arms pressing on the water at once
- Feeling a continuous stroke
HOW TO DO THIS DRILL
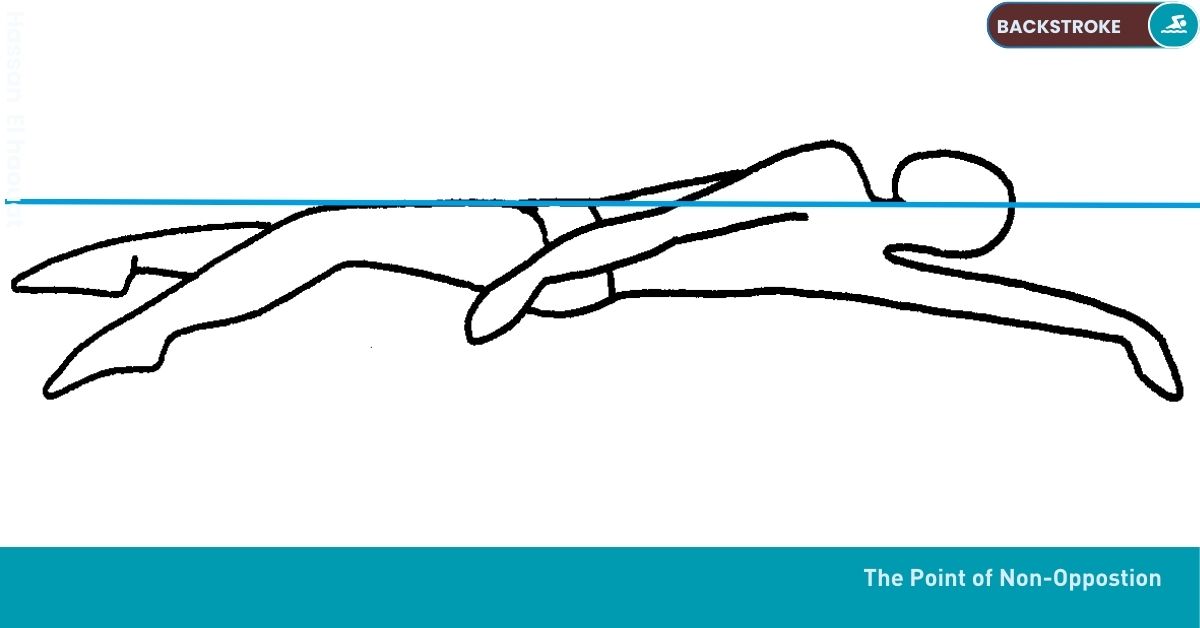
- Step 1: Push off the wall for backstroke, achieving a straight spine, good water-line, and productive kick. Swim backstroke to the other end of the pool. Focus on the opposition of the arm stroke. When one arm is under the water, one arm is over the water. When one arm is in mid-stroke under the water, the other arm is in mid-recovery.
- Step 2: Now focus on the point when one arm is starting the stroke, and the other arm is finishing the stroke. This sounds opposite. As you swim, feel what is really happening. As one arm is entering the water and descending about twelve inches downward, the other arm is still pushing past the hip. Both arms are in the water at the same time. Both are in the power phase of the stroke at the same time. For a moment, the arms are actually not opposite.
- Step 3: Continue swimming backstroke, feeling this moment of overlap. Feel how the roll of the stroke assists both arms, one to start the arm stroke, the other to finish the arm stroke. Use this moment to start your stroke with power, and to finish your stroke with power. Practice more until you can feel both arms engaged in the power phase of the stroke at the same time, at opposite ends of the stroke.
- Step 4: Kick to assist both the beginning and the end of the stroke. Feel the balance of the stroke shift from the finishing arm to the starting arm. Opposition is reset as the beginning arm sweeps into its anchored position at the same time as the other arm clears the water. Practice for several lengths of the pool. Develop a continuous stroke, using the moment of stroke overlap to access more power than with one arm at a time.