The recovery phase in backstroke is more than just getting the arm back to the start; it is a critical window for muscle relaxation and precision alignment. Unlike other strokes, backstroke recovery must account for the natural anatomical limits of the shoulder joint. These Recovery Drills are designed to help swimmers find their ideal "clock" alignment to avoid shoulder strain and "crossing over" the midline. By focusing on a locked elbow and a relaxed, "dog-eared" wrist, you can ensure that your arm enters the water in a position of maximum strength, ready to catch deep water without losing momentum.
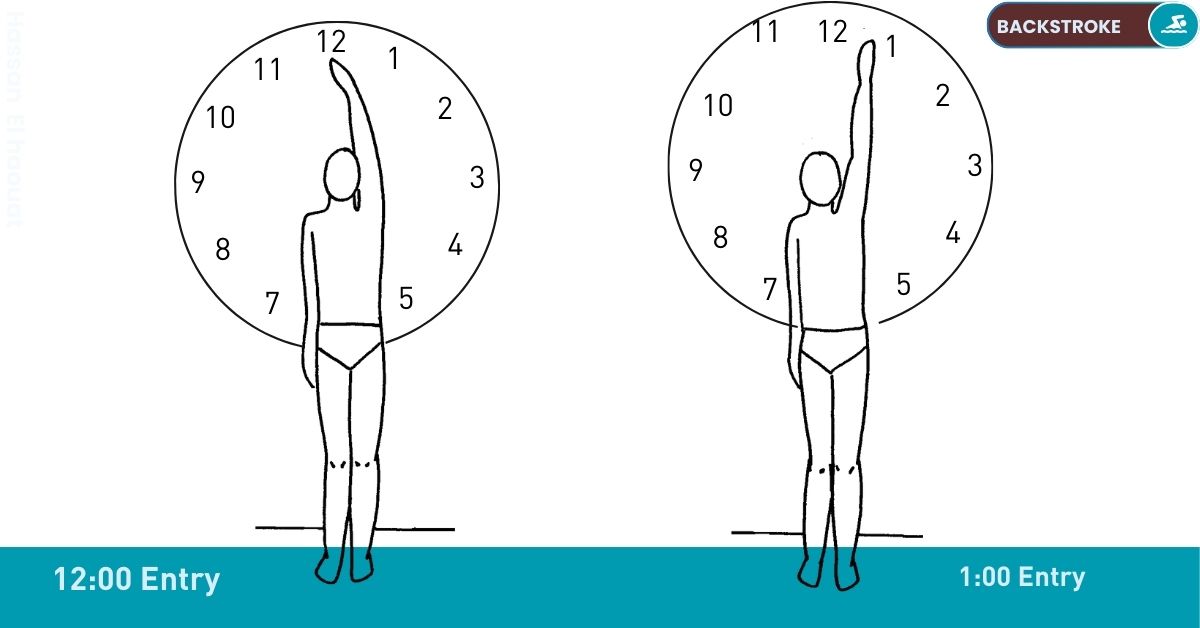
- Drill 37: Clock Arms – Using a "clock face" visualization (either in a mirror or using ceiling markers), swimmers learn that a 12:00 entry is often too narrow for the shoulder joint. By aiming for 11:00 or 1:00, the shoulder rotates more freely, allowing for a deeper, more natural descent into the water and preventing "over-reaching."
- Drill 38: Two-step Recovery – This drill breaks the recovery into stages. Swimmers stop their arm at the vertical peak of the arch to check that it is pointing straight at the sky rather than leaning over the face. This ensures the arm follows a clean, forward-aimed path that sets up a strong entry.
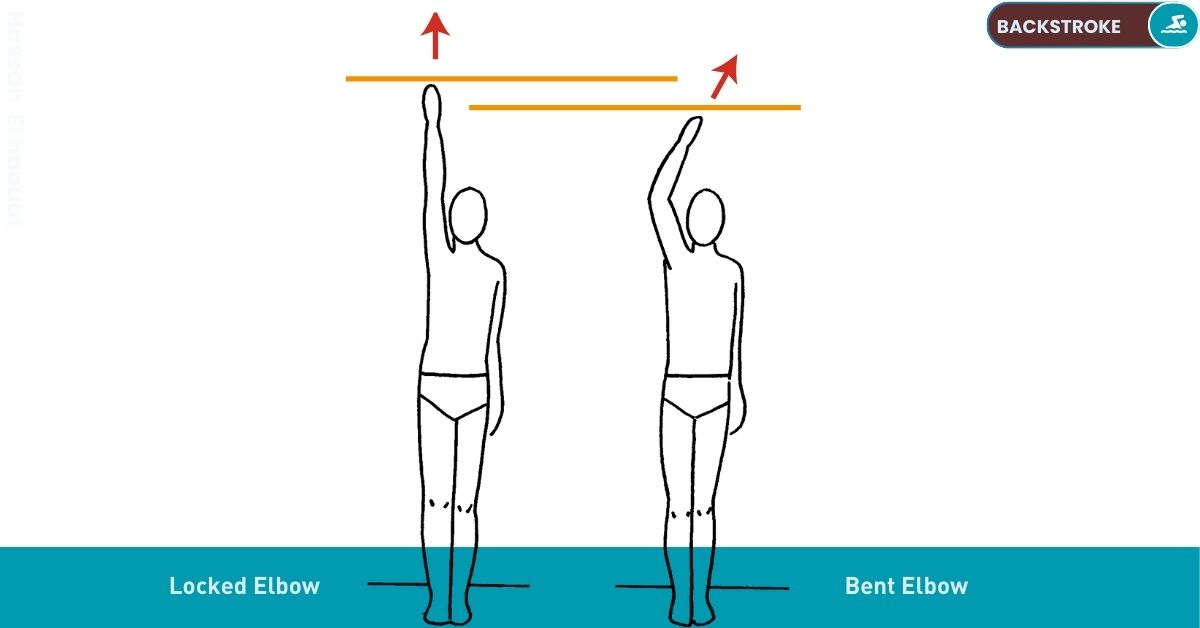
- Drill 39: Locked Elbow Drill – By comparing marks on a wall, swimmers see that a locked elbow significantly increases stroke length and improves alignment. In the water, maintaining a straight, "locked" arm connects the recovery to the underwater pull, creating better opposition balance and a more powerful transition to the catch.
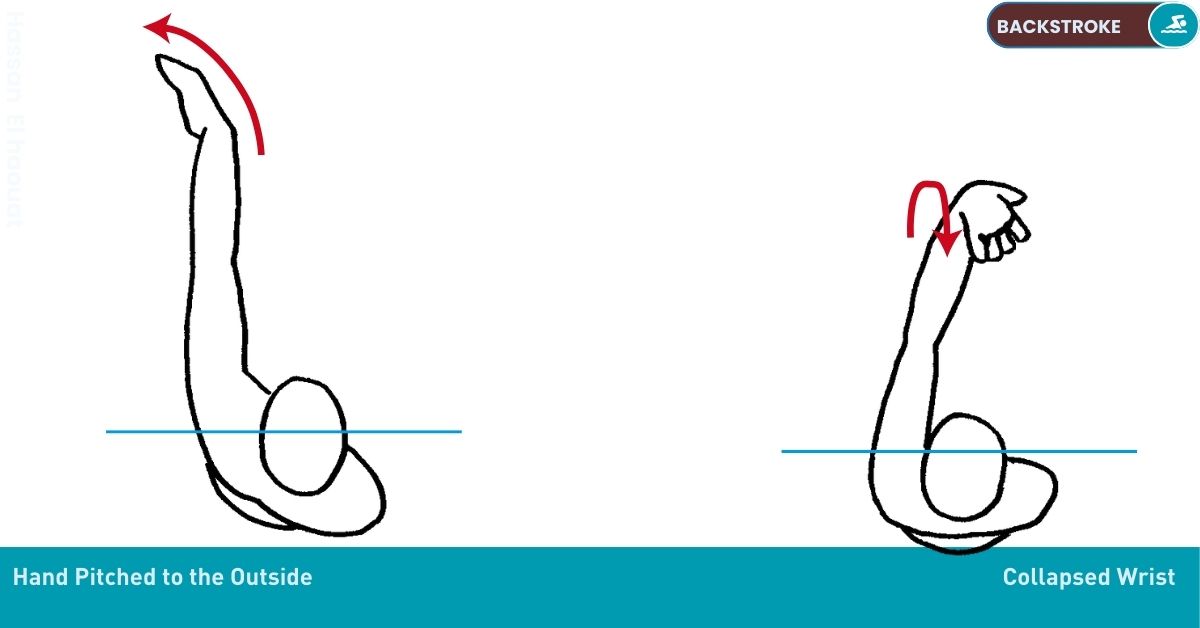
- Drill 40: Dog-ears – This drill focuses on the wrist and hand pitch. Swimmers avoid the "collapsed wrist" (palm-up) position, which causes forearm tension. Instead, they adopt the "Dog-ears" position—where the hand flops outward at the wrist—ensuring a pinkie-first entry that slices the water and immediately positions the palm to grab a "handful of water."
Backstroke Swimming : - Recovery Drill
Swim Drill - 37 - Clock Arms
THE PURPOSE OF THIS DRILL
- Using an aligned entry position
- Learning to avoid over-reaching
- Feeling the natural range of motion of the shoulder
HOW TO DO THIS DRILL
- Step 1: Stand in front of a full-length mirror. Imagine the face of a large clock centered on the mirror in front of you. Raise your right arm over your head as if preparing to enter the water for the backstroke, pinkie first. Position your hand at 12:00. Now, attempt to lower your arm downward as you would into the water to a point about twelve inches below where the water's surface would be. Notice that from the 12:00 position, your shoulder does not allow this rotation, unless you are double-jointed.
- Step 2: Again, raise your right arm over your head extended as if preparing to enter the water for the backstroke. This time, position your arm at 1:00, and attempt to lower your arm as you would into the water to a point about twelve inches below where the water's surface would be. Notice that your shoulder allows this rotation, moving more freely around the joint. Some swimmers may need to use a 1:30 or 2:00 for a more comfortable entry point.
- Step 3: Once you have found an entry point that allows free shoulder joint rotation, try duplicating this entry point with the other arm. Now try alternating arm action, monitoring your clock arms in the mirror in order to avoid an "over-reaching" 12:00 entry. Continue for 30 seconds.
- Step 4: Now, try alternating arm action with your eyes closed. Every six or seven strokes, freeze at your entry position, open your eyes, and check if you are properly aligned at 1:00 or 11:00 so your arm can descend freely downward and you are aligned most directly forward. Once you have checked, and made a modification if necessary, resume your stroke action with your eyes closed. Check again. Continue until you are able to maintain a recovery with a well-aligned entry position.
- Step 5: Now try it in the water. If you are swimming in an indoor pool, use the beams, pipes or lines on the ceiling to align your arms at 1:00 and 11:00. If you are swimming in an outdoor pool, keep imagining the clock around you, and align your arms outside 12:00. Practice lowering each arm down into the water to begin the stroke, and notice if your arm is rotating easily around the shoulder joint. Practice aligning your arm precisely in the direction you are heading. Continue until you are achieving a well-aligned entry that both allows your arm to achieve a wider range of motion and moves you most directly forward.
Backstroke Swimming : - Recovery Drill
Swim Drill - 38 - Two-step Recovery
THE PURPOSE OF THIS DRILL
- Establishing the path of the recovery
- Feeling correct recovery alignment
- Avoiding an over-reaching entry
HOW TO DO THIS DRILL
- Step 1: Push off the wall preparing to do the backstroke, both arms extended over your head, straight spine, good water-line, productive kick.
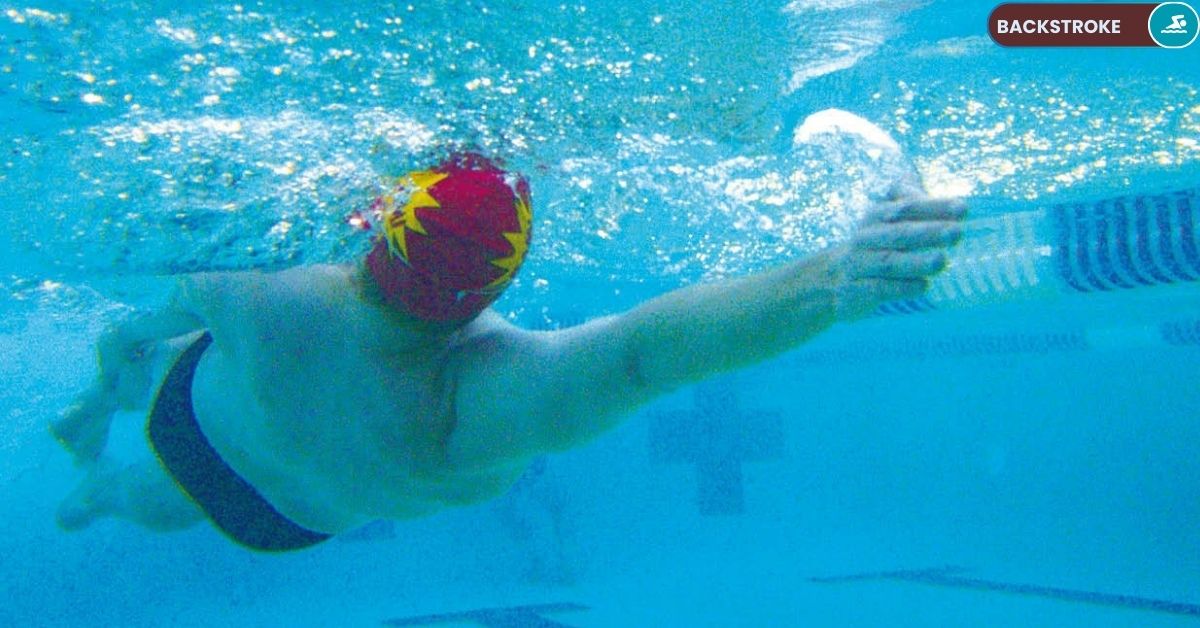
- Step 2: Take one stroke, leaving the other arm extended. When your arm finishes the underwater phase of the stroke past your hip, slide it straight out of the water, upward past the side of your body. Establish the path of your recovery by tracing a half-circle in the air, from the place where your arm exited the water to the point it will enter, extended past your shoulder, aligned in the direction you are heading. Repeat with the other arm, focusing on the forward-aimed, arched path of the recovering arm.
- Step 3: Now, as your arm begins the recovery after the next stroke, begin to trace the arch over the water, but stop your arm at the highest point in the arch and count to five. Notice the alignment to your higher arm. It should be directly above your shoulder, pointing to the sky, not above your face. A misaligned recovery leads to an over-reaching entry that starts the stroke from a position of weakness.
- Step 4: After the count of five, lower your arm back into the water, following the same recovery path in reverse, finishing with your hand past your hip. Count to five, and begin recovery again, this time tracing the whole recovery path and entering the water extended past your shoulder. Check your alignment at the high point as your arm passes. As your arm begins this second, full recovery, the extended arm begins its underwater stroke.
- Step 5: When the second arm completes the underwater stroke, again do a half recovery, then the complete recover. Continue to the far end of the pool, alternating arms with a two-step recovery. Practice for several lengths until the path of the recovery is well aligned with your shoulder at the top of the arch, and not over-reaching to the center at entry.

Backstroke Swimming : - Recovery Drill
Swim Drill - 39 - Locked Elbow Drill
THE PURPOSE OF THIS DRILL
- Learning to fully align your recovering arm
- Extending the stroke range by locking the recovering elbow
- Feeling opposition balance
HOW TO DO THIS DRILL
- Step 1: Holding a piece of chalk in your hand, stand with your back against a wall. Trace around the shape of your shoulders and head.
- Step 2: Still standing within your chalk outline on the wall, extend the arm with the chalk, as if preparing to enter the water from your backstroke recovery. Make a mark on the wall in that position. Return your arm to your side.
- Step 3: Again extend your chalk arm, but as you approach the entry position, push your elbow to the locked position, as if you would if trying to reach something on a shelf that is a bit too high. Make another mark on the wall, using more pressure in order to distinguish it from the first mark.
- Step 4: Step away from the wall and compare the two marks. Notice that by locking your elbow, the second mark aligns above your shoulder, where as the first mark aligns more closely with your head. In addition, many swimmers will notice that simply locking their elbow, the second mark will be higher on the wall by several inches, indicating a longer stroke. Try it with the other arm.
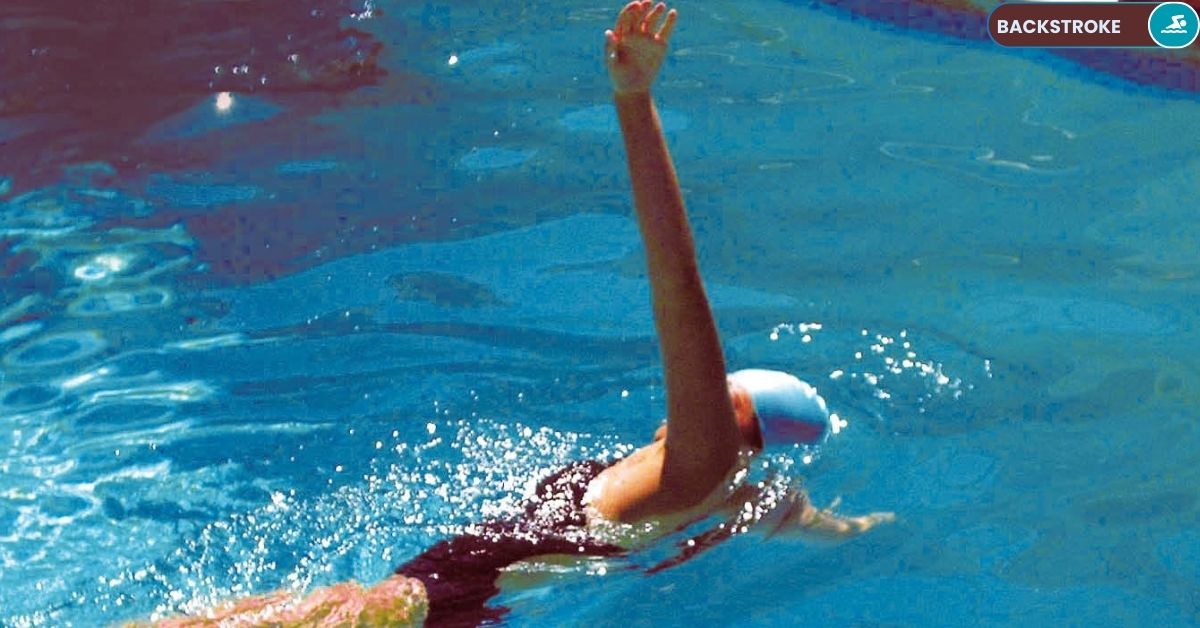
- Step 5: Now, get in the water and push off the wall for the backstroke, arms extended over your head, spine straight, good water-line, and productive kick. Take one underwater stroke ending past your hip. Begin your recovery focusing on your elbow. Look for any bend in your recovering arm at any point during the arching path over the water. Swim backstroke to the far end of the pool, watching each recovery, and checking for any bend in your elbow.
- Step 6: Again swim regular backstroke. As each stroke ends past your hip, deliberately push your elbow to the locked position before starting the recovery. Maintain your locked elbow throughout the recovery. Notice that your stroke will feel longer. Notice too that your locked elbow recovering arm will feel more connected to the underwater arm, as it creates an opposition balance while they move in conjunction. Notice as well that you will be able to feel the water better as your recovery arm transitions to the stroking arm.
Backstroke Swimming : - Recovery Drill
Swim Drill - 40 - Dog-ears
THE PURPOSE OF THIS DRILL
- Feeling an outward hand pitch
- Maintaining a firm arm and a relaxed hand
- Avoiding a collapsed wrist at entry
HOW TO DO THIS DRILL
- Step 1: Push off the wall for the backstroke. Achieve a straight spine, good water-line, opposition balance, and locked recovering elbow. Kick productively. Stroke through and recover. After recovery, your hand should enter the water pinkie first, slicing the water, rather than making a hole in it with your flat hand. This requires positioning your hand with the palm facing outward. Try the palms out entry for several strokes.
- Step 2: Now, swim backstroke again, maintaining a palms-out entry position at the end of recovery. Freeze in the position when your arm has passed the top of the recovery arch. Observe which way your fingers are pointing. If they are pointing inward toward your face, and you are seeing the back of your hand, you have a collapsed wrist. A collapsed wrist positions your palms upward, as if you were a waiter holding a tray over your shoulder. It is the weakest entry position possible, and a disruption in your alignment. Notice that with a collapsed wrist, the muscles in your forearms are working, rather than resting during recovery. Notice too, that with a collapsed wrist, it is much harder to maintain a locked elbow recovery. Continue swimming, avoiding a collapsed wrist.
- Step 3: Now, with your locked elbow, palms-out recovering arm, deliberately allow that hand to flop to the outside at the wrist, relaxing your fingers as you do. This is the Dog-ears position. Notice that your forearm becomes more relaxed simply by changing your wrist position. Notice too that with your hand in an outwardly pitched position, when your hand lowers into the water, it is positioned perfectly to grab a handful of water.
- Step 4: Continue swimming backstroke with a dog-eared recovery. Increase your stroke rate. Grab a handful of water with each entry, hold on to it, and move your body past your hand.