BREASTSTROKE
Body Position Drills
- Swim Drill - 51 - Streamline
- Swim Drill - 52 - Rocking Drill
Kick Drills (53-56)
- Swim Drill - 53 - Duck Feet
- Swim Drill - 54 - Breaststroke Kick on Your Back
- Swim Drill - 55 - Vertical Breaststroke Kick
- Swim Drill - 56 - Heads Up Breaststroke Kick
Arm Stroke Drills
- Swim Drill - 57 - 3D Breaststroke Arms
- Swim Drill - 58 - Breaststroke Sculling
- Swim Drill - 59 - Half-stroke Breaststroke
- Swim Drill - 60 - Corners Drill
- Swim Drill - 61 - Hand Speed Drill
- Swim Drill - 62 - Breaststroke with Fists
Recovery Drills
- Swim Drill - 63 - Growing Your Recovery
- Swim Drill - 64 - Shoot to Streamline
- Swim Drill - 65 - Fold and Shrug
Breathing Drills
- Swim Drill - 66 - Inhale at the High Point
- Swim Drill - 67 - Eyes on the Water
- Swim Drill - 68 - Tennis Ball Drill
Leverage Drills
- Swim Drill - 69 - Breaststroke with Dolphin
- Swim Drill - 70 - Breaststroke Alternating Dolphin and Breaststroke Kick
- Swim Drill - 71 - Stroke Up to Breathe, Kick Down to Glide
Coordination Drills
- Swim Drill - 72 - No Stars
- Swim Drill - 73 - Stroke, Breathe, Kick, Glide Mantra
- Swim Drill - 74 - Glide Length, Glide Speed
- Swim Drill - 75 - Thread the Needle
Breaststroke Swimming : - Body Position Drill
Swim Drill - 51 - Streamline
THE PURPOSE OF THIS DRILL
- Eliminating drag
- Achieving an advantageous breaststroke glide position
- Feeling effective core tension and stability
HOW TO DO THIS DRILL
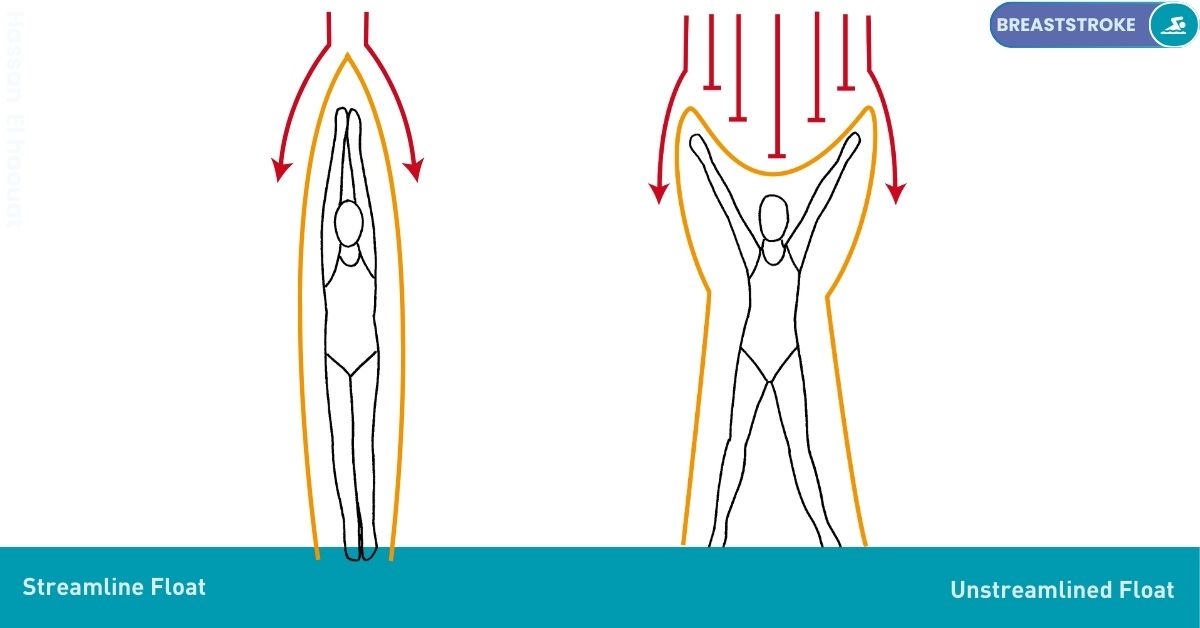
- Step 1: Position your feet wide apart on the wall and push off on your front still with your legs apart, arms extended but with your hands about thirty-six inches apart. You should be floating like an "X". With your face in the water, look forward. Float until you stop. Notice the distance you travelled.
- Step 2: Again push off the wall in the same "X" position, put this time, lower your chin and look at the bottom of the pool. Float until you stop. Notice that the distance you travelled is farther. Simply by eliminating the frontal resistance of your face being forward, you bump into less water, and move forward better.
- Step 3: Now push off the wall, with your legs apart, looking at the bottom of the pool, and this time clasp one hand over the other, and straighten your elbows so you are squeezing your ears between your arms. Your arms should be pointing forward, like an arrow. Float until you stop. Notice that the distance you travelled is even farther. By narrowing your leading edge, you bump into less water, moving forward better.
- Step 4: Now push off the wall, looking at the bottom of the pool, clasping one hand over the other, with straight elbows, squeezing your ears between your arms. This time position your legs closer for the push off, then when you leave the wall hold them together, thigh to ankle. Float until you stop. Notice that the distance you travelled is much farther. By reducing the total space you take up, you bump into less water, and move forward better.
- Step 5: Now push off the wall, looking at the bottom of the pool, clasping one hand over the other, with straight elbows, squeezing your ears between your arms, legs together, thigh to ankle. Engage your core, so that your spine becomes straight. Pull your belly button back toward your spine. Float until you stop. Notice that the distance you travelled is farther still. By creating a firm straight line with your body, you bump into the least water possible, and move through the water in the most streamlined manner. This is the glide or "home base" position for breaststroke.
Breaststroke Swimming : - Body Position Drill
Swim Drill - 52 - Rocking Drill
THE PURPOSE OF THIS DRILL
- Using a rocking motion for breaststroke
- Developing unified core action
- Understanding the purpose of rocking
HOW TO DO THIS DRILL
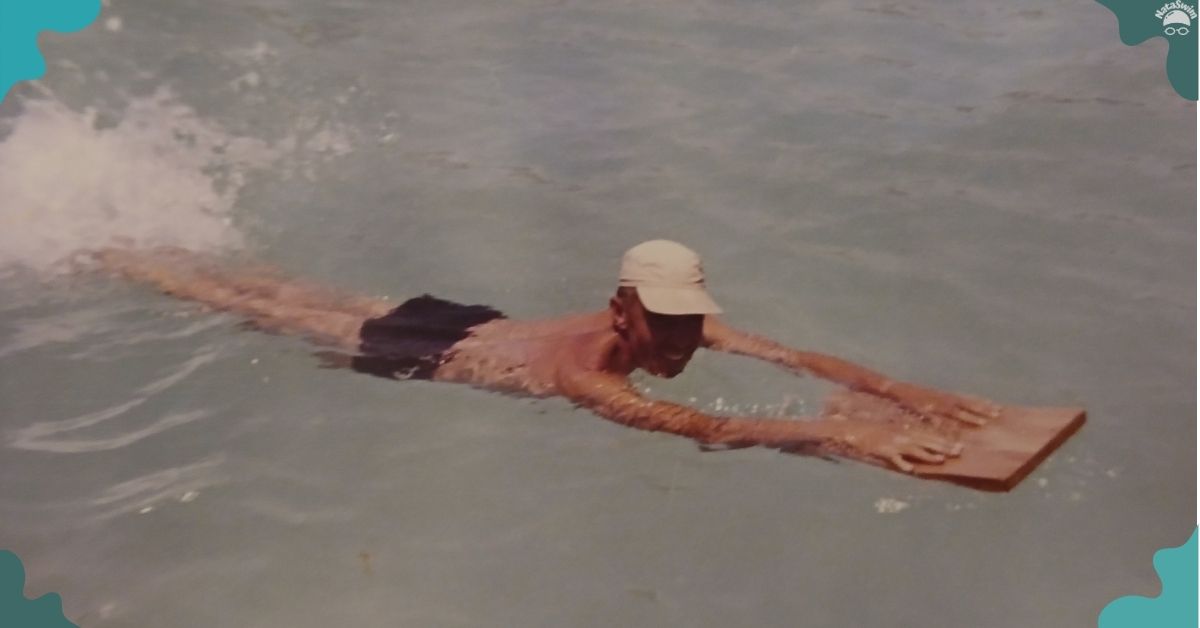
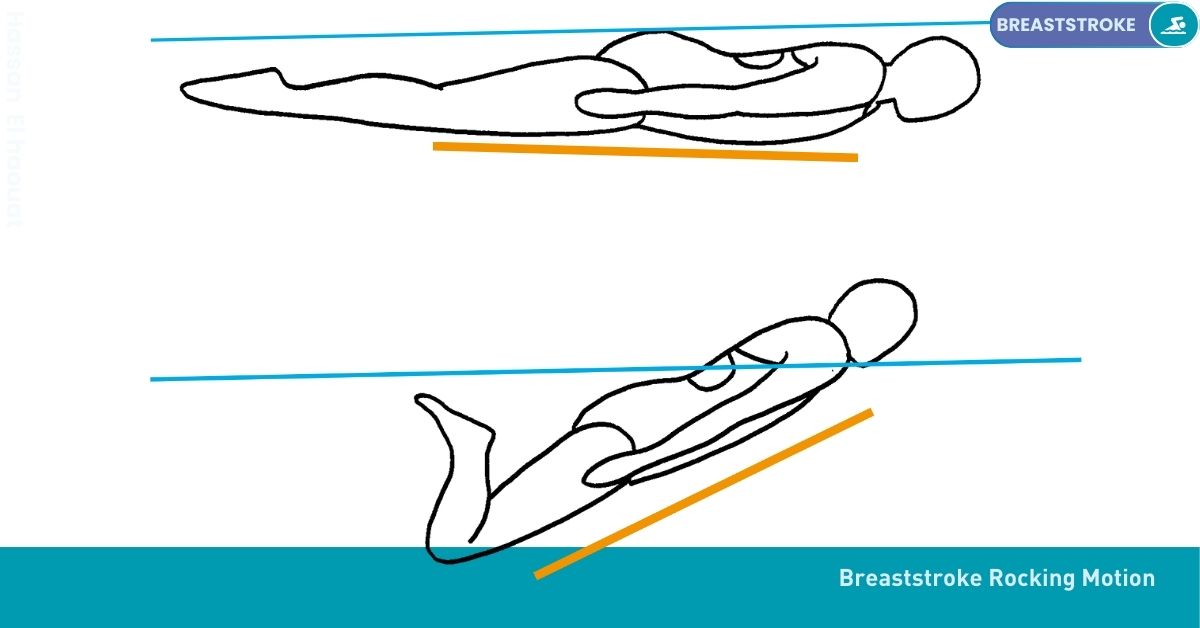
- Step 1: Float face down in the water, arms at your sides. Engage your core and straighten your spine. Achieve a "downhill" floating position by pressing your chest down into the water about three inches. Notice that your legs float higher. This resembles the body position during the glide phase of the breaststroke. This is one extreme of the rocking action of the stroke. Hold for five seconds.
- Step 2: Now, release your chest press as you draw your heels back toward your buttocks, bending at the knee. Keep your feet under the water. Feel your floating position change. Notice that without raising your chin, your head rises. Your knees should be the lowest point of your float. This resembles the body position when you are approaching the inhale and the power phase of the kick. It is the other extreme of the breaststroke rocking motion. Hold for five seconds.
- Step 3: Next, try it with forward momentum. Push off the wall with good force, face down, arms at your sides, core engaged, spine straight. Achieve the glide position immediately by pressing your chest down about three inches. While you are still moving forward, switch to breathing position by releasing your chest and drawing your heels back. Notice that your forward motion slows right away.
- Step 4: Again, push off the wall and press your chest down about three inches. Then switch to the breathing position, but this time, quickly shift again, so you are pressing your chest down in the water, your legs are straight, and you regain your glide position. Notice how you can overcome the slowing effect of the breathing position by returning to the advantageous glide position quickly. Try it again. Alternate floating chest down and chest up continuously for several seconds while still moving forward.
- Step 5: Now, push off the wall with your face down, arms at your sides, core engaged, and spine straight. Begin the rocking motion of the breaststroke, spending twice as much time in the glide position, as in the breathing position. Practice several times. Notice that by returning to the glide position more quickly, you can continue your forward momentum much longer.

Breaststroke Swimming : - Kick Drill
Swim Drill - 53 - Duck Feet
THE PURPOSE OF THIS DRILL
- Learning to use your feet as paddles
- Using ankle rotation to keep hold of the water
- Avoiding potential drag
HOW TO DO THIS DRILL
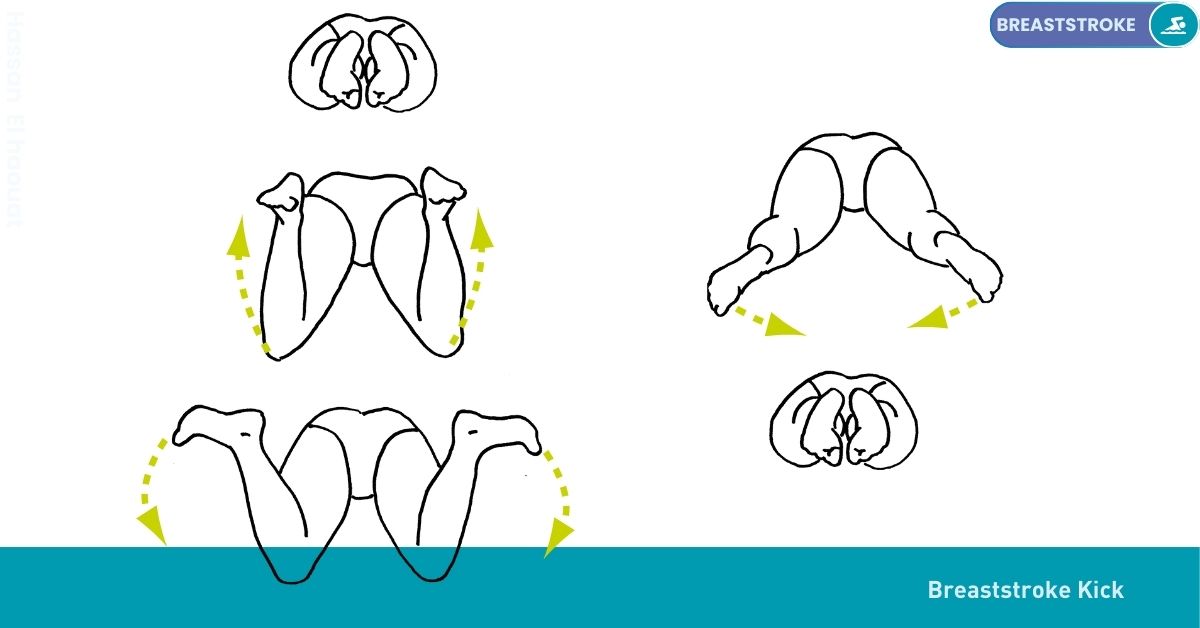
- Step 1: Observe a duck swimming in the water. Focus on its feet. They are a perfect swimming feet! They are wide and flexible, and very paddle-like. Looking closely at the kicking motion, although the duck kicks with alternating legs, the actual kicking motion is very similar to the breaststroke kick. Studying the motion of one foot, it shows a good example of how the human foot should move in the breaststroke kick. As the duck's foot prepares for the power phase of the kick, from front to back, it takes a flexed position, forming a right angle to the ankle. During the rounded sweep-back of the duck's kick, notice how the angle of the foot steadily changes, rotating from a flexed and pitched out starting position to a pointed, inwardly pitched position at the end of the kick. This changing foot position, produced by rotating the ankle, allows the duck to maintain pressure on the water most effectively with its foot at all stages of the kick, and create very effective forward motion.
- Step 2: Now observe the foot of the duck as it returns to the starting position for another kick. Notice that while the foot is pointed, it appears as it is retracted, reducing the size of the "paddle". It also moves more slowly than during the power phase. This is the recovery of the duck's kick. The duck's foot slides back to the starting position without applying pressure on the water.
- Step 3: Keeping the duck's kicking technique in mind, get in the water, at least waist deep, and stand facing the wall of the pool. Hold onto the wall with both hands, arms extended. Draw one foot up behind you, so your heel is close to your buttocks. It should be completely submerged, and remain that way throughout the kick. Flex your foot, creating a right angle at your ankle. Also pitch your toes outward.
- Step 4: From this position, press the bottom of your foot against the water. Notice the water resistance on the bottom of your foot when it is flexed. Trace a rounded line with your foot, outward and then inward, until your leg is straight. Try it again with more speed. In order keep your foot pressing against the water as it makes the rounded sweep, the position of your foot must steadily change. Rotate your foot from the ankle to maintain the feeling of water resistance on the bottom of your foot. Practice this several times, increasing speed.
- Step 5: When you have achieved steady resistance on the bottom of your foot from the point where your foot starts near your buttocks, through the rounded sweep, until your leg is straight, then try to mimic the duck's foot recovery. As you bring your foot back up to the starting point, position it so you feel little or no resistance. Slide it through the water smoothly and with less speed. Once it reaches the starting position, flex your foot again and pitch your toes out preparing for another power phase. Practice this several times. Then practice the whole kick, power phase and recovery.
- Step 6: Once you are able to feel a difference in the resistance between the power phase and the recovery, try doing the kick with both legs simultaneously. Holding the wall with one arm extended, place the other hand lower on the wall so you can brace yourself easily in a horizontal position. Keep your feet submerged throughout the kick. Your feet should move as mirror images to each other. Draw both heels back toward your buttocks. Focus on using your feet like paddles to engage the water throughout the power phase. Done correctly, by the end of the kick, you should have to tense your arms to prevent yourself from advancing toward the wall. Slide your feet gently back to the starting point, so you don't feel any pull away from the wall. Practice the breaststroke kick several times.
Breaststroke Swimming : - Kick Drill
Swim Drill - 54 - Breaststroke Kick on Your Back
THE PURPOSE OF THIS DRILL
- Developing a propulsive kick
- Avoiding folding at the hips
- Positioning your knees inside your feet
HOW TO DO THIS DRILL
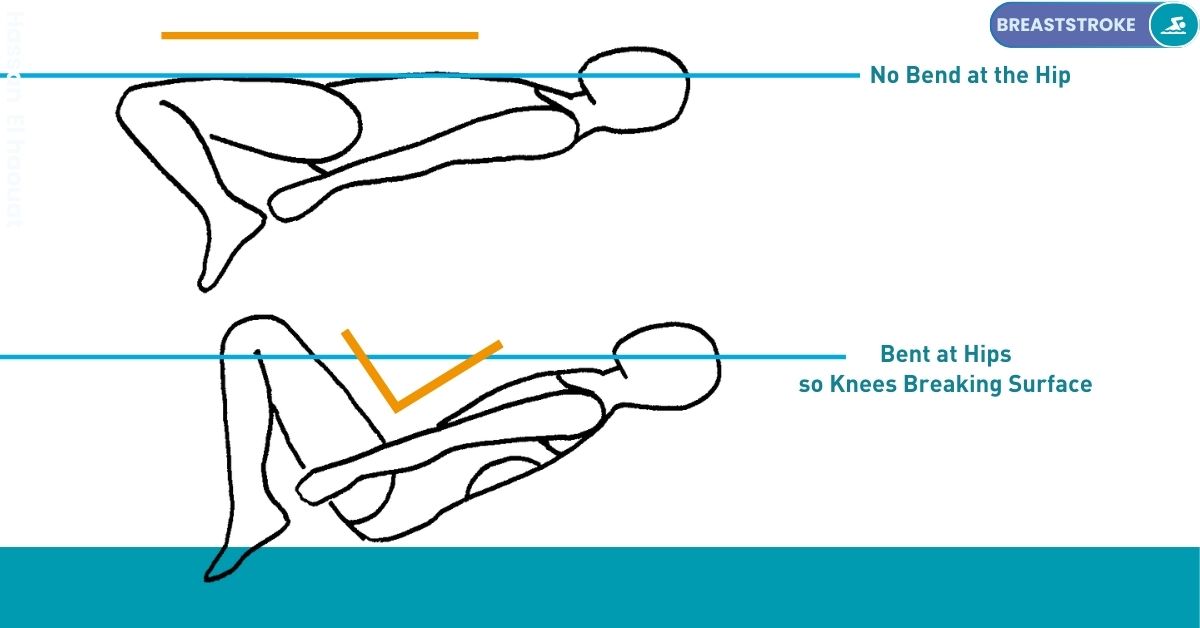
- Step 1: Lay on your back in the water, hands at your sides, and slightly behind you, fingertips extended. Begin to kick breaststroke kick on your back. Bring your heels back to the point that they touch your fingertips. Then with your feet flexed and pointed outward, use a quick motion to trace a rounded sweep with your feet, outward then inward, maintaining water pressure on the soles of your feet until your legs are straight. Repeat several times, drawing your heels back slowly and smoothly, then engaging the water with the soles of your feet and pressing firmly against the water until your legs are straight.
- Step 2: Now, continuing the same kicking action on your back, focus on your knees. They should remain under the surface of the water as your heels come back and touch your fingertips. If your knees are coming out of the water, it means you are folding at the hips. For many people, this causes a wave of water to wash over their face. If you were swimming on your front doing a breaststroke kick folded at the hips, that wave would work as drag, greatly slowing your forward motion. Try again, maintaining a straight line from your shoulders to your knees. Produce a knee bend by drawing your heels back, rather than by folding at the hips.
- Step 3: Still focusing on your knees, positioned under the surface of the water in a straight line from shoulder to knee, position them about shoulder width apart. As you draw your heels back to touch your fingertips, hold the position of your knees steady. Notice that with your knees held still, your feet will be farther apart than your knees when your fingertips touch your heels.
- Step 4: Continue your kick, holding your knees steady at shoulder width apart. Trace a rounded sweep with your feet, outward then inward, without your knees moving wider apart. Only at the very end of the kick, as your legs straighten do your knees also move, coming together as the feet also come together. Notice that with firm knees, your lower leg, ankle and foot are rotating around your knees as they sweep out and straighten. Practice again.
- Step 5: Once you are able to achieve a kick without folding at the hip, and you are able to maintain a stable knee position, try kicking with more force. You should be able to produce enough forward motion with each kick that you can glide in the straight leg position for three to five seconds before slowing down. Practice this several times.
Breaststroke Swimming : - Kick Drill
Swim Drill - 55 - Vertical Breaststroke Kick
THE PURPOSE OF THIS DRILL
- Developing a productive kick
- Using foot speed during the power phase
- Eliminating drag
HOW TO DO THIS DRILL
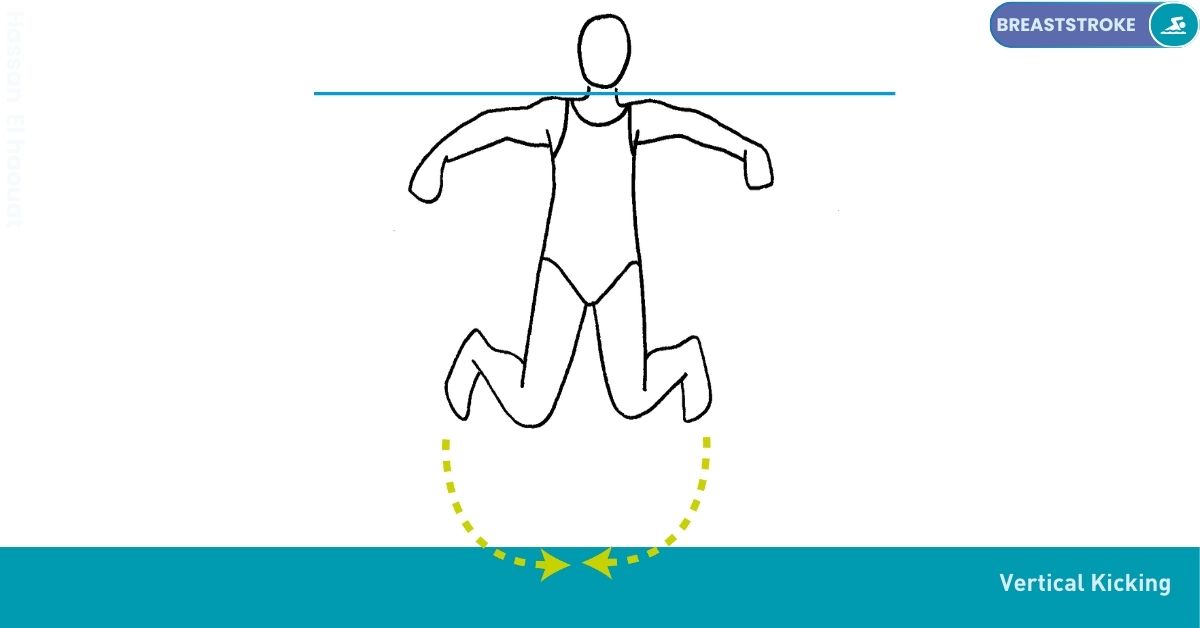
- Step 1: In water, at least as deep as you are tall, get into a vertical position. Begin a gentle sculling action (tracing side to side underwater figure eights with your hands) to keep your head above water.
- Step 2: To begin the power phase of the breaststroke kick, draw your heels back toward your buttocks. Use flexed feet, stable knees, and kick in a path that your feet rotate around your knees, without producing forward or backwards motion. Use a forceful and quick enough kick so that you bob upward with each kick as your legs straighten. Practice several times, with increasing foot speed.
- Step 3: Practice several times. While preparing for the power phase of the kick, avoid raising your knees toward your abdomen so that you don't pull yourself down underwater. Make sure your feet are in the flexed position before beginning the power phase of the kick.
- Step 4: Once you have achieved a productive vertical kick, stop the sculling action with your hands. Position your hands: left hand on right shoulder and right hand on left shoulder. Kick, keeping your head above water. Maintain for 30 seconds.
- Step 5: When you are able to keep your head up without the help of arm movements, try the advanced version of this drill: Position your arms so they extend side to side on the surface of the water. Now raise your hands out of the water, bending at a right angle at the elbow. Kick! Can you keep your head up for 30 seconds?
Breaststroke Swimming : - Kick Drill
Swim Drill - 56 - Heads Up Breaststroke Kick
THE PURPOSE OF THIS DRILL
- Using your senses to recognize a productive kick
- Observing momentum
- Practicing an effective kick
HOW TO DO THIS DRILL
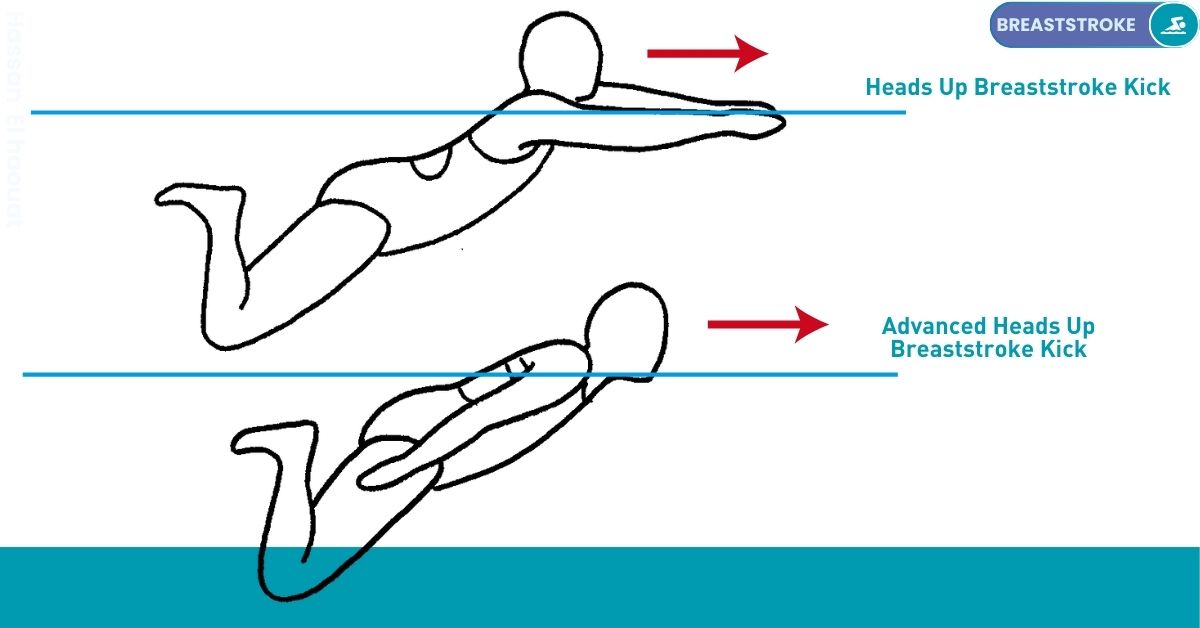
- Step 1: Push off the wall in a streamlined position, arms extended, clasping one hand over the other. Establish a stable hip position. With your head up, allow your chin to rest on the surface of the water. Begin kicking breaststroke kick, keeping your feet completely submerged throughout each kick.
- Step 2: Notice your movement. During the power phase of the kick, you should be able to see your kick producing forward momentum. During the recovery phase of the kick, you should notice no slowing, or movement in the reverse direction. Feel your feet working like paddles during the power phase, pressing on the water. Feel your feet during the recovery, gently slipping back to the starting point without pressing on the water. Listen to your kick. It should not make a sound during the power phase or recovery.
- Step 3: Continue kicking with your head up, chin on the water, arms extended to the far end of the pool, looking, listening and feeling. Practice for several lengths of the pool, resting at each end.
- Step 4: Once you are able to produce an effective heads up kick with your arms extended, try the advanced version of this drill. Kick another length, but this time put your arms at your sides, keeping your head up and chin on the surface of the water.
- Step 5: Notice that with your arms at your sides, you must use a faster kick, and one with greater force to keep your face above water. Use a forceful kick that gains speed throughout its path, and a gentle recovery, until you can also produce forward momentum for a glide with every kick without your face submerging. Practice for several lengths of the pool, resting at each end.
Breaststroke Swimming : - Arm Stroke Drill
Swim Drill - 57 - 3D Breaststroke Arms
THE PURPOSE OF THIS DRILL
- Getting the most out of the arm stroke
- Using an accelerating stroke
- Maintaining a compact stroke
HOW TO DO THIS DRILL
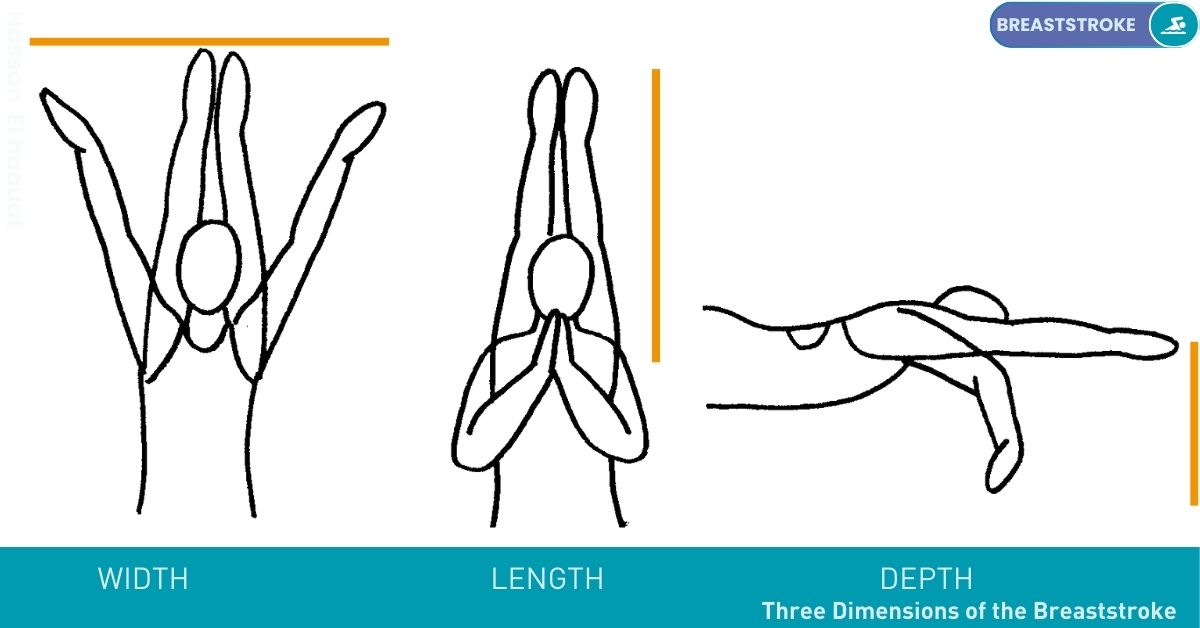
- Step 1: Push off the wall for breaststroke. Sweep outward until your hands are slightly outside your shoulders, forming a "Y". Your arms should be straight at this point in the stroke. This is the widest point in the breaststroke arm stroke. From there, sweep your hands inward until they meet under your chin. This is the narrowest point in the breaststroke arm stroke. Practice to the far end of the pool, identifying the wide and the narrow points of the stroke.
- Step 2: Again push off the wall for the breaststroke, arms extended. Sweep outward, with your fingertips just below the surface of the water. This is the shallowest point in the breaststroke arm stroke. From there, holding your elbows firm, sweep your hands down and inward, tracing a half circle until your hands meet in the middle, under your chin. This is the deepest point in the breaststroke arm stroke. Practice to the far end of the pool, identifying the shallow and the deep points of the stroke.
- Step 3: Again push off the wall for the breaststroke. Start the stroke with your arms completely extended. This is the longest point in the breaststroke arm stroke. Sweep outward, then inward. Your hands meet under your chin. This is the shortest point in the breaststroke arm stroke. Practice to the far end of the pool, identifying the long and the short points of the stroke.
- Step 4: Continue swimming breaststroke for several lengths of the pool, observing the three dimensional path of the stroke. Notice the complete area of the arm stroke, by feeling the widest and narrowest points, the shallowest and deepest points, and, the longest and shortest points.
Breaststroke Swimming : - Arm Stroke Drill
Swim Drill - 58 - Breaststroke Sculling
THE PURPOSE OF THIS DRILL
- Learning to use lateral strokes
- Holding on to the water
- Experiencing a high elbow scull
HOW TO DO THIS DRILL
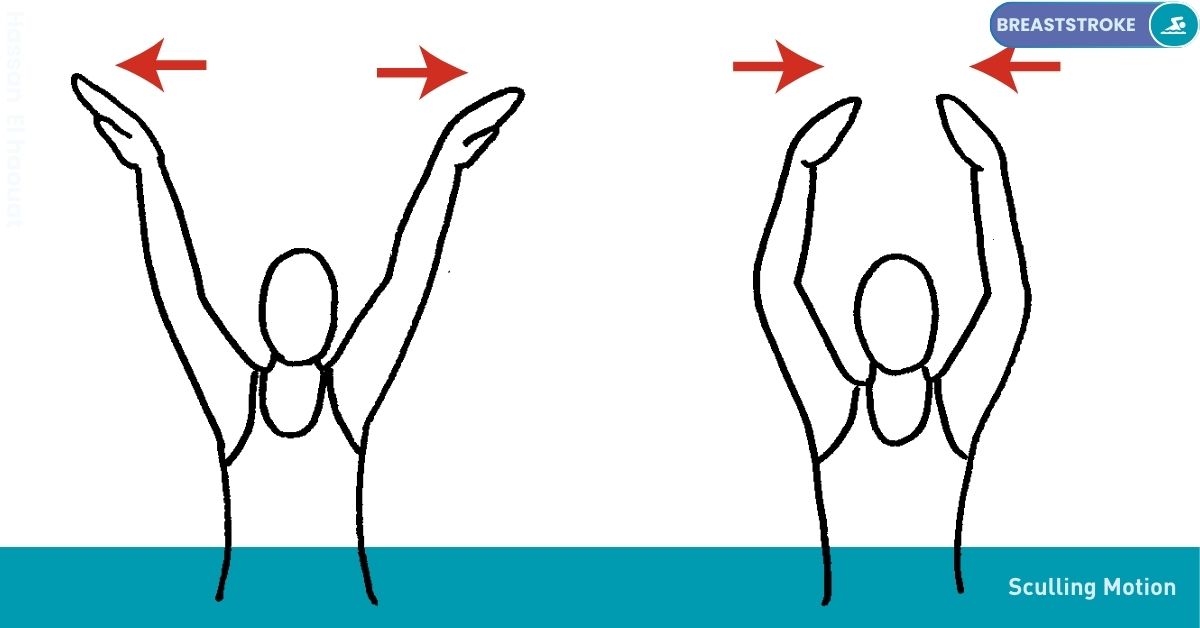
- Step 1: Push off the wall, arms extended, face in the water. Use core stability to maintain a good floating position. If necessary, use a gentle but continuous flutter kick. Keeping your hands completely submerged at least two inches under the surface of the water, begin a sculling action with your hands, maintaining firm wrists. Your hands should be tracing a mirror image of each other. Press the water outward with the palms of your hands, positioning your thumbs lower than your pinkies.
- Step 2: After pressing outward just wider than your shoulders, reverse your hand pitch so your thumbs are higher than your pinkies and press the water inward with the palms of your hands.
- Step 3: Before your hands meet, again switch the pitch of your hands to thumbs-down and press outward. Produce a continuous lateral sculling action for one minute. To breathe, press your chin forward gently.
- Step 4: Increase your hand speed, maintaining high elbows and firm wrists. Trace sideways figure eights with each hand. Practice until you feel you are holding onto the water in both directions, even as you change directions.
- Step 5: Without increasing the width, depth or length of your scull, and without adding or increasing kicking, attempt to create forward motion with your skull. Use your whole arm to trace your figure eights, maintaining firm wrists, and high elbows. Practice until you can move to the far end of the pool.
Breaststroke Swimming : - Arm Stroke Drill
Swim Drill - 59 - Half-stroke Breaststroke
THE PURPOSE OF THIS DRILL
- Learning to use compact strokes
- Using a quick stroke
- Eliminating drag
HOW TO DO THIS DRILL
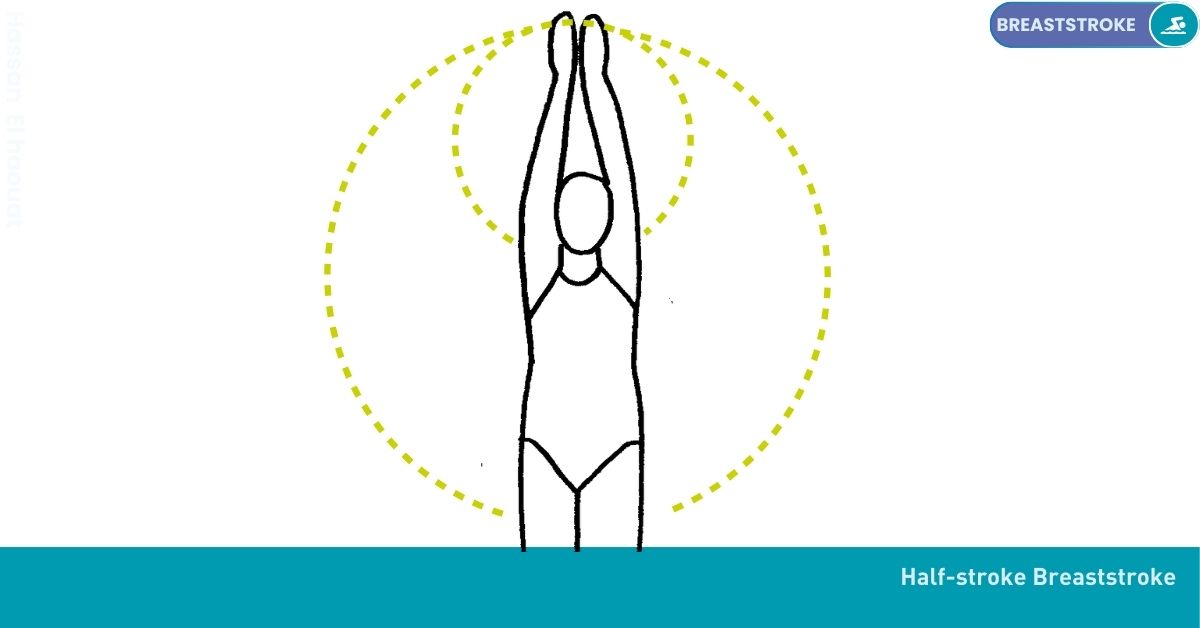
- Step 1: Push off the wall, preparing to do the breaststroke, arms extended, face in the water. Do four arm strokes with your face in the water, watching your hands as they sweep outward, then inward through the path of the stroke. Return your arms to the fully extended position between each stroke. Kick each time your arms approach straight.
- Step 2: Take a breath, then do four more strokes. Reduce the width of your arm stroke until your hands stay within your field of vision throughout the stroke. Still return your arms to the fully extended position between each stroke. Notice that a stroke with less width takes much less time to get your arms back to the extended start position.
- Step 3: After breathing, do four more strokes maintaining your reduced arm stroke width. Now, watch your hands as they sweep from shallow to deep through the path of the stroke. Again, return your arms to the fully extended position between each stroke. Kick as your arms approach straight.
- Step 4: Take a breath, then do four more strokes, reducing the depth of your stroke so that your hands remain within your field of vision throughout the stroke. Still return your arms to the fully extended position between each stroke. Notice that a stroke with less depth takes much less time and effort to get your arms back to the extended start position.
- Step 5: Practice the reduced stroke again. Make it compact and quick. It should feel like half a stroke. With your face in the water, your hands should remain easily within your sight throughout the arm stroke.
Breaststroke Swimming : - Arm Stroke Drill
Swim Drill - 60 - Corners Drill
THE PURPOSE OF THIS DRILL
- Accelerating into the insweep
- Producing lift without pushing down
- Holding onto the water
HOW TO DO THIS DRILL
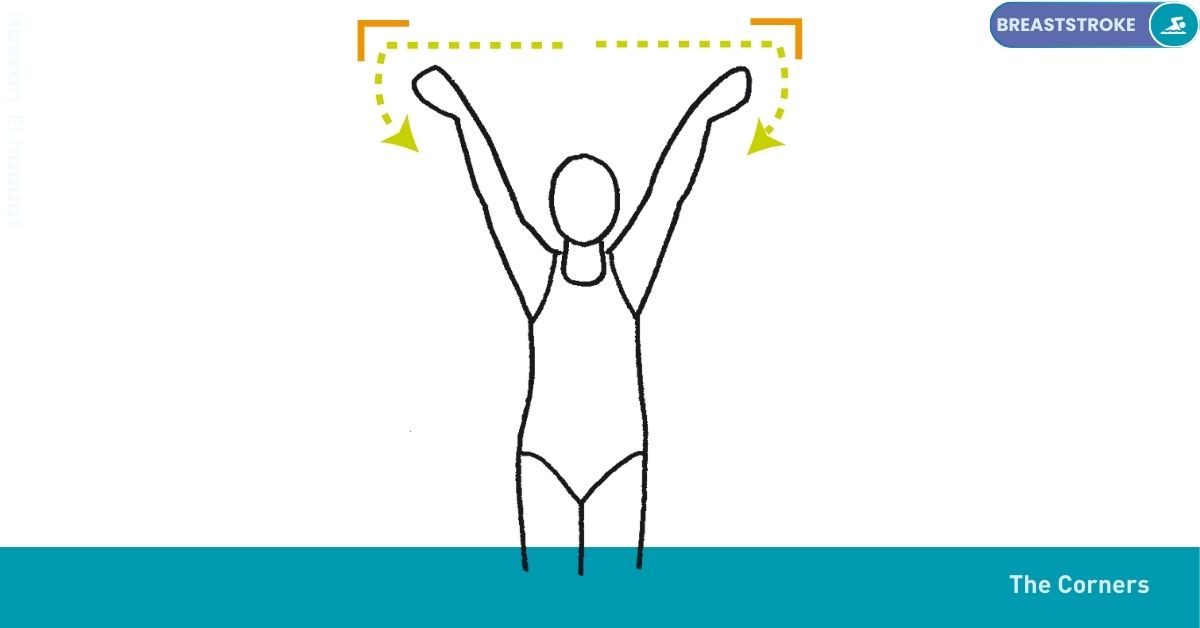
- Step 1: Push off the wall for the breaststroke, arms extended. Press your chest into the water, and use core tension and a straight spine to achieve a "downhill" float. Begin the breaststroke arm stroke, pressing outward with your thumbs low, then inward with your thumbs high. Keep your hands within your range of vision.
- Step 2: Do four or five quick strokes, holding on to the water throughout the entire path of the stroke, especially during the transition from outsweep to insweep. It is very important to maintain firm wrists and high elbows during this transition. It should feel like you are turning tight corners with each arm. It is important to feel that you are doing so with your whole arms, not just your hands. Upon arriving at these corners, gather speed for the insweep. Increase your speed as you round the corners. At the end of each insweep, when your hands come together in the middle, push them straight ahead to the extended position.
- Step 3: Notice that with a quick enough arm stroke, which accelerates at the corners, you feel the effects of lift, without ever pushing down on the water. Try it again. Increase the speed of your stroke so that you produce noticeable lift in your upper body as your hands transition from outsweep to insweep. Without altering your head position, your face will rise as you begin your quick insweep. Notice that if you maintain a firm core, when your upper body rises, your feet will drop just a bit. Use this opportunity, when your face is naturally at its highest out of the water to get a breath. Then return your face to the water as your hands approach the extended position. Press your chest downward.
- Step 4: Continue practicing your quick lateral arm stroke, accelerating at the corners to produce lift. Then, quickly return to the "downhill" position. Spend half as much time in the breathing position as in the glide position.
Breaststroke Swimming : - Arm Stroke Drill
Swim Drill - 61 - Hand Speed Drill
THE PURPOSE OF THIS DRILL
- Observing a compact arm stroke
- Using a quick arm stroke
- Holding on to the water
HOW TO DO THIS DRILL
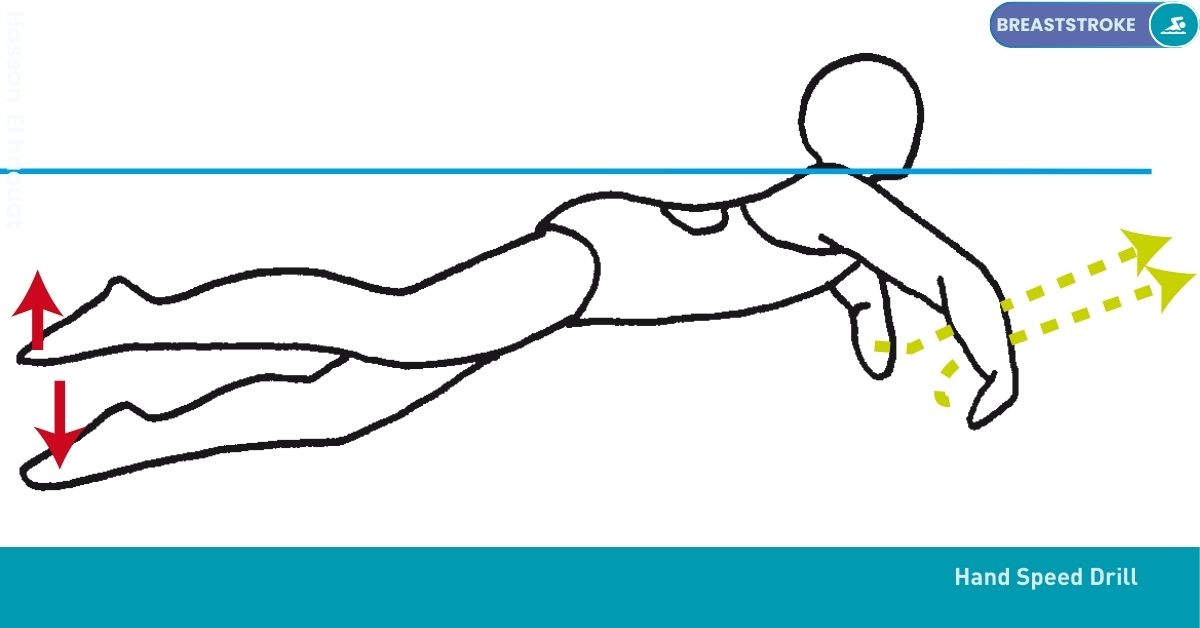
- Step 1: Push off the wall, arms extended, face forward out of the water, chin on the surface. Use core tension to maintain a good floating position. Begin doing the breaststroke arm stroke, accompanied by a very quick flutter kick. Look down at your hands just below the surface of the water as you do the breaststroke arm stroke. Keep the entire stroke within your range of vision.
- Step 2: Check for firm wrists and high elbows, especially at the corners. Practice until you feel you are holding on to the water in both directions. Start each new stroke from an extended arm position.
- Step 3: Still focusing on your hands, increase the rate of your arm stroke. Pick up speed through the corners and into the insweep. Practice until your arms are accelerating through the entire stroke. Your stroke should be moving fast enough so that you can clap your hands under your chin at the end of the insweep. Then, quickly return your arms to the starting point, fully extended.
- Step 4: Now focus on your quick flutter kick. Kick at a rate of at least one down-beat per second. Try to accomplish an entire arm stroke during three to four kicks. Watch your hands, checking that you are maintaining a compact stroke, firm wrists and high elbows, and accelerating into the insweep. When your hands return to the extended position, hold them there for six kicks before trying to do another complete arm stroke within the time of three to four kicks.
- Step 5: Continue practicing to the far end of the pool. Focus on the speed of your hands throughout each arm stroke, then return to the extended position and hold. Start each arm stroke from this still position, then attempt to go from zero to sixty within the time of three or four kicks.
Breaststroke Swimming : - Arm Stroke Drill
Swim Drill - 62 - Breaststroke with Fists
THE PURPOSE OF THIS DRILL
- Learning to feel the water with the forearm
- Understanding the changing elbow position
- Appreciating the role of the hand
HOW TO DO THIS DRILL
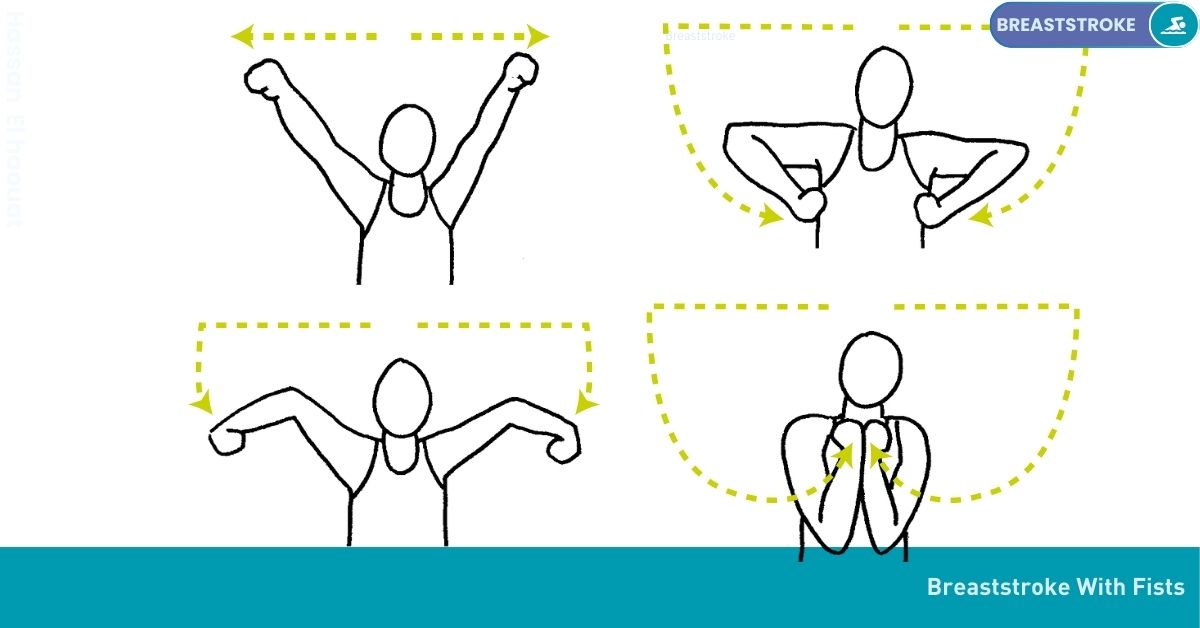
- Step 1: Push off the wall as if preparing to do the regular breaststroke. Before the first stroke, form closed fists with each hand.
- Step 2: Start the arm stroke. At first it may seem impossible to make forward progress without the paddles of your open hands. Stroke quickly, purposely positioning your arms so that the inside of your forearms press against the water throughout the arm stroke. This will require you to initiate your stroke with your arms extended, but elbows rotated high, then to maintain firm elbows while your fists sweep outward.
- Step 3: Accelerate the stroke maintaining high elbows as you turn the corners with your fists. Keep the stroke speed quick. Adapt your stroke to the handless paddle. When your hands approach the end of the insweep, then allow your elbows to fold inward in front of your rib cage, still pressing against the water with your forearms. Practice the change of elbow position again, letting your elbows come inward, but not back like chicken wings, and only at the end of the insweep. Continue to the far end of the pool.
- Step 4: Now push off again, this time with open hands. Swim regular breaststroke, using your hands as well as your forearms to press against the water in both directions. Do a quick, accelerating stroke. Keep high elbows until the last part of the insweep.
- Step 5: Continue alternating lengths of fists and open hands until you are feeling the water with a paddle that includes both your hand and your forearm.
Breaststroke Swimming : - Recovery Drill
Swim Drill - 63 - Growing Your Recovery
THE PURPOSE OF THIS DRILL
- Achieving the longest recovery
- Using your elbows to extend recovery
- Using your chest to extend recovery
HOW TO DO THIS DRILL
- Step 1: Stand in waist deep water, facing the pool wall. Bow forward so that your chin is on the surface the water. Look down and forward, preparing to watch your breaststroke arm stroke and recovery. Extend your arms in front of you so your fingertips touch the wall. Your hands should be slightly submerged in the water. Now, begin the arm stroke, compact, quick through the corners, maintaining firm wrists throughout, and high elbows until the last part of the insweep. When your hands finish the insweep, return them to the extended position, fingertips touching the wall in front of you.
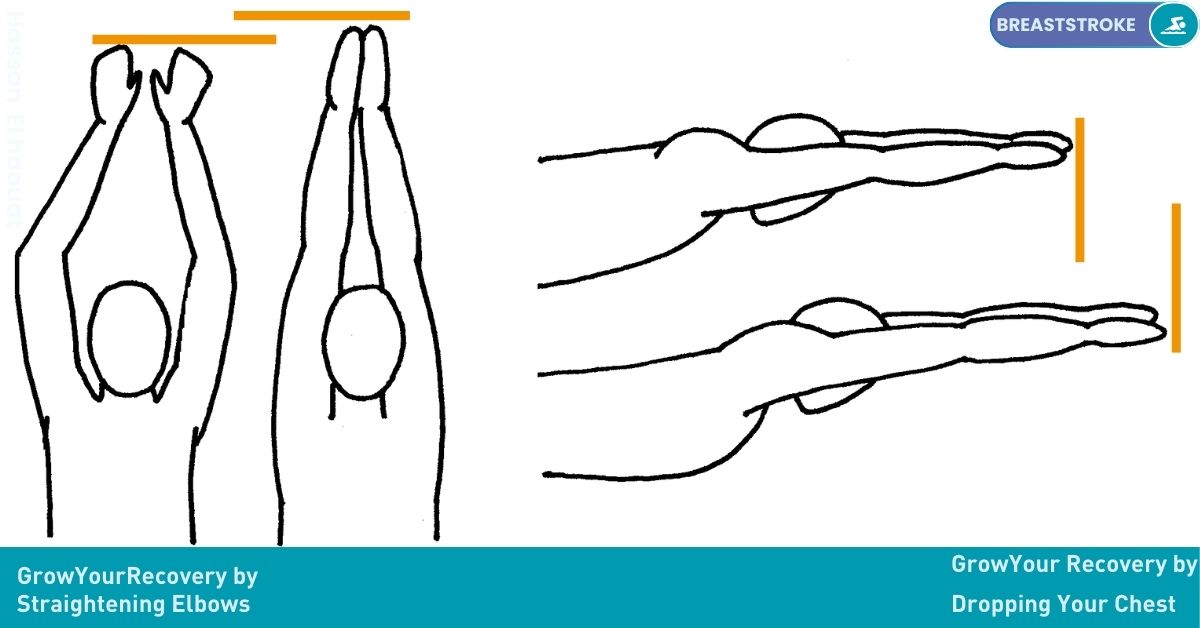
- Step 2: Take one step back – the length of your foot. Maintaining your chin on the surface of the water, do another breaststroke arm stroke, compact, quick through the corners, firm wrists throughout, high elbows until the last part of the insweep. At the end of the insweep, form a point with the fingertips of both hands, and drive your hands and elbows forward with speed. As your hands reach toward the wall, bring your forearms as close together as possible. Your arms should form a long arrowhead, from hands to shoulders. Notice that simply by straightening your arms more and creating a narrow leading edge with your hands, forearms and elbows, you have increased the length of your recovery, and are able to touch the wall.
- Step 3: Take another step back – the length of your foot. With your chin still on the surface of the water, do another breaststroke arm stroke, compact, quick at the corners, firm wrists, high elbows. At the end of the insweep, with your fingertips together and pointed forward, drive your hands and elbows forward with speed, narrowing the space between your forearms as you reach. Before your hands have reached full extension, drop your chest down and forward into the water as you reach for the wall. Notice that using your chest in the recovery action, you have increased the length of your recovery even more, and are able to touch the wall.
- Step 4: Now practice growing your recovery while swimming. Push off the wall face down, achieving a firm core and good floating position. Begin the breaststroke arm stroke. As your hands finish the insweep, return your arms to the front extended position, making a tight arrow with your arms. Drive your hands and elbows forward, bringing your forearms as close together as you can. With your arms forming a narrow leading edge, drop your chest down into the water. Do a breaststroke kick as your chest drops. Feel your body move forward in a streamlined glide. Hold that position for three to five seconds before starting another stroke. Continue to the far end of the pool.
Breaststroke Swimming : - Recovery Drill
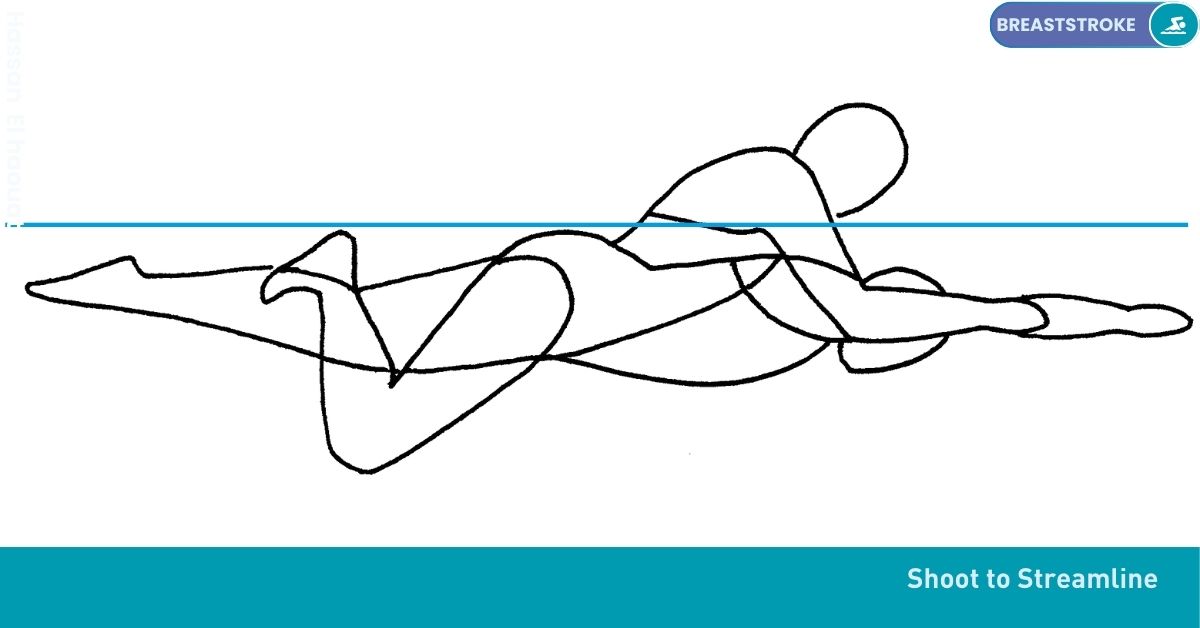
Swim Drill - 64 - Shoot to Streamline
THE PURPOSE OF THIS DRILL
- Learning to accelerate into the recovery
- Recovering with the rocking motion of the stroke
- Eliminating any pause between insweep and recovery
HOW TO DO THIS DRILL
- Step 1: Push off the wall, preparing to do the breaststroke, your arms extended fully in front of you, forming the point of an arrow from your hands to your shoulders. Achieve a "downhill" floating position. Begin a compact arm stroke, that is quick through the corners.
- Step 2: Maintain firm wrists throughout the stroke, and high elbows until the last part of the insweep, when your elbows fold inward in front of your rib cage. As your elbows fold in, notice that your hands come together in a sort of praying position. This is the breaststroke breathing position, a necessary but drag-producing point in the stroke.
- Step 3: Getting back to the "downhill" position quickly is crucial in retaining your hard-earned forward momentum. To achieve this, the recovery must continue the forward motion of the breaststroke, avoiding any pause after the insweep. From the "praying position", shoot your hands and elbows forward at lightning speed, with your forearms close together as you drop your chest and head down forward. Kick when your arms are in mid-recovery. Glide for three to five seconds in a fully streamlined position.
- Step 4: Do another stroke. Use a quick outsweep, and a quicker insweep. Make the recovery quickest of all. Do it again, accelerating through the entire stroke, then shooting your arms forward in the recovery. Notice that the narrower your recovery is, the faster it cuts through the water. Notice too, that by eliminating any pause in the "praying position", the recovering arms add to the forward momentum of the arm stroke.
- Step 5: Continue practicing the narrowest recovery possible, eliminating any stall between the insweep and the recovery. Keep practicing until your arm stroke and recovery have become one continuous, accelerating action. Catch the forward momentum of the stroke and shoot to the streamline. Glide for three to five seconds after each recovery.
Breaststroke Swimming : - Recovery Drill
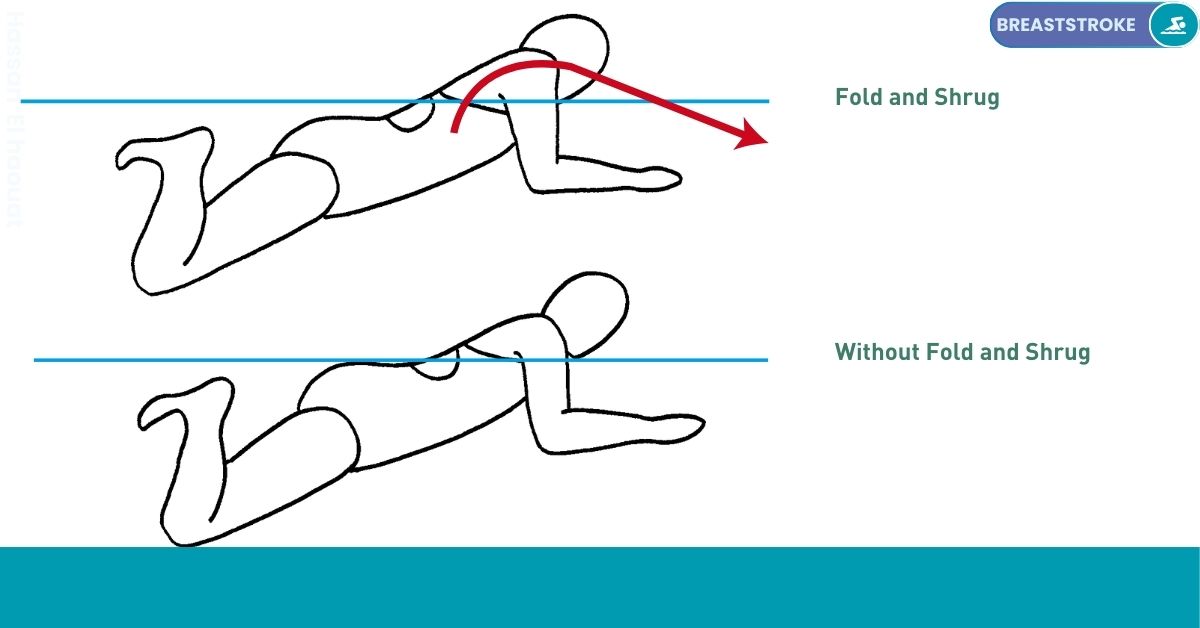
Swim Drill - 65 - Fold and Shrug
THE PURPOSE OF THIS DRILL
- Adding speed to the recovery
- Increasing momentum into the glide
- Learning to rest after the recovery
HOW TO DO THIS DRILL
- Step 1: Push off the wall preparing to swim breaststroke, arms extended. Achieve the "downhill" floating position. Begin your arm stroke, sweeping out, then accelerate around the corners, and in towards the middle to the "praying position" before recovery. This is also the point in the stroke when you draw your heels up toward your buttocks, preparing to start the power phase of your kick. In this position, your head and chest should be higher than your hips. You have a brief window of opportunity for breathing between the corners and the praying position.
- Step 2: As your elbows fold quickly inward to the "praying position", shrug your shoulders up. Then, as you transition to your quick, narrow recovery, shrug your shoulders forward and down. Notice that with this shoulder shrug, your upper body becomes more involved in the recovery. Kick as your arms approach the streamlined position. Glide and rest for three to five seconds.
- Step 3: Do another stroke. Accelerate through the outsweep corners and insweep. Fold your elbow in at the end of the insweep and shrug your shoulders up, then forward and down into the recovery. Notice that the shrug helps keep your momentum going through the "praying position", where a disadvantageous pause often occurs. As you shoot your hands and forearms forward, and drop your chest down and forward, notice too that your recovery carries more speed. Kick as your arms approach the streamlined position. Glide and rest for three to five seconds.
- Step 4: Do another stroke. Quick outsweep, turn the corners and accelerate into the insweep. Approach the "praying position and shrug your shoulders up as your elbows fold in front of your chest, then down and forward giving more speed to the recovery. Notice that you are able to achieve a greater "downhill" streamline with the shrug helping to shift your weight forward. Glide and rest for three to five seconds.
- Step 5: Continue to practice for several lengths of the pool. Sweep out, then in. Fold and shrug. Feel the momentum of the stroke follow your arms into their recovery and glide.
Breaststroke Swimming : - Breathing Drill
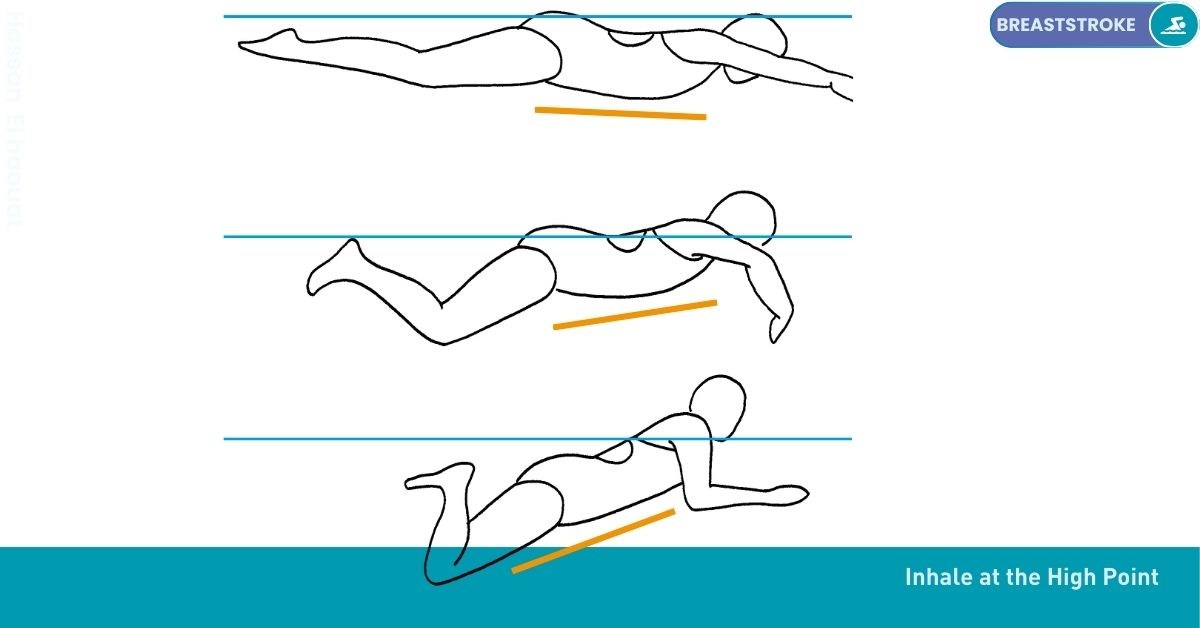
Swim Drill - 66 - Inhale at the High Point
THE PURPOSE OF THIS DRILL
- Learning the correct timing of the inhale
- Breathing with the line of the stroke
- Feeling lift
HOW TO DO THIS DRILL
- Step 1: Push off the wall preparing to swim breaststroke, arms extended. Achieve the "downhill" floating position. Begin your arm stroke, sweeping out, maintaining firm wrists and high elbows. Hold on to the water as you accelerate into the corners, maintaining a firm spine all the way through your neck. As your hands round the corners, preparing to sweep inward quickly, feel your body position change, and your upper body rise. Notice that without raising your chin, your mouth clears the water. Use this opportunity to inhale. As you recover and kick, notice that you regain the "downhill" position, and your face returns to the water.
- Step 2: Do another stroke. Sweep your hands outward and into the corners. As your hands change directions at the corners, feel the lift produced for your head and upper body. Your breathing window occurs when your mouth clears the water, through the high point in the stroke, near the praying position. When you transition into the recovery, and back to the "downhill" position, allow your face to drop into the water with the rest of your upper body as you kick.
- Step 3: Continue stroking. Allow your face to rise with each stroke cycle, as your stroke produces lift. Inhale at the high point in the stroke until your face returns to the water as you kick, with the forward line of the recovery.
- Step 4: Continue practicing until you achieve your inhale as your face naturally rises to its high point. Then, allow your face to return to the water without creating any pause in the stroke.
Breaststroke Swimming : - Breathing Drill
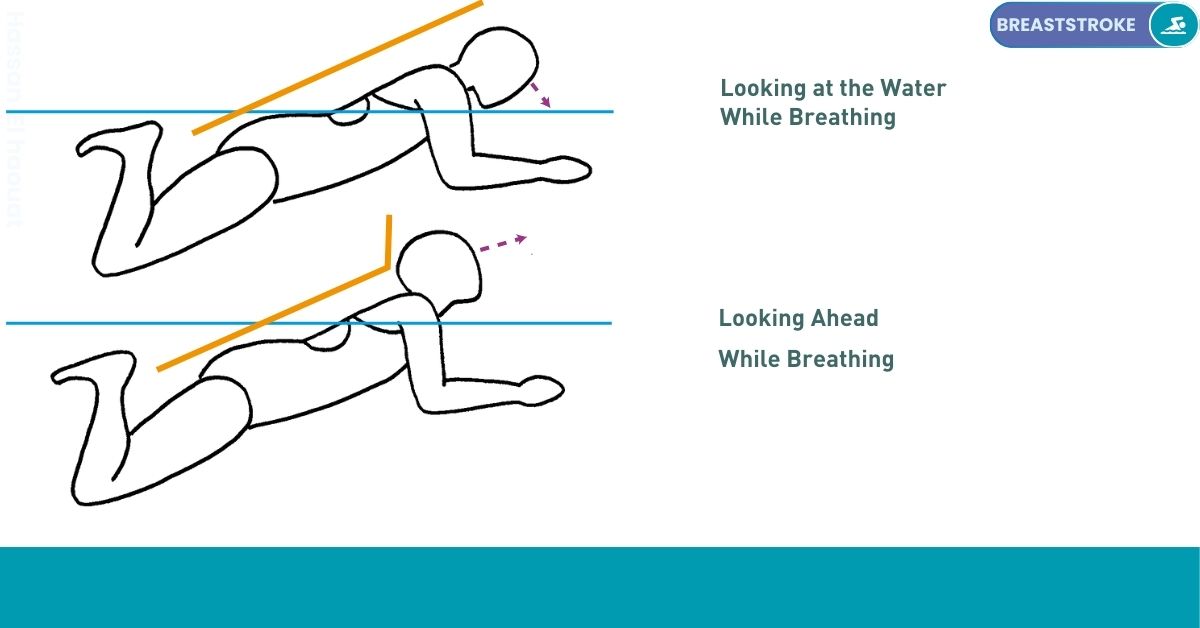
Swim Drill - 67 - Eyes on the Water
THE PURPOSE OF THIS DRILL
- Maintaining a stable head position
- Breathing with the line of the stroke
- Avoiding a nodding breathing style
HOW TO DO THIS DRILL
- Step 1: Push off the wall preparing to swim breaststroke. Achieve the "downhill" floating position, arms extended. Focus on maintaining a straight spine, from your hips through your neck. You should be looking at the bottom of the pool, not forward. Begin your arm stroke, sweeping out, and holding on to the water as you accelerate into the corners. As your hands move quickly round the corners, and you feel lift, allow your face to rise, focusing your eyes down at the water right in front of you the whole time. Inhale. Still maintaining your firm spine, return your face to the water as you recover and kick. Exhale.
- Step 2: Do another stroke. Inhale at the corners, looking at the water directly in front of you. As you finish your inhale, you should be able to see your hands move into the recovery. You should not be able to see the far end of the pool. As you kick, your face should drop down between your arms, and without changing your chin position, you should again be looking at the bottom of the pool as you exhale.
- Step 3: Continue stroking, maintaining a straight spine line through your neck. Avoid any nodding action as you breathe with each stroke. As your face rises to inhale, keep your eyes on the water right in front of you. Watch your hands move into the recovery. Regain your "downhill" position as you kick, letting your face return to the water without any independent head movement. Exhale and glide, looking at the bottom of the pool.
- Step 4: Practice to the far end of the pool, maintaining a stable head position, looking down at the water during breathing, and at the bottom of the pool during the glide.
Breaststroke Swimming : - Breathing Drill
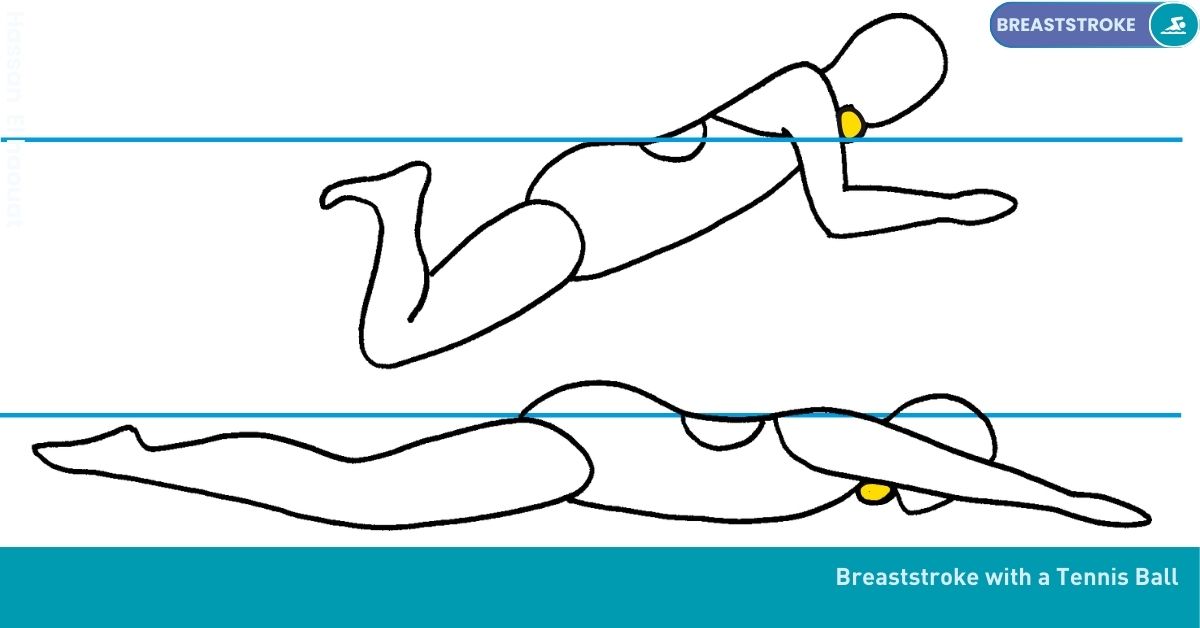
Swim Drill - 68 - Tennis Ball Drill
THE PURPOSE OF THIS DRILL
- Maintaining a stable head position
- Breathing with the lift of the stroke
- Achieving lift by dropping the hips
HOW TO DO THIS DRILL
- Step 1: Place a tennis ball under your chin and hold it there, maintaining a straight spine all the way up through your neck. This will require you to adjust the position of the tennis ball out from your throat, holding on to it with the point of your chin. Check in a mirror to insure your spine-line is not compromised.
- Step 2: Push off the wall preparing to swim breaststroke, holding the tennis ball with your chin. Achieve the "downhill" floating position, arms extended. In order to avoid dropping the tennis ball, look at the bottom of the pool. Begin your arm stroke, sweeping out, and accelerate into the corners. As your hands quickly round the corners and you achieve lift, inhale without dropping the tennis ball. Return your face to the water as you recover and kick. Exhale.
- Step 3: Do another stroke. Accelerate your arm stroke to achieve lift. Maintaining a firm hip position, draw your heels back toward your buttocks, and breathe when your head is naturally at the highest point in the stroke. Hold on to the tennis ball and inhale from the corners through the praying position. As you recover and kick, press your chest down, allowing your face to return to the water without dropping the tennis ball.
- Step 4: Once you have succeeded in doing a stroke without dropping the tennis ball, try three strokes in a row. Maintain stable hips and a straight spine-line through your neck. Use an accelerating arm stroke as you draw your heels back to achieve lift to inhale. Regain your "downhill" position as your recover and kick, looking down at the water and pressing your chest down for the glide.
- Step 5: Repeat this drill over several practices, until you are able to hold on to the tennis ball for an entire length of the pool.
Breaststroke Swimming : - Leverage Drill
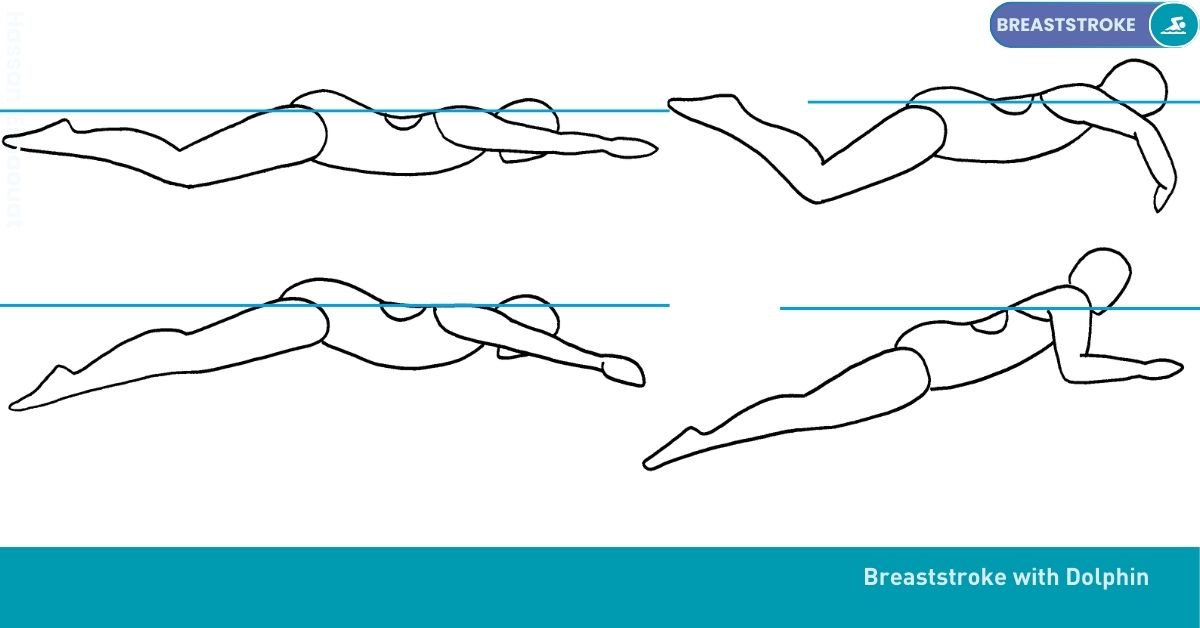
Swim Drill - 69 - Breaststroke with Dolphin
THE PURPOSE OF THIS DRILL
- Developing a productive rocking motion
- Maintaining a firm core
- Developing a rhythmic stroke
HOW TO DO THIS DRILL
- Step 1: Push off the wall preparing to swim breaststroke, arms extended, looking at the bottom of the pool. Maintaining a firm core, do six good full-body dolphin kicks. Avoid over-bending at the knee, and allow each kick to whip down from high in your body down to your feet. As you move through the water, notice how the dolphin action positions your body similar to the rocking motion of the breaststroke.
- Step 2: After six kicks, add the breaststroke arm stroke. Sweep out toward the corners as you snap your feet downward. The combined actions of your quick insweep and the downbeat of the dolphin should enable you to feel lift at this point, so you are able to achieve your inhale.
- Step 3: Without any pause in your arm stroke, finish your insweep and kick again as you shoot through the recovery. The combined action of a quick, narrow recovery, and the downbeat of the dolphin, should enable you to regain your "downhill" position.
- Step 4: Do another stroke. Kick down as your hands approach their widest point, and down again as your hands go into the fast recovery.
- Step 5: Do several strokes in a row. Use a rhythmic dolphin, and produce two evenly spaced down-beats to each arm stroke. One kick should give you lift to achieve breathing. The other should add to the speed of your recovery, so you achieve a productive glide.
- Step 4: Practice more until you can feel a rhythmic rocking motion that assists the other actions of the stroke.
Breaststroke Swimming : - Leverage Drill
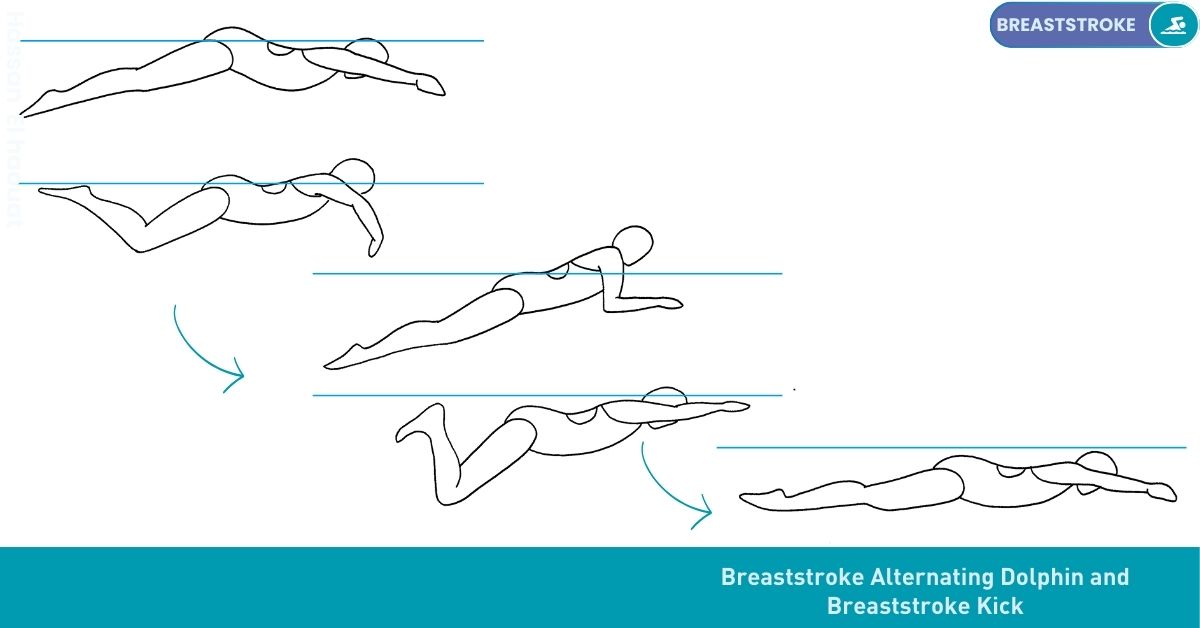
Swim Drill - 70 - Breaststroke Alternating Dolphin and Breaststroke Kick
THE PURPOSE OF THIS DRILL
- Using dolphin action in the breaststroke
- Transferring power through the rocking action of the stroke
- Practicing a productive rocking action
HOW TO DO THIS DRILL
- Step 1: Push off the wall, preparing to swim breaststroke. Achieve a straight spine and streamlined position. Begin the breaststroke arm stroke, sweeping out to the corners. Inhale with the insweep. Do one good full-body dolphin at the corners, and another one as you shoot your hands forward into a narrow, streamlined recovery. Glide.
- Step 2: Begin the next arm stroke. Sweep your hands out, round the corners and inhale as you do the insweep. This time, do one good breaststroke kick as you shoot your hands forward into a narrow, streamlined recovery. Glide.
- Step 3: Continue swimming breaststroke alternating dolphin and breaststroke kick. Accelerate your arm stroke so the insweep merges seamlessly into the recovery. Your hands should arrive in the streamlined position before the kick finishes. Notice that by doing so you achieve a good "downhill" streamline, and productive glide with both kinds of kick. Notice too that the rocking motion of the stroke works the same with both kicks.
- Step 4: Keep swimming breaststroke alternating dolphin and breaststroke kick. On the stroke with breaststroke kick, there is one arm stroke and one kick per stroke. On the stroke with dolphin kick, there is one arm stroke to two kicks. Notice, though, that when doing the stroke with the breaststroke kick, a dolphin-like down-beat becomes apparent in the hips, as you transition to recovery.
- Step 5: Keep practicing, allowing the rocking motion of the stroke to transfer power through your body, with dolphin as well as with breaststroke kick. Once you are producing good glide momentum with both dolphin and breaststroke kick, alternate laps of the drill and regular breaststroke. Feel the rocking motion transfer power to the rest of the body like with the dolphin.
Breaststroke Swimming : - Leverage Drill
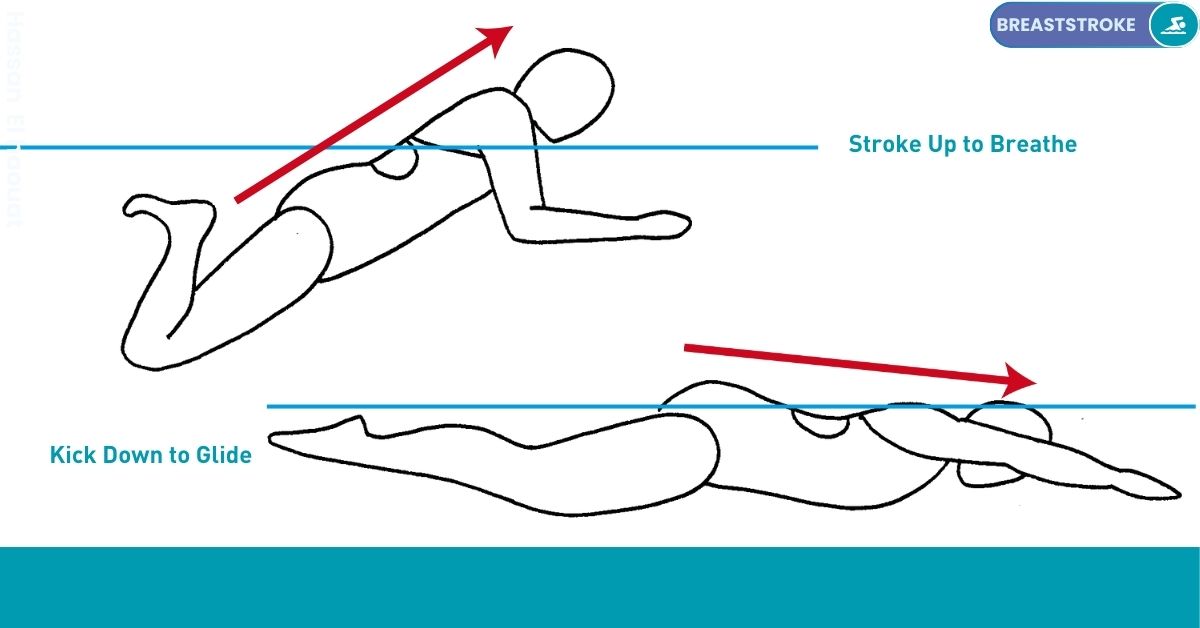
Swim Drill - 71 - Stroke Up to Breathe, Kick Down to Glide
THE PURPOSE OF THIS DRILL
- Feeling a productive rocking motion
- Maintaining the forward line of the stroke
- Avoiding flat breaststroke
HOW TO DO THIS DRILL
- Step 1: Push off the wall preparing to swim breaststroke, arms extended, looking at the bottom of the pool. Maintain a firm spine and achieve a "downhill" floating position by pressing your chest downward. Begin your arm stroke, sweeping out and into the corners. Allow your chest to rise as you round the corners, and as you accelerate the insweep, feel your face clear the water. Use this part of the stroke, from the corners through the insweep to inhale as you move forward.
- Step 2: As you transition to the recovery, your heels should be in a position close to your buttocks preparing for the power phase of the kick. When your hands pass your face during the recovery, kick with force, and feel your head and upper body return to the water. Use this power phase of the kick to achieve a productive glide. Hold for three to five seconds.
- Step 3: Do another stroke. Feel your body achieve the breathing position during your arm stroke. Feel your body position change back to the "downhill" position as you kick. Notice the absence of a flat floating position.
- Step 4: Do several strokes in a row. Stroke up to breathe, kick down to glide, all the time moving forward. Practice until you are able to achieve a quick inhale with your arm stroke, and a productive glide following your kick, spending twice as much time in the "downhill" position as in the breathing position.
Breaststroke Swimming : - Coordination Drill
Swim Drill - 72 - No Stars
THE PURPOSE OF THIS DRILL
- Using the most efficient breaststroke timing
- Avoiding drag
- Using the arm then the legs
HOW TO DO THIS DRILL
- Step 1: Push off the wall for the breaststroke, arms extended. Look at the bottom of the pool and achieve a straight spine. Notice how well you move through the water in this narrow, streamlined position.
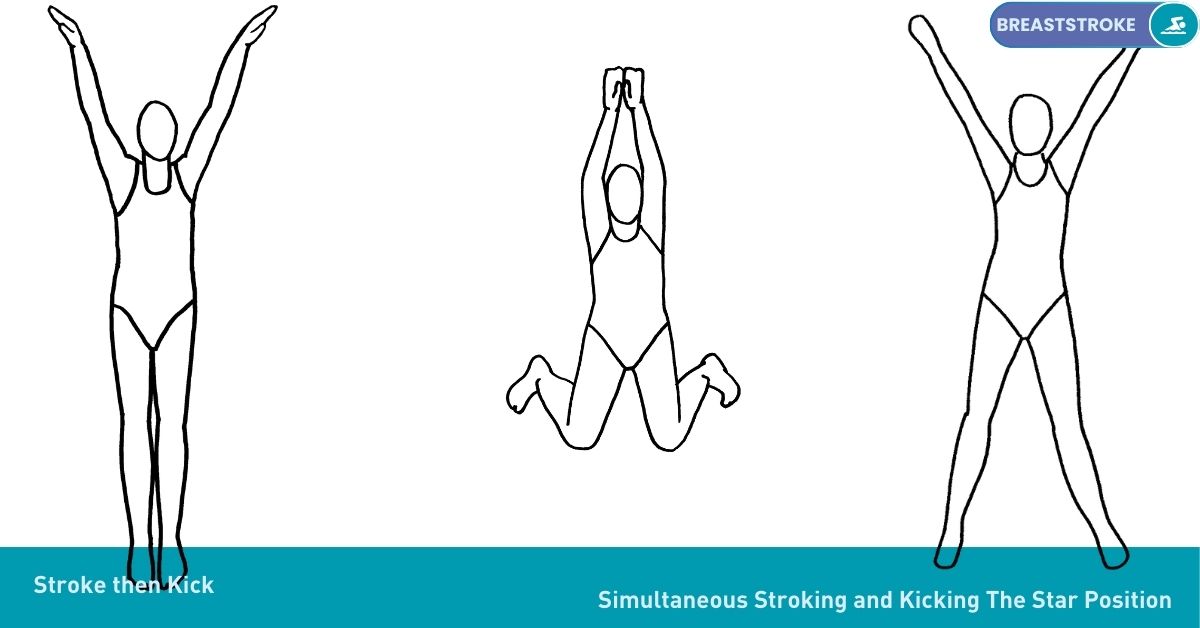
- Step 2: Begin to swim breaststroke to the far end of the pool. Use a quick stroke tempo with both your arms and your legs. After several strokes, freeze at the point in the stroke when your hands are at their widest. Notice where your feet are. They should be at their narrowest point.
- Step 3: Continue swimming breaststroke, and resume your quick stroke tempo. After several strokes, freeze at the point when your feet are at their widest. Notice where your hands are. They should be at their narrowest point.
- Step 4: If your hands and feet are wide at the same time, this puts you in the star position, the most disadvantageous way to move through the water. The star position is achieved when your arms and legs are in their power phase at the same time. In this position, the arm and the leg action cancel each other out, and you produce little or no forward motion. Swim breaststroke again, checking for the star position.
- Step 5: To avoid the star position, your kick must follow your arm stroke with very little overlap. Begin the power phase of the legs only when your arms are well into the recovery. Try it. Push off the wall for the breaststroke. Sweep your hands out toward the corners, actively holding your ankles together in the extended position. As your arms sweep in and you breathe at the high point in the stroke, draw your heels back gently toward your buttocks. Shoot your arms into streamline without any pause. As your arms approach their narrow point forward, then kick.
- Step 6: Continue swimming breaststroke, performing your arm stroke and then your kick. Keep your legs still during the power phase of your arms, and your arms still during the power phase of your legs. You will achieve the best forward motion in breaststroke if you stagger the wide points of the stroke. Time your stroke so that feet are narrow when your arms are wide, and, your arms are narrow when your feet are wide. Achieve total streamline with your whole body before starting the next stroke.
Breaststroke Swimming : - Coordination Drill
Swim Drill - 73 - Stroke, Breathe, Kick, Glide Mantra
THE PURPOSE OF THIS DRILL
- Learning the correct sequence of stroke actions
- Avoiding cancelling out the effect of one stroke action with another
- Practicing the correct timing of the breaststroke
HOW TO DO THIS DRILL
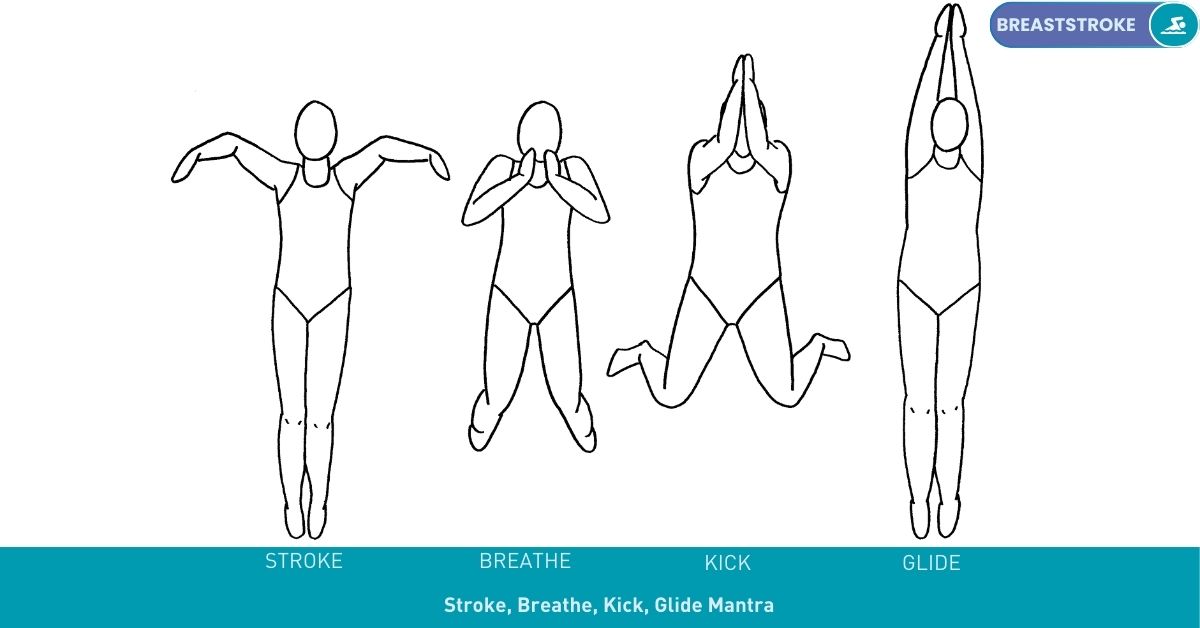
- Step 1: Visualize the breaststroke in your mind. Say to yourself the steps in sequence of the breaststroke: stroke, breathe, kick, glide. Say it again. Stroke, breathe, kick, gliiiiiiiiide, drawing out the word glide, so it takes as much time to say as the three previous steps combined. Match each step in the sequence to the breaststroke in your mind. "Stroke" refers to the arm stroke, outsweep, corners and insweep. "Breathe" refers to the inhale. "Kick" refers to the power phase of the kick. "Glide" refers to the streamlined float that maximizes the momentum of the stroke.
- Step 2: Push off the wall, preparing to swim breaststroke, straight spine, streamlined position. Say the steps in the sequence to yourself again as you glide forward. Now perform the stroke actions in slow motion, repeating the sequence of steps in your mind, beginning each action when you say that step. Correctly timed, the glide should take as long as the other three actions of the stroke combined. Stroke, breathe, kick, gliiiiiiiiide.
- Step 3: Do another stroke, again matching the start of each action to the step as you say it to yourself. If you are following the stroke sequence correctly, your arm stroke and inhale should be finished before you begin the power phase of your kick. So, you could modify the mantra to be "Stroke, breathe, then kick, gliiiiiide.
- Step 4: Keep practicing, and repeating to yourself the stroke sequence and timing mantra. Once you are able to perform each stroke action in order, increase your stroke rate. Notice that while the arm stroke starts first, the breathing overlaps with the insweep of the arm stroke. So, you could modify the mantra to be "Stroke and breathe, then kick, gliiiiiide." The "and" marks the corners of the arm stroke.
- Step 5: Keep practicing and repeating the mantra. Notice that your arms will have already reached the extended position when your kick finishes, and your body reaches streamline. So, you could modify the mantra to be "Stroke and breathe, then kick and gliiiiiide." The second "and" marks the point when the feet come together at the end of the kick.
- Step 6: Continue practicing with the fully developed mantra giving sequence and timing to your stroke. "Stroke and breathe, then kick and gliiiiiide."
Breaststroke Swimming : - Coordination Drill
Swim Drill - 74 - Glide Length, Glide Speed
THE PURPOSE OF THIS DRILL
- Developing a productive glide
- Recognizing when to start the next stroke
- Using momentum to rest and benefit the next stroke
HOW TO DO THIS DRILL
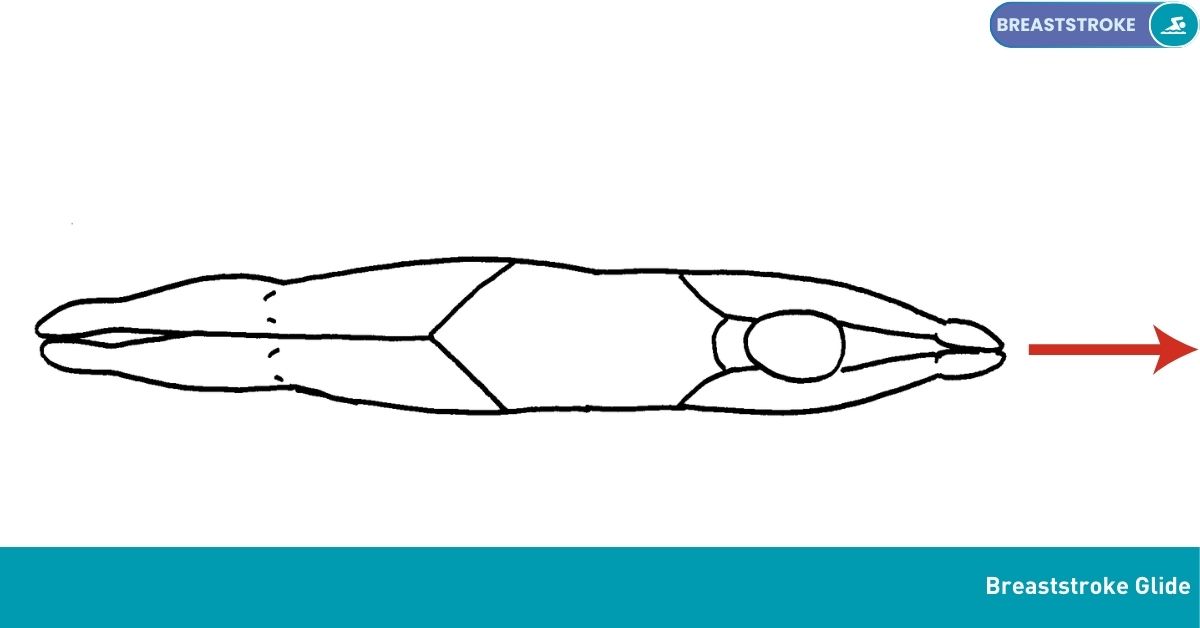
- Step 1: Push off the wall for the breaststroke, arms extended, hand forming the point of an arrow, looking at the bottom of the pool. Watching the bottom of the pool, glide until you come to a complete stop. Stand and make note of your distance.
- Step 2: Again, push off the wall for the breaststroke. Watch the bottom of the pool, and this time glide until you start to slow down. Stand and compare your distance to your first glide. Notice that there is not much difference in the distance you have travelled. By gliding until you completely stop, you use much more time to travel a little more distance.
- Step 3: Try the comparison again with a glide plus a stroke. First push off and glide until you stop. At that point do one complete breaststroke. Stand and make note of your distance. Again push off the wall. This time, just as you start to slow down, do one complete stroke. Stand and compare your distance to your first glide and stroke. Notice that you have travelled the same distance, or even farther with the second method. By bringing some of the momentum with you into the stroke, the length of your glide may be shorter, but you travel father overall.
- Step 4: Try the drill again several times. Focus on finding the exact point where you maximize the length of your glide without sacrificing speed or momentum.
Breaststroke Swimming : - Coordination Drill
Swim Drill - 75 - Thread the Needle
THE PURPOSE OF THIS DRILL
- Achieving coordinated forward motion
- Maximizing streamline and momentum
- Learning to rest during the glide instead of the recovery
HOW TO DO THIS DRILL
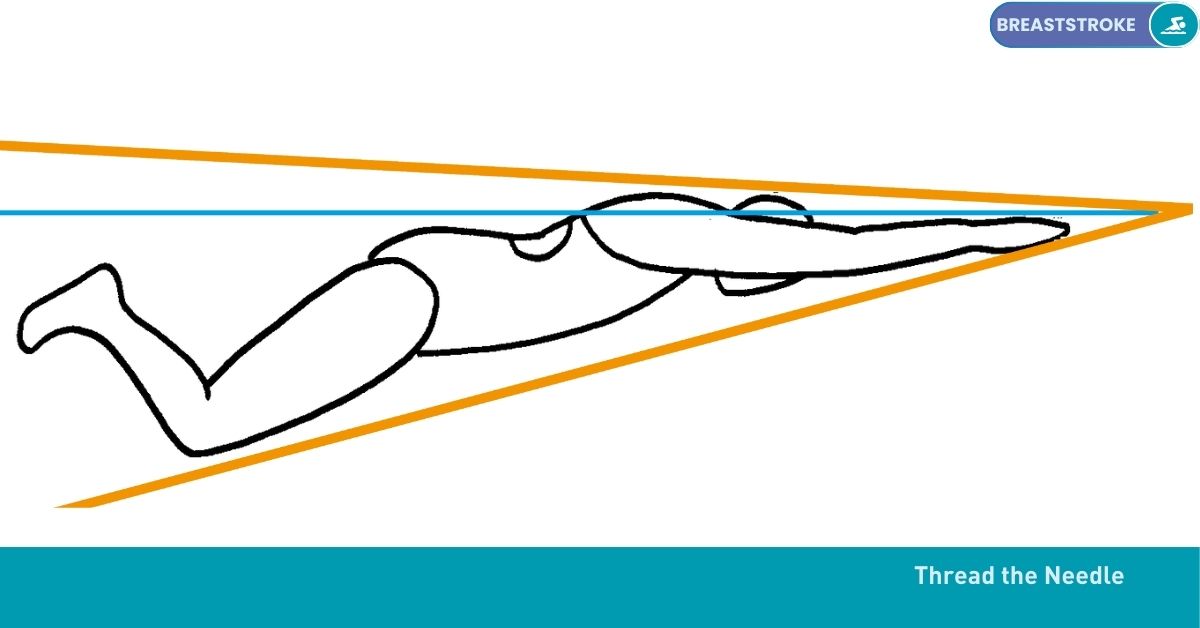
- Step 1: Push off the wall preparing to do the breaststroke. Focus on your body position while gliding forward. It should be long, narrow and streamlined. Your head should be tight between your elbows, and you should be looking at the bottom of the pool. Your legs should be extended and together, toes pointed. This is the position you should strive for with each glide. It is the position that makes the smallest hole in the water. First made with your fingertips, it is the same hole passed through by your forearms, elbows and head, shoulders, chest, hips, legs and finally your feet.
- Step 2: Begin to swim breaststroke, focusing on achieving a long, narrow streamlined glide after each kick. Try to get back to the streamlined position as quickly as possible after each stroke. Notice that you don't have to wait until you have fully achieved streamline to make your small hole in the water. Begin as you recover, shooting your hands forward to a long narrow point before your feet have finished kicking.
- Step 3: Pretend the small hole that you pass through in your glide position is right in front of you as you transition into recovery. Pretend you have to pass through it like your were thread passing through the eye of a needle. Create a narrow leading edge with your hands. Keep your chin low and shoot your elbows forward, with your forearms close together as your chest and head drop down.
- Step 4: Maintain a firm spine as you thread the needle through recovery, achieving streamline the instant your feet come together and through the eye of the needle at the end of the kick. Notice that the recovery in breaststroke works best as an active part of the stroke action, unlike in other strokes where a swimmer can use recovery to rest. In breaststroke it is after the recovery, during the streamlined glide that the swimmer has a moment to rest.
- Step 5: Continue practicing, threading the needle with each stroke, from the beginning of the recovery through to the end of the kick.